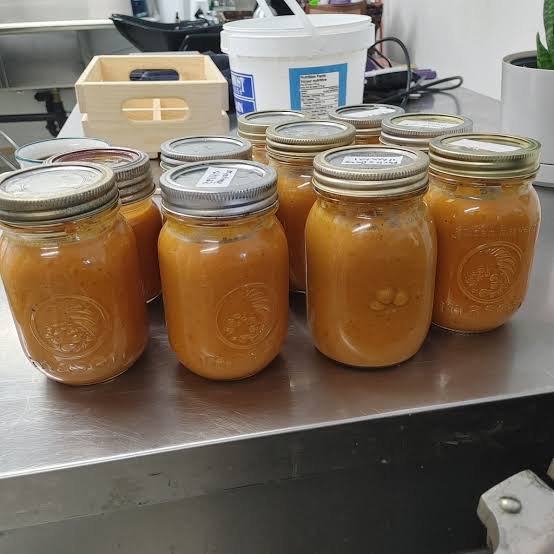
Canning butter chicken is a wonderful way to preserve one of the most loved comfort foods in the world right inside your own pantry. This detailed food guide teaches you how to prepare and safely preserve rich, creamy, and flavorful chicken curry in sturdy glass jars for long term storage. Butter chicken is famous for its smooth tomato gravy, warm Indian spices, and tender pieces of chicken that melt in your mouth with every single bite. By learning how to store this complete dish safely in jars, you can capture all the authentic restaurant flavors and keep them ready on your shelf whenever hunger strikes. Home canning allows you to control every single ingredient that goes into your jar, ensuring that your family enjoys wholesome food without unnecessary chemical preservatives, extra sodium, or cheap artificial flavorings. It is a fantastic cooking project for home cooks who want to build a self sufficient pantry packed with ready to eat gourmet meals.
People all over the world fall deeply in love with butter chicken because it offers a perfect balance of mild spicing, velvety rich gravy, and deeply comforting savory flavor. Unlike very hot curries that might burn your tongue, butter chicken brings a gentle warmth that appeals to adults and young children alike. The magical combination of aromatic garlic, ginger, fragrant spices, rich butter, and pureed tomatoes creates a sauce that feels like a warm hug on a cold day. When you open a home canned jar of this delicious curry, the mouthwatering smell immediately fills your entire kitchen and instantly makes everyone hungry. Food lovers appreciate having a quick dish that tastes like it took all day to simmer, yet only requires a few minutes to heat up on the stovetop. It brings pure joy to the dinner table and satisfies intense cravings for authentic takeout without having to spend extra money or wait for delivery drivers.
There are so many wonderful occasions and reasons to make a large batch of home canned butter chicken for your kitchen shelves. Busy weeknights often leave us feeling tired and drained, making it very tempting to order expensive fast food that is bad for our health. Having pre cooked jars of rich chicken curry in your pantry means you can enjoy a fresh, piping hot dinner in less than ten minutes after a long workday. It is also an absolute lifesaver for outdoor enthusiasts, campers, and busy students who need quick, hearty, high protein meals that pack plenty of natural energy. If you care about fitness and balanced nutrition, home canning gives you total freedom to use lean chicken breast, low fat dairy options, or natural sugar alternatives without sacrificing any taste. Opening a fresh jar during a cozy family movie night or an unexpected dinner gathering brings emotional warmth, pure comfort, and delicious satisfaction to everyone gathered around your table.
Mastering the art of canning your own meat dishes creates a wonderful sense of pride, security, and independence in your daily life. Knowing that your pantry is stocked with high quality, protein rich dinners gives you complete peace of mind during emergency situations, power outages, or busy seasonal changes. The process of blending rich spices, simmering velvety tomatoes, and carefully sealing the jars is deeply rewarding for anyone who loves cooking from scratch. You will feel an amazing sense of accomplishment every time you look at bright, beautiful jars of golden orange curry neatly arranged on your pantry shelves. Sharing these handmade jars with close friends, helpful neighbors, or family members makes a thoughtful and unique gift that shows true care and love. This step by step guide will walk you through every single part of the process in clear, easy to understand language so you can achieve success on your very first try.
Ingredients You Will Need
To make a large batch of canned butter chicken, gather the following ingredients in clear quantities:
- 3 pounds of boneless and skinless chicken breasts cut into small bite sized cubes
- 2 tablespoons of vegetable oil or clear clarified butter
- 2 large yellow onions finely chopped
- 4 cloves of fresh garlic finely minced
- 1 tablespoon of freshly grated ginger root
- 2 tablespoons of mild yellow curry powder
- 1 tablespoon of ground garam masala spice
- 1 teaspoon of ground cumin powder
- 1 teaspoon of ground coriander seeds
- 1 teaspoon of mild sweet paprika powder
- 1 teaspoon of turmeric powder
- 1 teaspoon of fine sea salt
- 1/2 teaspoon of freshly cracked black pepper
- 1/2 teaspoon of red chili powder or cayenne pepper for mild heat
- 3 cups of smooth unseasoned tomato puree or canned tomato sauce
- 1 cup of low sodium chicken broth or clear bone broth
- 2 tablespoons of fresh lemon juice
- 1 tablespoon of pure honey or granulated white sugar
- 1 cup of heavy cream or thick canned coconut milk to add during reheating time
Step By Step Method
Follow these basic steps to safely prepare and store your butter chicken:
- Prepare your cooking equipment and sterilize your glass canning jars, metal lids, and screw bands in hot clean water to ensure everything is completely clean.
- Wash your fresh chicken breasts thoroughly under cool running water, pat them dry with clean paper towels, and chop them into small bite sized pieces using a sharp knife.
- Heat two tablespoons of cooking oil or clear clarified butter in a large heavy pot over medium high heat on your stovetop.
- Add the finely chopped yellow onions to the hot pot and stir frequently for about five to seven minutes until they become soft, clear, and slightly golden.
- Stir in the minced fresh garlic and grated ginger root, cooking everything together for one full minute until the air fills with a sweet fragrant aroma.
- Add all the dried spices including curry powder, garam masala, ground cumin, coriander, sweet paprika, turmeric, sea salt, black pepper, and chili powder directly into the pot.
- Cook the spices with the aromatic onions for two minutes to roast them gently and unlock their natural oils and deep flavor.
- Add the chopped chicken pieces into the seasoned pot and stir continuously until all sides of the meat turn white and are lightly browned on the outside.
- Pour in the three cups of smooth tomato puree, one cup of chicken broth, fresh lemon juice, and honey, stirring thoroughly to combine all components together.
- Bring the curry sauce to a gentle rolling boil, then lower the heat to medium low and let the dish simmer uncovered for fifteen minutes so the flavors meld together nicely.
- Keep in mind that for long term pressure canning safety, dairy products like heavy cream or fresh milk should not be added into the jars prior to processing because dairy can spoil or change texture under intense heat.
- Carefully spoon the hot cooked chicken and rich tomato sauce evenly into your clean, warm glass canning jars using a clean food funnel.
- Leave a clear space of one inch at the top of each jar to allow the liquid to expand safely during the high pressure canning process.
- Use a clean plastic butter knife or wooden skewer to gently scrape along the inside walls of the jars to release any trapped air bubbles.
- Wipe the top rims of all glass jars thoroughly with a clean damp cloth to remove any sticky sauce or oil residue that could prevent a tight seal.
- Place a flat metal sealing lid onto each jar, then screw the metal outer bands on until they are fingertip tight without overtightening them.
- Place the filled glass jars inside your pressure canner containing two to three inches of warm water according to the manufacturer instructions for your specific unit.
- Lock the pressure canner lid securely into position and heat it on high until steam vents continuously out of the exhaust pipe for ten full minutes.
- Place the pressure regulator weight on the vent pipe and bring the pressure up to ten pounds of pressure or the correct level for your local elevation.
- Process pint jars for seventy five minutes or quart jars for ninety minutes continuously while keeping the pressure steady.
- Once the processing time ends, turn off the heat source completely and allow the pressure canner to cool down naturally until the pressure drops back to zero on its own.
- Carefully open the canner lid away from your face, remove the hot jars using jar tongs, and place them onto a soft towel on your kitchen counter.
- Let the jars cool down undisturbed at room temperature for twenty four hours while listening for the satisfying pop sound that proves a complete airtight seal.
- Test every lid by pressing down on the middle section to verify that it does not flex up and down before storing sealed jars in a cool, dark, dry pantry.
- When you are ready to serve your meal, open a jar, pour the contents into a saucepan, heat until boiling hot, and stir in your choice of fresh heavy cream or coconut milk right before eating.
Why This Recipe Is Special
This home canned butter chicken recipe stands out because it blends traditional Indian restaurant flavors with practical home meal preparation techniques. It allows busy families to enjoy wholesome, home cooked meals without relying on commercial factory products that contain high amounts of sodium, unwanted preservatives, or artificial additives. Chicken breast provides a high amount of clean protein that supports muscle building, tissue repair, and long lasting energy throughout your daily tasks. Spices like turmeric and ginger bring natural anti inflammatory benefits that support healthy digestion and keep your immune system strong during cold seasons. The rich tomato base offers natural antioxidants such as lycopene which promotes strong heart health and protects your overall body wellness. Preparing this dish from scratch lets you control every single ingredient, making it easy to adjust spice levels or reduce salt according to your family specific health needs.
Extra Tips For Better Taste
To elevate the overall flavor profile of your butter chicken, consider marinading the raw chicken pieces in fresh lemon juice and basic spices for thirty minutes before cooking. Toasting your dry spices in a dry pan for a few seconds prior to adding liquids unlocks a much deeper, richer taste profile in the finished gravy. If you prefer a smoother sauce texture, you can blend the simmered onion and tomato sauce with an immersion blender before adding the chicken pieces back into the pot. When you reheat your preserved jar for dinner, stir in a small spoon of real butter along with a pinch of crushed dried fenugreek leaves to match authentic restaurant flavors. Serve your rich butter chicken hot over freshly steamed basmati rice, warm garlic naan bread, or light cauliflower rice to create a balanced meal experience.
Final Thoughts
Creating your own canned butter chicken is a truly satisfying endeavor that fills your kitchen with incredible smells and stocks your shelves with ready to eat comfort food. It brings great peace of mind knowing that a delicious, hearty dinner is always sitting in your pantry waiting to be enjoyed at a moment notice. Whether you are cooking for a large family or preparing quick solo dinners for busy workdays, this recipe delivers top quality taste with minimal stress. Gather your cooking ingredients, follow these simple guidelines, and enjoy the rich rewarding flavors of home canned butter chicken today.
Nutrition Details
Here is an estimated nutrition breakdown per serving based on a standard yield of six total servings per batch:
| Nutrient Name | Quantity Per Serving | Percentage Of Daily Value |
| Calories | 320 kcal | 16% |
| Total Fat | 12 grams | 15% |
| Saturated Fat | 4 grams | 20% |
| Cholesterol | 85 milligrams | 28% |
| Sodium | 580 milligrams | 25% |
| Total Carbohydrates | 14 grams | 5% |
| Dietary Fiber | 3 grams | 11% |
| Total Sugars | 7 grams | Included |
| Protein | 38 grams | 76% |
| Calcium | 60 milligrams | 5% |
| Iron | 2.5 milligrams | 14% |
| Potassium | 650 milligrams | 14% |
Disclaimer
Please keep in mind that nutritional needs and dietary responses vary from person to person based on age, activity level, and personal health conditions. The nutritional values provided in this article are general estimates meant for educational reference only and may change based on exact brands or ingredients used. Always follow safe home pressure canning safety guidelines carefully to prevent food spoilage or health risks. Consult with a qualified healthcare professional or nutritionist if you have specific dietary concerns, food allergies, or medical restrictions.