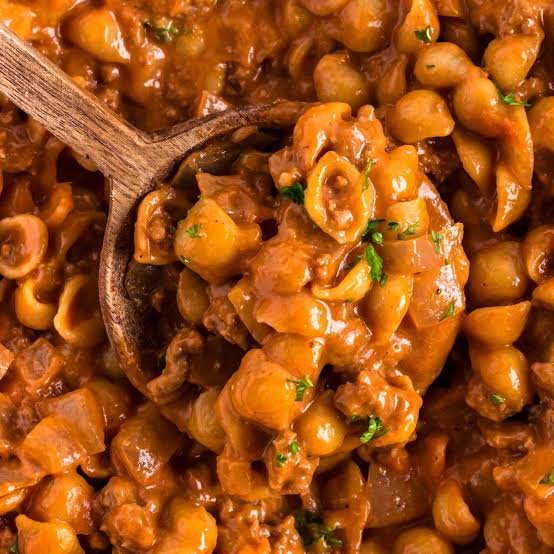
Canned Homemade Hamburger Helper: The Ultimate Guide to Easy Shelf Stable Meals
Welcome to a fantastic home cooking guide that will transform how you prepare quick weeknight dinners for your family forever. Today we are exploring the wonderful world of canning homemade hamburger helper meat sauce bases that make cooking fast, affordable, and delicious. Many people grew up eating classic boxed hamburger helper meals, but those commercial boxes are often packed with artificial flavors, excessive salt, and preservatives that are not great for long term health. By making your own shelf stable canned savory ground beef starter at home, you take complete control of the quality of your ingredients, the spice levels, and the overall nutrition. This recipe allows you to brown high quality lean ground beef, combine it with sweet diced onions, aromatic garlic, ripe tomatoes, and rich herbs, then process it safely in a pressure canner so it stays good on your pantry shelf for months. Whenever you have a busy evening with work, school, or sports practices, all you need to do is open one of these glass jars, dump the contents into a hot skillet, add your choice of fresh dry pasta or noodles with milk and broth, and simmer until tender. It yields a rich, velvety, cheesy beef skillet meal that tastes infinitely better than anything you can buy in a store while saving you valuable time and money.
People all across the country love this specific recipe because it brings unmatched convenience directly into the modern busy kitchen. Think about those chaotic weeknights when everyone comes home tired, hungry, and stressed, asking what is for dinner when you have not thawed any meat from the deep freezer. Instead of ordering expensive takeout food that leaves you feeling heavy and sluggish, you can walk straight over to your food pantry, grab a jar of this seasoned beef base, and cook a warm feast in less than fifteen minutes. Beyond pure convenience, home cooks absolutely adore the rich, home cooked flavor profile of this classic dish. Commercial boxed mixes use dehydrated meat powders and artificial cheese chemicals that pale in comparison to real garlic, actual diced onions, sweet tomato paste, and genuine sharp cheddar cheese added fresh at the end. Children and adults alike devour this meal, cleaning their plates with big smiles and asking for second helpings every single time you cook it. It brings a cozy sense of nostalgic comfort that reminds people of warm family dinners around the kitchen table, but with a fresh and wholesome twist that you can feel completely proud serving to the people you love most.
Making this canned beef starter is much more than just a smart culinary decision; it is a deeply satisfying emotional experience that connects you with self reliance, financial savings, and good nutrition. When you see your pantry shelves lined with gleaming glass jars filled with hearty, seasoned meat sauce, you feel a profound sense of security and pride knowing your family is prepared with wholesome food. It is also an absolute lifesaver for fitness conscious individuals and busy parents who want to monitor their daily nutrient intake without spending hours cooking from scratch every single day. You can easily adjust the fat content by choosing extra lean ground beef, control the sodium level by using low salt broths, and eliminate all synthetic additives or hidden sugars. Cooking this meal brings immense comfort on rainy afternoons, chilly winter evenings, or exhausting workdays when your energy levels are low but your appetite is high. The inviting aroma of sizzling garlic, simmering beef, and savory herbs filling your kitchen creates an instant feeling of warmth, happiness, and cozy hospitality that instantly makes any house feel like a loving home.
If you are completely new to home food preservation, there is no need to feel nervous because pressure canning ground meat is straightforward when you follow simple safety rules. High acid foods like fruits or jams can be safely processed in a basic hot water bath, but low acid foods like meat, poultry, and vegetables must always be processed in a pressure canner to ensure complete safety and shelf stability. Modern pressure canners are extremely safe, reliable, and easy to operate once you understand the basic sequence of venting steam, bringing the pressure gauge to the correct level for your elevation, and letting the unit cool down naturally. Once you master this process, you will unlock a whole new world of food freedom where meal prep becomes an effortless hobby rather than a stressful chore. You will find yourself buying lean ground beef in bulk whenever it goes on sale at your local grocery store, turning large butcher packs into beautiful, shelf stable jars that sit ready for action on your pantry shelf. Let us jump right into the exact list of ingredients you will need to gather before stepping up to the stove.
Ingredients You Will Need
To ensure your canned hamburger helper base turns out tasty, safe, and rich in flavor, gather these exact simple ingredients before you begin cooking:
-
Lean Ground Beef: 5 pounds (use 85 percent to 90 percent lean ground beef so there is minimal excess grease in your jars)
-
Yellow Onions: 2 large yellow onions (finely chopped into small uniform pieces)
-
Fresh Garlic: 6 cloves of fresh garlic (minced or finely grated)
-
Tomato Paste: 6 ounces (one small can of concentrated tomato paste for deep rich color and umami)
-
Diced Tomatoes: 28 ounces (one large canned jar or tin of crushed or finely diced tomatoes with juice)
-
Beef Broth: 4 cups of low sodium beef broth or unsalted homemade beef stock
-
Worcestershire Sauce: 3 tablespoons (adds deep savory complexity to the beef)
-
Yellow Mustard: 1 tablespoon of prepared yellow mustard or 1 teaspoon of dry mustard powder
-
Smoked Paprika: 2 teaspoons of smoked paprika (gives a lovely warm color and subtle smoky flavor)
-
Onion Powder: 2 teaspoons of pure onion powder
-
Garlic Powder: 2 teaspoons of pure garlic powder
-
Italian Seasoning: 1 tablespoon of dried Italian herb blend (contains oregano, basil, and thyme)
-
Black Pepper: 1 teaspoon of freshly cracked black pepper
-
Canning Salt: 2 teaspoons of pure canning salt (do not use iodized table salt as it makes liquid cloudy)
-
Water: Extra boiling water on hand to top off jars if needed to maintain correct headspace
Step by Step Method
Step 1: Prepare Your Equipment and Jars
Before turning on the stove, set up your canning workstation cleanly and logically. Inspect seven pint sized glass canning jars for any subtle cracks, chips, or rough edges around the top rim. Wash your jars, new metal flat lids, and screw bands in warm soapy water, then rinse them thoroughly with clean hot water. Place your clean jars into your pressure canner filled with about two to three inches of warm water so the jars stay hot and do not crack when filled with hot food. Keep your metal lids in a small bowl of warm water off the stove so the sealing rubber rings stay soft and clean.
Step 2: Brown the Ground Beef and Vegetables
Place a large, heavy bottomed stockpot or Dutch oven over medium high heat on your stove. Add the five pounds of lean ground beef into the hot pot, breaking it up into fine crumbles using a sturdy wooden spoon or meat masher tool. Add the finely chopped yellow onions and minced garlic directly into the meat as it cooks so the fresh juices soften the beef and release their delicious aromas. Continue stirring and cooking for about eight to ten minutes until all the ground beef is browned with no pink color remaining.
Step 3: Drain Excess Fat Completely
Once the ground beef and onion mixture is fully cooked, turn off the heat burner. Place a large metal colander over a heatproof bowl or pot in your sink, then carefully pour the cooked meat into the colander. Allow all the hot grease and excess melted oil to drain away completely for several minutes. Draining excess fat is an essential canning safety step because residual animal fats can rise to the top of the jars during pressure processing and prevent the rubber rings on the lids from forming an airtight seal.
Step 4: Combine Seasonings and Simmer Meat Base
Return the drained meat, onions, and garlic back into your large stockpot over medium low heat. Stir in the tomato paste, crushed diced tomatoes with juices, low sodium beef broth, Worcestershire sauce, prepared yellow mustard, smoked paprika, onion powder, garlic powder, Italian seasoning, black pepper, and pure canning salt. Mix everything together thoroughly until the tomato paste dissolves evenly throughout the warm meat mixture. Bring the liquid to a gentle simmer for about five minutes so all the savory herbs and spices meld together into a fragrant, rich sauce.
Step 5: Fill the Hot Canning Jars
Carefully lift your hot canning jars out of the pressure canner using a sturdy jar lifter tool and set them on a clean kitchen towel spread across your countertop. Place a wide mouth canning funnel over the top of the first hot jar. Spoon the hot simmered beef and sauce mixture into the jar, leaving exactly one inch of empty space between the top of the food and the top rim of the jar. This one inch gap is known as headspace, and maintaining it accurately allows the food to expand and contract safely during high pressure processing without overflowing or breaking the seal.
Step 6: Remove Air Bubbles and Adjust Headspace
Insert a non metallic bubble remover tool or a soft silicone spatula down into the sides of the filled jar, gently sliding it around the edges to release any trapped air bubbles hidden inside the thick meat sauce. Check the headspace again with a measuring ruler. If the food level dropped after removing air bubbles, add a little extra hot sauce or boiling beef broth until the level sits exactly one inch below the rim. Repeat this bubble removing process carefully for all filled jars.
Step 7: Clean Rims and Apply Lids
Dip a clean paper towel into warm water or white vinegar and wipe the top glass rim of every jar meticulously. Removing any tiny specks of sauce, grease, or spice from the glass rim is critical to ensure a tight vacuum seal. Place a warm, sterile metal sealing lid directly onto the centered rim of each jar. Screw the outer metal band down over the lid using only your fingertips until it feels comfortably snug. Do not overtighten the bands with full hand strength because air must be allowed to escape from inside the jar during the pressure canning cycle.
Step 8: Process Jars in the Pressure Canner
Carefully lower the filled glass jars back into your pressure canner using your jar lifter, keeping them standing straight upright without tilting. Lock the heavy pressure canner lid securely into position according to the manufacturer instructions for your specific brand. Leave the weight off the vent pipe, turn the stove heat to high, and let steam vent freely out of the pipe in a strong steady stream for ten continuous minutes to purge all trapped air from the vessel. After ten minutes of steady venting, place the pressure regulator weight on the pipe or monitor your dial gauge closely. Bring the pressure up to ten pounds of pressure (or eleven pounds if using a dial gauge, adjusting for your local elevation if located above one thousand feet sea level).
Step 9: Time the Canning Cycle Precisely
Once your pressure canner reaches the correct target pressure, set a timer for seventy five minutes for pint jars (or ninety minutes if you chose to fill larger quart jars). Adjust your stove burner heat up or down slightly to maintain a steady, smooth pressure level throughout the entire processing duration. Never allow the pressure to dip below your target number; if the pressure drops below ten pounds at any point, you must bring it back up and restart the timer from the beginning to ensure total safety.
Step 10: Cool Down and Store Safely
When the processing timer finishes, turn off the stove burner completely and leave the pressure canner sitting untouched on the cool stove. Allow the canner to cool down naturally until the internal pressure drops all the way back to zero on its own, which usually takes thirty to forty five minutes. Do not force cool the unit by applying cold water or pulling off the weight early. Once depressurized, remove the lid carefully, lift the hot jars out using your jar lifter, and place them onto a towel lined wooden counter away from cold drafts. Leave the jars untouched for twenty four hours while they cool completely. You will hear satisfying popping sounds as the lids pull down and vacuum seal tightly. After twenty four hours, check each lid by pressing the center; it should be flat and firm with no spring or bounce. Remove the outer metal screw rings, wipe the glass jars clean, label them with the date and recipe name, and store your shelf stable jars in a cool, dark food pantry.
Step 11: Cooking Your Fast Weeknight Meal
When you are ready to serve dinner, open one pint jar of your canned beef helper starter. Pour the contents into a deep skillet on the stove along with one cup of milk, one cup of beef broth or water, and two cups of uncooked dry pasta like macaroni, rotini, or egg noodles. Bring the skillet to a gentle boil, then cover with a lid and simmer over medium low heat for about ten to twelve minutes until the noodles become soft and absorb the savory liquid. Turn off the heat, stir in one to two cups of freshly shredded sharp cheddar cheese until melted and creamy, and serve piping hot to your happy family.
Why This Recipe Is Special
This homemade canned ground beef starter stands head and shoulders above store bought options for dozens of reasons that benefit your health, your budget, and your tastebuds. First and foremost, you have total control over every single ingredient that enters your family body. Commercial boxed helper mixes are notorious for containing excessive levels of sodium, artificial food colorings, processed palm oils, hidden sugars, and chemical anti caking agents designed to keep dry powders stable on store shelves for years. When you make this recipe at home, you skip all those synthetic extras entirely, using real whole vegetables, pure ground beef, natural spices, and rich tomato products that deliver real nutrition and genuine flavor.
From a financial standpoint, this recipe provides unbeatable savings that add up significantly over the course of a year. Buying lean ground beef in bulk packs when your local grocery store offers deep discount sales allows you to lock in cheap protein prices before market inflation pushes them higher. Canning allows you to preserve that fresh meat at its peak quality without taking up precious space in your deep freezer. Freezers require constant electricity to run and risk losing hundreds of dollars of food during unexpected power outages caused by summer storms or winter freezes. Glass canned jars sitting safely on a dark pantry shelf require zero electricity, last for years, and are completely immune to power grid failures.
Additionally, the texture and taste of home canned ground beef is remarkably soft, tender, and delicious. During the seventy five minutes of high pressure processing inside the canner, the beef breaks down in the rich tomato broth, absorbing all the aromatic garlic, onion, and herb flavors deep into the meat fibers. The result is a melt in your mouth texture that blends seamlessly with fresh pasta and rich melted cheese when you finish cooking it on the stove. It tastes like a slow simmered Sunday afternoon beef ragu that took hours to craft, yet you can assemble it in a mere twelve minutes on a busy Tuesday night when you have very little energy to cook.
Extra Tips for Better Taste
To take your homemade canned hamburger helper meals from good to restaurant quality amazing, try implementing these fun and creative cooking tips whenever you make a fresh batch:
-
Sauté Vegetables Thoroughly: Take a few extra minutes to cook your diced onions and garlic in the skillet until they turn soft, translucent, and slightly caramelized before adding the liquids. This simple extra step unlocks natural sugars in the onions that add incredible depth to the overall sauce.
-
Layer Fresh Herbs at Serving Time: While dried Italian herbs process wonderfully inside the canning jar, stirring in a handful of freshly chopped parsley, fresh basil, or green chives right before serving adds a bright pop of fresh green color and clean garden flavor that cuts through the rich cheddar cheese.
-
Add Extra Secret Veggies: If you have picky eaters at home who struggle to eat enough vegetables, you can finely grate fresh carrots, sweet zucchini, or mild bell peppers and simmer them directly into the ground beef mixture before canning. They blend invisibly into the red tomato sauce while adding beneficial vitamins and minerals.
-
Experiment with Different Cheeses: Sharp yellow cheddar cheese is the classic choice for that nostalgic boxed meal style, but you can elevate the dish by mixing in sharp white cheddar, smoky provolone, creamy Monterey Jack, or spicy pepper jack cheese for an exciting spicy kick.
-
Use Homemade Bone Broth: Swap standard store bought canned broth for rich, homemade beef bone broth packed with natural collagen. It creates a silky, luxurious mouthfeel in the finished sauce while boosting the overall protein and gut healthy amino acid content of your dinner.
-
Include a Splash of Cream: When cooking your pasta in the skillet with your canned beef base, replace half of the regular milk with heavy whipping cream or sour cream at the very end. This creates an unbelievably decadent, creamy velvet sauce that feels like upscale comfort food.
Final Thoughts
Making your own canned homemade hamburger helper starter base is one of the most rewarding kitchen projects you can undertake for your home and family. It combines the warm, nostalgic comfort of a beloved classic childhood dinner with the modern benefits of clean eating, wholesome ingredients, and impressive financial savings. Taking a couple of hours on a quiet weekend afternoon to brown savory beef, chop aromatic onions, season rich tomato sauce, and process sparkling glass jars builds a wonderful pantry safety net that takes the daily stress out of evening meal preparation. Opening a jar on a chaotic weeknight fills your home with comforting aromas and delivers a piping hot, cheese draped pasta dinner to your dining table in less time than it takes to drive through a fast food restaurant. Once you experience the incredible convenience, wholesome taste, and pure joy of serving your family delicious home canned meals made with love, you will never want to go back to dry commercial store boxes ever again. Happy canning and enjoy every single hearty bite of your homemade creations.
Nutrition Details
Here is an estimated breakdown of the nutritional content for one pint jar of canned hamburger helper beef base (which serves two generous adult portions when prepared with added whole wheat pasta and real sharp cheddar cheese):
| Nutrient Category | Amount Per Serving (Half Pint Base) | Amount Prepared (With Pasta and Cheese) |
| Calories | 280 kcal | 520 kcal |
| Total Fat | 12 grams | 22 grams |
| Saturated Fat | 5 grams | 11 grams |
| Trans Fat | 0 grams | 0 grams |
| Cholesterol | 75 milligrams | 110 milligrams |
| Sodium | 480 milligrams | 680 milligrams |
| Total Carbohydrates | 10 grams | 48 grams |
| Dietary Fiber | 2 grams | 4 grams |
| Sugars | 5 grams | 7 grams |
| Protein | 32 grams | 42 grams |
| Calcium | 40 milligrams | 320 milligrams |
| Iron | 3.5 milligrams | 4.8 milligrams |
| Potassium | 550 milligrams | 720 milligrams |
Note: Nutritional values are estimated averages based on standard ingredient database calculations. Exact numbers will vary depending on the specific fat percentage of ground beef selected, brand of canned tomato products used, type of pasta chosen, and exact quantity of added cheddar cheese.
Disclaimer
This recipe and educational article are provided for general informational, home cooking, and entertainment purposes only. Everyone’s body is unique, and individual dietary needs, nutritional requirements, allergen sensitivities, and metabolic results may change based on age, activity level, and existing health conditions. When engaging in home food preservation and pressure canning at home, always consult and strictly follow updated safety guidelines established by official agricultural extension services or the National Center for Home Food Preservation to ensure complete food safety. Always verify that your pressure canner is operating accurately, check seals on jars before consumption, and reheat meat products thoroughly to proper internal temperatures before serving. If you have specific dietary restrictions, high blood pressure concerns, or medical issues related to sodium or protein intake, please consult with a qualified professional healthcare provider or registered dietitian before making significant changes to your regular meal routine.