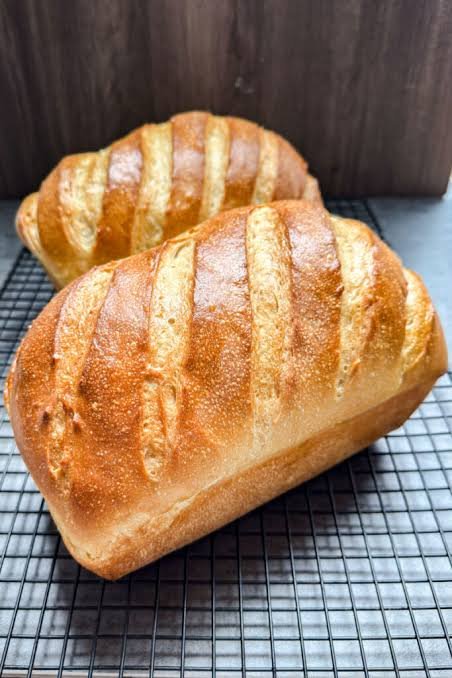
Making homemade bread is one of the most rewarding kitchen experiences you can ever have in your whole life. This simple recipe for sourdough sandwich bread is designed to bring the traditional art of baking right into your cozy home kitchen without any stress or complicated steps. If you have ever wanted to bake a soft, fluffy loaf of sourdough bread that easily holds your favorite sandwich ingredients without tearing apart, then this recipe was created just for you. Unlike round artisanal sourdough loaves that have thick crusts and big open holes, this sandwich style sourdough bread features a soft crust and a fine, tender crumb that makes it ideal for daily toast, sandwiches, and quick snacks. The main goal of this recipe is to make real sourdough baking simple, approachable, and fun for completely new home bakers while giving you a fresh loaf that tastes much better than anything you can buy at a store.
People all over the world fall completely in love with this sourdough sandwich bread because it offers the perfect balance of comfort, flavor, and wonderful texture. Home cooks love that this loaf brings together the rich, slightly tangy flavor of traditional wild yeast with the soft, easy to slice nature of standard loaf pan bread. Store bought bread often contains artificial preservatives, unnecessary sugars, and chemical conditioners that can sit heavily in your stomach, but this natural bread uses basic wholesome ingredients that make you feel truly satisfied after every meal. The aroma that fills your entire home while this loaf bakes in the oven is warm, soothing, and incredibly delicious, creating an instant feeling of comfort for your family and friends. Once you experience the golden brown crust, the soft interior, and the incredible fresh taste of a homemade sourdough slice, you will never want to go back to processed factory bread again.
There are so many wonderful reasons to make this beautiful bread, ranging from warm emotional connections to amazing health benefits and incredible taste experiences. Emotionally, taking the time to care for your wild yeast sourdough starter, mixing the soft dough with your hands, and watching it slowly rise gives you a deep sense of peaceful accomplishment in our fast modern world. It is a slow living ritual that allows you to slow down and create something beautiful from scratch for the people you love most. From a fitness and health perspective, natural sourdough fermentation breaks down complex gluten and phytic acid, making the nutrients much easier for your body to absorb while remaining far gentler on your digestive system. Whether you are aiming to feed your family cleaner meals, improve your gut health, or simply enjoy the rich taste of fresh toast smothered in real butter on a cozy Sunday morning, this recipe fits perfectly into your happy lifestyle.
As you step into the wonderful world of home baking, this easy sourdough sandwich bread will quickly become a cherished staple in your weekly meal planning routine. It is a fantastic confidence builder for beginners who feel intimidated by complex rustic sourdough techniques, as the trusty rectangular loaf pan supports the dough and ensures a beautiful shape every single time. You do not need any expensive special tools or advanced skills to achieve a gorgeous result that looks like it came from an authentic rustic bakery. Every time you pull a golden brown loaf out of your oven, you will feel immense pride knowing that you transformed simple water, flour, and natural starter into a nourishing masterpiece. Get ready to fall in love with the process of making wholesome food with your own hands as we walk step by step through this simple, delightful recipe together.
Ingredients You Will Need
To bake one large loaf of delicious sourdough sandwich bread, gather the following ingredients in your kitchen:
Active sourdough starter: 150 grams or roughly three fourths of a cup, fully fed and bubbly
Warm clean water: 250 grams or one cup, filtered water works best
Bread flour: 500 grams or about four cups, unbleached for the best rise and structure
Whole milk or warm water: 50 grams or about three tablespoons, to keep the bread extra soft
Pure honey or maple syrup: 30 grams or two tablespoons, for mild natural sweetness
Fine sea salt or kosher salt: 10 grams or two level teaspoons, to enhance the flavor
Unsalted butter or coconut oil: 30 grams or two tablespoons, softened at room temperature
Step By Step Method
Step 1: Preparing Your Starter Before you begin mixing your main dough, make sure your sourdough starter is active, healthy, and very bubbly. Feed your starter about four to six hours before you plan to mix the bread dough, keeping it in a warm location. When your starter has doubled in size and looks full of tiny air bubbles, it is ready to use for baking.
Step 2: Mixing the Liquids and Sweetener In a large mixing bowl, combine the active bubbly sourdough starter, warm water, warm milk, and honey. Use a wooden spoon or a whisk to mix these liquid ingredients together until the starter completely dissolves into a smooth milky liquid.
Step 3: Adding the Flour Pour the bread flour into your bowl on top of the wet mixture. Use your hands or a sturdy spoon to mix everything together until all the dry flour is fully hydrated and no dry spots remain in the bowl. The dough will look a bit shaggy and sticky at this point, which is completely normal. Cover the bowl with a clean kitchen towel and let it rest for thirty minutes to allow the flour to absorb the liquid.
Step 4: Adding Salt and Butter After the short rest, add the salt and softened room temperature butter to the top of your dough. Use your fingers to squeeze and knead the butter and salt directly into the dough until everything is completely blended together and smooth.
Step 5: Kneading the Dough Transfer the dough onto a clean, lightly oiled counter surface. Knead the dough gently for about eight to ten minutes by pushing it forward with the heel of your hand and folding it back over itself. Continue this steady rhythmic kneading process until the dough becomes elastic, smooth, and much less sticky. You can also use a stand mixer with a dough hook attachment on low speed for six minutes if you prefer an easier method.
Step 6: First Rise or Bulk Fermentation Place your kneaded dough ball back into a lightly oiled bowl. Cover the bowl with a damp towel or plastic wrap to prevent the top surface from drying out. Leave the bowl in a cozy warm spot in your kitchen to rise for roughly six to eight hours. The exact time will depend on the warm temperature of your room, but the dough should expand by about fifty to seventy five percent and feel airy to the touch.
Step 7: Shaping the Sandwich Loaf Gently tip the fermented dough out onto a clean work surface. Lightly press the dough flat into a rectangular shape using your fingertips to release any big trapped air bubbles. Fold the left side of the rectangle into the middle, then fold the right side over top like a letter. Roll the dough up tightly from top to bottom into a solid log shape, pinching the seam tightly closed at the bottom.
Step 8: Final Rise in the Loaf Pan Grease a standard nine inch by five inch bread loaf pan thoroughly with butter or non stick cooking spray. Carefully transfer your shaped dough log into the prepared loaf pan, placing the seam side facing down. Cover the loaf pan loosely with a clean towel and allow it to rise again in a warm spot for about two to three hours, or until the dough rises roughly one inch above the top rim of the pan.
Step 9: Preheating Your Oven When your dough is almost finished rising in the loaf pan, preheat your oven to 375 degrees Fahrenheit or 190 degrees Celsius. Make sure your oven rack is set in the middle position so the bread bakes evenly.
Step 10: Baking the Bread Place the loaf pan into the preheated oven on the center rack. Bake for thirty five to forty minutes until the top crust is deep golden brown and the loaf sounds hollow when you gently tap the top surface. If the top gets dark too quickly during baking, cover it loosely with a sheet of aluminum foil for the final ten minutes.
Step 11: Cooling Properly Remove the baked bread from the oven and allow it to sit inside the pan for five minutes. Carefully turn the loaf out of the pan onto a wire cooling rack. Allow the bread to cool completely for at least two hours before slicing into it, as slicing warm sourdough can cause the interior crumb to become gummy and wet.
Why This Recipe Is Special
This specific sourdough sandwich bread recipe stands out from other home baking recipes because it brings together traditional health benefits with modern sandwich convenience. Standard rustic sourdough can often be too chewy or full of large holes that allow condiments to leak through onto your fingers, but this enriched soft sourdough provides a uniform structure perfect for daily meals.
From a health standpoint, long natural sourdough fermentation acts as a fantastic pre digestion process for your body. The beneficial bacteria and wild yeast work together over hours to break down complex wheat proteins and reduce phytic acid, which is an compound that can hinder mineral absorption. This means that people who experience mild discomfort from ordinary factory white bread often find that authentic fermented sourdough causes no bloating or discomfort at all.
Furthermore, the addition of a small amount of honey and healthy fat like butter creates a soft texture that stays fresh on your kitchen counter for several days without any artificial chemical preservatives. You get to nourish your body with wholesome energy while enjoying an incredible deep flavor profile that combines subtle sweetness with delicate natural tanginess.
Extra Tips for Better Taste
Use Milk for Extra Softness: Replacing a portion of the water with whole milk adds natural fat and sugar, giving your final loaf an amazingly soft crust and tender crumb structure.
Add Herbs and Garlic: Mix one teaspoon of garlic powder along with fresh rosemary or dried oregano into the dough during step four to create an amazing savory sandwich loaf.
Brush the Top with Butter: As soon as you remove the hot bread from the oven, brush the top crust generously with melted salted butter for a gorgeous shiny finish and extra richness.
Try Cinnamon Raisin Variation: Flatten the dough during step seven, sprinkle a light layer of cinnamon sugar and sweet raisins over the surface, then roll it up tightly for a sweet morning breakfast bread.
Control the Tanginess: If you prefer a milder flavor with less sourness, use your starter right at its peak rise. If you love a stronger sour kick, let your dough ferment in the refrigerator overnight during the first rise.
Final Thoughts
Baking your own sourdough sandwich bread at home is a deeply satisfying journey that blends warm tradition, healthy choices, and simple kitchen joy. Once you master this easy step by step process, creating fresh additive free bread for your household will become a comforting weekly ritual that you look forward to every time. Share a slice toasted with jam, pile it high with your favorite sandwich fillings, or simply enjoy it plain with a spread of rich creamy butter. Enjoy every single moment of the baking experience, and celebrate the incredible magic of creating real wholesome food right in your own beautiful home.
Nutrition Details
Below is the nutrition breakdown for one full recipe and per slice, based on a standard loaf cut into twelve equal slices:
| Nutrient Category | Total Recipe Loaf | Per Single Slice |
| Total Calories | 2150 kcal | 179 kcal |
| Carbohydrates | 410 g | 34.1 g |
| Dietary Fiber | 14 g | 1.2 g |
| Sugars | 26 g | 2.2 g |
| Total Fat | 32 g | 2.7 g |
| Saturated Fat | 18 g | 1.5 g |
| Protein | 54 g | 4.5 g |
| Sodium | 3900 mg | 325 mg |
| Potassium | 520 mg | 43 mg |
Disclaimer
The nutritional values provided in this article are simple estimates calculated using standard ingredients and average values. Every person has a unique physical body, and personal digestive responses or dietary requirements can change based on individual health conditions. If you have specific dietary needs, severe gluten intolerance, or medical concerns, please consult a qualified healthcare professional or certified dietitian before introducing new foods into your diet.