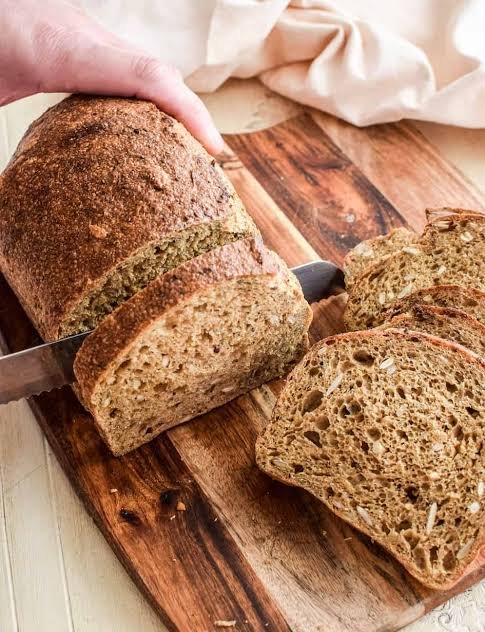
Sourdough sandwich bread is a wonderful homemade bread that combines the wonderful classic tangy flavor of natural fermentation with the soft and tender sliceable texture of everyday sandwich loaves. Unlike traditional rustic sourdough artisan boules that feature extremely hard and crunchy dark crusts alongside giant uneven air pockets, this specific recipe focuses entirely on creating a smooth sliceable loaf that holds all your favorite sandwich toppings perfectly. It uses a active vibrant sourdough starter to lift the dough naturally without needing any packet of commercial yeast at all. The process of making this bread brings incredible comfort to your kitchen as simple whole ingredients transform through time into a soft golden loaf. You will find that this soft loaf gives you the best of both baking worlds because you enjoy rich gut friendly benefits alongside a squishy sliceable crumb that kids and adults both love for daily meals.
People across the world fall deeply in love with this homemade sourdough sandwich loaf because it brings back the authentic warmth and incredible aroma of traditional home baking. Many families are looking for ways to move away from store bought store loaves that contain hidden preservatives, artificial additives, unexpected refined sugars, and commercial processing aids. When you slice into a fresh loaf that you baked yourself using basic ingredients, the feeling of personal achievement is truly unmatched. The flavor profile is gentle and approachable, featuring just a subtle hint of bright sourdough tang that complements sweet spreads like strawberry jam as easily as savory fillings like roasted turkey and cheddar cheese. The tender texture keeps your sandwiches intact without falling apart or squishing down into a dense ball, which makes it an absolute favorite for school lunchboxes, quick breakfasts, and family picnics.
Making this delicious sourdough sandwich bread fits wonderfully into many emotional, physical, and practical life moments throughout your weekly routine. From an emotional perspective, slow baking is a deeply peaceful ritual that helps you slow down, reduce stress, and focus on slow living in a fast world. If you care about fitness and daily nutrition, this bread is much easier on your stomach because natural fermentation breaks down heavy gluten protein chains and phytic acid naturally before you even bake it. This long slow fermentation process helps your body absorb vital nutrients much better while avoiding that uncomfortably heavy full feeling that regular fast yeast breads often cause. Whether you are aiming to feed your family cleaner whole foods, looking to save money on expensive bakery items, or simply seeking a cozy weekend baking project that fills your home with heavenly scents, this recipe answers your needs completely.
Learning to master this recipe will build your confidence in the kitchen and help you understand how simple baking can completely replace processed store bought items. You do not need any advanced baking equipment or expert skills to achieve a beautiful tall loaf that rises high above the rim of your bread pan. Every single step in this recipe relies on easy gentle techniques that respect your busy schedule through flexible fermentation timing options. As you bake this recipe week after week, you will naturally develop a feel for the dough, learning how temperature and moisture work together in your unique home environment. The end result is always a rewarding, beautiful golden brown loaf of healthy bread that brings incredible joy to your breakfast table, makes lunch time extra special, and makes every meal feel thoughtful and completely nourishing.
Ingredients You Will Need
Below is the complete list of clean simple ingredients required to bake one large loaf of tender sourdough sandwich bread:
- Active sourdough starter that is bubbly and fed: 150 grams (about three quarters of a cup)
- Warm fresh water around 80 degrees Fahrenheit: 250 grams (about one cup plus one tablespoon)
- Unbleached bread flour or high protein all purpose flour: 500 grams (about four cups)
- Whole milk or lukewarm water: 50 grams (about three tablespoons)
- Pure honey or maple syrup: 25 grams (about one tablespoon)
- Unsalted butter melted and cooled to warm: 30 grams (about two tablespoons)
- Fine sea salt or kosher salt: 10 grams (about one and a half teaspoons)
- Extra melted butter or olive oil for greasing the pan and brushing the top crust: 10 grams (about one tablespoon)
Step by Step Method
Step 1: Stirring the Wet Base Together
Begin by placing your mixing bowl on a digital kitchen scale. Zero out the scale weight so you can measure accurately. Add your active bubbly sourdough starter into the bowl. Pour in the warm fresh water and the warm whole milk. Next, add the sweet honey and the warm melted butter. Take a whisk or a sturdy wooden spoon and mix these wet ingredients together thoroughly until the sourdough starter completely dissolves into a creamy light milky liquid. Mixing well at this early stage ensures that your wild yeast cells are spread evenly throughout the liquid before you add any dry ingredients.
Step 2: Adding the Flour and Salt
Add all of the high protein flour into the liquid mixture. Sprinkle the fine sea salt evenly over top of the flour. Use a strong spatula or your clean hands to mix everything together until all dry white flour pockets disappear entirely. At this stage, the dough will look quite shaggy, rough, and sticky, which is completely normal. Do not be tempted to add extra flour right now. Cover the bowl loosely with a damp kitchen towel or a reusable bowl cover and let it rest undisturbed for 30 minutes at room temperature. This brief resting period is called an autolyse, which allows the flour to fully absorb the liquid and start developing gluten naturally.
Step 3: Performing the Kneading or Stretching Process
After the 30 minute rest, remove the bowl cover. You can knead this dough in a stand mixer with a dough hook on low speed for about 6 to 8 minutes until it becomes smooth and supple. Alternatively, you can knead it by hand on a lightly floured clean counter for about 8 to 10 minutes. If you prefer a gentle no knead approach, perform four sets of stretch and folds directly inside the bowl every 30 minutes over two hours. To stretch and fold, wet your fingers with fresh water, grab one side of the dough, gently pull it upward, and fold it over the top center. Turn the bowl ninety degrees and repeat on all four sides. Your dough will gradually shift from a shaggy rough mass into a silky smooth elastic ball.
Step 4: The Main Bulk Fermentation Rise
Cover your bowl tightly with plastic wrap or a secure lid to prevent the surface of the dough from drying out. Place the bowl in a cozy, warm spot in your home away from harsh cold air drafts. Let the dough rise naturally until it increases in total volume by about 50 to 75 percent. Depending on the ambient room temperature of your kitchen and the strength of your starter, this initial rise can take anywhere from 4 hours in a warm room to 8 hours in a cooler room. Look for signs of progress like small air bubbles beneath the surface, rounded dome edges, and a light airy bounce when you gently wiggle the bowl.
Step 5: Shaping Your Sandwich Loaf
Generously coat an eight by four inch metal loaf pan with soft butter or cooking spray. Lightly dust your clean kitchen counter with a tiny bit of flour. Turn your risen dough out onto the counter surface gently. Press down gently with flat open hands to flatten the dough into a rectangular shape while releasing large trapped air bubbles. Fold the left third of the rectangle over to the center, then fold the right third over top like a folded letter. Roll the dough up firmly from the top edge downward into a tight smooth log shape. Pinch the side seams closed using your fingers. Place the shaped dough log into your prepared loaf pan with the smooth seam side facing down.
Step 6: The Final Proofing Period
Cover the loaf pan loosely with a clean light kitchen towel or a large plastic bag puffed up with air so it does not touch the sticky top surface of the dough. Allow the dough to undergo its final rise at room temperature until it expands and rises about one inch above the top rim of the metal loaf pan. This final rise usually takes about 2 to 4 hours depending on room warmth. Alternatively, you can place the covered pan into your refrigerator overnight for a long cold rise up to 12 hours, which slows down fermentation and builds an even richer tangy flavor.
Step 7: Baking to Golden Perfection
Preheat your oven to 375 degrees Fahrenheit (190 degrees Celsius). If your loaf was resting in the refrigerator overnight, set it on the counter while the oven heats up. Gently brush the top surface of the risen dough with a little melted butter or milk for a beautiful shine and soft top crust. Place the loaf pan onto the middle center rack of your fully heated oven. Bake for 35 to 45 minutes without opening the oven door early. The loaf is done when the top crust turns a rich golden chestnut color and the internal temperature reaches 200 degrees Fahrenheit when checked with a digital probe thermometer.
Step 8: Cooling and Slicing
Remove the loaf pan safely from the hot oven using thick oven mitts. Let the hot bread rest inside the metal pan for 10 minutes so the outer edges release naturally. Carefully tip the loaf out of the pan onto a wire cooling rack. Brush the top crust immediately with a thin layer of extra warm butter to keep the crust soft and tender. Allow the bread to cool completely to room temperature for at least two full hours before slicing. Slicing warm sourdough releases trapped steam, which makes the soft inside gummy and wet. Use a sharp serrated bread knife for perfectly smooth thin sandwich slices.
Why This Recipe Is Special
This sourdough sandwich bread recipe stands out from other home baking guides because it balances health, flavor, and user friendly ease in one complete package. Traditional sourdough artisan recipes call for intense high heat baking inside heavy iron Dutch ovens, resulting in thick crusts that can be tough on young teeth or sensitive gums. This recipe introduces small amounts of healthy milk, butter, and natural honey into the dough matrix, which breaks down rigid gluten structures just enough to yield a tender, squishy slice while retaining all the sourdough goodness.
From a health perspective, natural fermentation offers extraordinary wellness benefits for your daily diet. The wild yeasts and beneficial lactic acid bacteria work together slowly over many hours to pre digest tough starches and proteins. This activity breaks down phytic acid, an anti nutrient found in grains that normally blocks your digestive tract from absorbing essential minerals like magnesium, zinc, iron, and calcium. As a result, people who experience light bloating or stomach mild discomfort from commercial yeast breads often discover they can enjoy this fermented sourdough bread comfortably without any heavy feeling.
Furthermore, this loaf relies entirely on clean whole food ingredients without relying on chemical dough conditioners, fake emulsifiers, or artificial mold inhibitors found in store bought options. You have absolute control over every ingredient that enters your body. The natural acidity created during fermentation serves as a natural preservative, keeping your loaf fresh, soft, and moist on your counter for several days without spoiling quickly.
Extra Tips for Better Taste
- Use lukewarm milk instead of all water to give your bread an ultra plush crumb and a light sweet flavor.
- Substitute pure honey with raw maple syrup or brown sugar if you want subtle caramel flavor notes.
- Brush the top crust with garlic butter and sprinkle sesame seeds or poppy seeds on top right before baking for extra crunch and aroma.
- Keep your sourdough starter in peak active condition by feeding it equal parts water and flour a few hours before mixing the dough.
- If your kitchen is cold, let your dough rise inside your oven with only the interior oven light turned on to create a warm environment.
- Slice your completely cooled loaf entirely and store the individual slices in a freezer bag in your freezer for easy fast toast anytime.
- Add two tablespoons of golden flax seeds or chia seeds into the flour mixture to boost the fiber and healthy omega three content.
Final Thoughts
Baking your own sourdough sandwich bread at home is a deeply satisfying journey that blends warm traditional comfort with clean healthy living. Once you see that golden brown loaf rise up high in your oven and experience the rich cozy scent filling every corner of your home, you will never want to go back to buying factory made plastic wrapped bread again. Take your time, enjoy the simple soothing steps, and share these delicious nutritious slices with the people you love most.
Nutrition Details
| Item / Metric | Full Recipe Loaf | Per Serving (1 Slice / 12 Slices Total) |
| Serving Size | 1 Full Baked Loaf (approx. 850g) | 1 Slice (approx. 70g) |
| Total Calories | 2160 kcal | 180 kcal |
| Total Fat | 36 g | 3.0 g |
| Saturated Fat | 18 g | 1.5 g |
| Trans Fat | 0 g | 0 g |
| Cholesterol | 45 mg | 3.75 mg |
| Sodium | 3900 mg | 325 mg |
| Total Carbohydrates | 384 g | 32 g |
| Dietary Fiber | 14.4 g | 1.2 g |
| Total Sugars | 21.6 g | 1.8 g |
| Protein | 60 g | 5.0 g |
| Calcium | 180 mg | 15 mg |
| Iron | 14.4 mg | 1.2 mg |
| Potassium | 600 mg | 50 mg |
Disclaimer
This recipe and the accompanying nutritional information are provided for general educational, instructional, and culinary entertainment purposes only. Everyone’s body, metabolic rate, digestive system, and dietary requirements are unique, meaning individual health benefits and nutritional outcomes may vary from person to person. If you have specific dietary restrictions, gluten allergies, or underlying medical health conditions, please consult with a qualified physician or registered dietitian before making significant changes to your regular diet.