Sourdough fermentation is one of the most natural and traditional ways to bake wholesome bread right inside your home kitchen. This complete guide focuses on making a simple artisan loaf using the powerful magic of wild yeast and beneficial wild bacteria. Instead of buying quick commercial yeast packets from the grocery store, you learn how to make fresh dough using simple flour, fresh water, fine salt, and your active starter culture. The process converts standard basic ingredients into a soft, fluffy loaf with a beautiful golden crust that smells amazing. Baking bread this way is a wonderful journey that teaches you how simple ingredients transform into incredible food through patience and care. You will gain a deep understanding of how wild micro organisms work together to lift your dough and create unmatched flavor profiles that commercial bread simply cannot replicate.
People around the world love sourdough fermentation because it offers an incredible depth of flavor that store bought bread can never match. The wild bacteria present in the starter culture create natural acids during the long rising process, giving the loaf its signature mild sour tang and rich aroma. Beyond the amazing taste, food lovers enjoy the wonderful crisp texture of the outer crust combined with the soft, airy inside. The process of caring for a starter and watching your dough double in size gives a deep sense of accomplishment and creative joy. Baking this way connects you to ancient culinary traditions that human beings have enjoyed for thousands of years. It brings true comfort to your routine, turning simple kitchen time into a peaceful, rewarding hobby that satisfies both your mind and your appetite.
You might choose to bake fermented sourdough bread for emotional comfort, fantastic health benefits, or personal fitness goals. On a quiet weekend morning, mixing dough by hand serves as a wonderful relaxing activity that lowers stress and helps you slow down from a busy work week. From a health and fitness perspective, long fermentation breaks down tough starches and gluten proteins, making the final bread much easier on your digestive system. People who often feel bloated after eating commercial white bread usually find that naturally fermented loaves feel gentle on their stomach. The slow natural process also lowers the glycemic index of the bread, which helps keep your energy levels steady throughout the day without sudden blood sugar spikes. It is the perfect choice when you want to feed your family nourishing, real food made with simple wholesome ingredients.
Mastering this traditional baking method gives you full control over everything that goes into your daily food choices. Modern commercial loaves often contain added sugars, commercial preservatives, artificial softening agents, and unnecessary chemical additives that your body does not need. When you practice sourdough fermentation at home, you know exactly what your family is eating every single day. The process builds confidence in your cooking abilities as you learn to read the dough through touch, sight, and subtle changes in smell. Whether you are baking a fresh loaf for a cozy Sunday family breakfast, preparing healthy sandwich slices for weekly meal prep, or gifting a warm artisan loaf to a neighbor, this recipe brings genuine joy to every occasion.
Ingredients You Will Need
To make one delicious artisan loaf of fermented bread, gather the following simple items:
Active sourdough starter: 100 grams (bubbly and fed within 4 to 8 hours)
Bread flour or unbleached all purpose flour: 450 grams
Whole wheat flour: 50 grams
Room temperature filtered water: 350 grams (about 80 degrees Fahrenheit)
Fine sea salt or non iodized salt: 10 grams
Rice flour: 2 tablespoons (used only for dusting the shaping basket)
Step by Step Method
Step 1: Feeding Your Starter
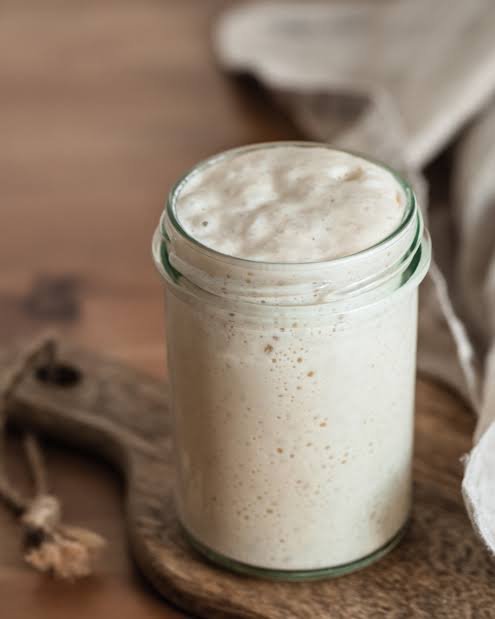
Before you begin mixing your main loaf, you must make sure your wild culture is strong and ready to rise. Take your sourdough starter from the refrigerator or counter and feed it equal parts flour and warm water by weight. Place the jar in a warm spot in your kitchen and let it rest for four to eight hours. You will know it is ready to use when it doubles in volume, shows lots of tiny bubbles on the sides, and smells pleasantly sweet and yeasty.
Step 2: Mixing Water and Flour (Autolyse)
Pour 350 grams of room temperature filtered water into a large mixing bowl. Add 100 grams of your active, bubbly starter into the water and stir gently with a wooden spoon or spatula until it dissolves into a milky liquid. Add 450 grams of bread flour and 50 grams of whole wheat flour into the bowl. Stir everything together until all dry flour disappears and a shaggy dough forms. Cover the bowl with a damp cloth and let it rest undisturbed for 40 minutes. This resting phase allows the flour to fully absorb the water and start developing gluten naturally.
Step 3: Adding Salt and Kneading
Sprinkle 10 grams of fine sea salt evenly over the top of your wet dough. Dimple the salt into the dough using your fingers, then grab one side of the dough, pull it gently upward, and fold it back over the top. Rotate the bowl a quarter turn and repeat this stretch and fold movement. Continue stretching and folding for about three minutes until the salt is completely mixed in and the dough feels smoother. Cover the bowl again with your damp cloth.
Step 4: Stretch and Fold Series (Bulk Fermentation)
Over the next two hours, you will perform four sets of stretches and folds spaced 30 minutes apart. To stretch and fold, wet your hands with a little water so the dough does not stick to your fingers. Reach down under one side of the dough, lift it gently without tearing it, and fold it over its own top. Turn the bowl a quarter turn and do it again. Repeat this four times for each set until you complete a full circle. Cover the bowl between each set. You will notice the dough becomes stronger, smoother, and more elastic with every single set.
Step 5: First Warm Rise
After finishing your last stretch and fold set, leave the dough in the covered bowl at warm room temperature. Allow it to rise undisturbed until it increases in size by roughly 50 percent, shows soft bubbles on top, and feels light when you gently shake the bowl. This warm fermentation step usually takes anywhere from three to five hours depending on how warm your kitchen is.
Step 6: Shaping the Loaf
Lightly dust a clean countertop with flour and gently turn your fermented dough out onto the surface. Flatten it very gently into a round disk using your hands. Fold the bottom edge up toward the center, fold the left and right sides toward the middle like an envelope, and then roll the dough down from the top into a smooth cylinder. Turn the cylinder over so the smooth seam side faces down. Use your hands to pull the dough gently toward yourself across the counter surface to create tight surface tension on top of the round ball.
Step 7: Final Cold Fermentation (Cold Proofing)
Dust a proofing basket or a round bowl lined with a clean cotton towel using two tablespoons of rice flour. Rice flour is very important because it prevents the wet dough from sticking to the fabric. Lift your shaped dough carefully and place it upside down into the basket so the smooth top rests on the bottom. Cover the basket loosely with a plastic bag or reusable bowl cover. Transfer the basket into your refrigerator and leave it to ferment slowly overnight for 12 to 16 hours. Cold fermentation slows down the yeast while allowing beneficial bacteria to keep building incredible tangy flavor.
Step 8: Baking the Loaf
Place a Dutch oven with its lid inside your oven and preheat to 450 degrees Fahrenheit (232 degrees Celsius) for one full hour. Remove your cold dough from the refrigerator. Cut a piece of parchment paper and place it over the basket, then flip the basket over so the dough rests on the paper. Use a very sharp blade or razor to score a clean line one inch deep across the top of the dough to help steam escape. Carefully pull the hot Dutch oven out of your main oven, drop the dough inside using the parchment paper edges, cover with the lid, and bake for 20 minutes.
Step 9: Uncover and Finish Baking
After 20 minutes of baking with the lid on, carefully remove the hot lid from your Dutch oven. Lower the oven temperature to 410 degrees Fahrenheit (210 degrees Celsius). Continue baking uncovered for another 20 to 25 minutes until the crust turns a rich golden mahogany brown color and sounds hollow when you tap the bottom.
Step 10: Cooling
Carefully lift the hot loaf out of the pot using the parchment paper and place it on a wire cooling rack. Allow the bread to cool completely for at least two hours before slicing into it. Slicing warm bread releases trapped steam and causes the inside texture to become gummy, so patience is key for the best final slice.
Why This Recipe Is Special
This sourdough fermentation recipe is truly special because it relies entirely on the natural powers of simple real ingredients without artificial additives, commercial rise enhancers, or quick chemical yeasts. Long, slow fermentation allows wild lactobacilli bacteria to break down complex starches and phytic acid, an anti nutrient naturally found in grains that blocks mineral absorption in human bodies. By breaking down phytic acid, sourdough allows your body to easily absorb essential minerals like magnesium, iron, zinc, and calcium.
From a flavor standpoint, this loaf stands in a class of its own. The contrast between the crunchy deep dark crust and the soft, open, springy interior provides a delightful culinary experience with every bite. Furthermore, the slow acid buildup works as a natural preservative, keeping your bread fresh on the kitchen counter for days without needing synthetic chemical additives. It offers an authentic artisan taste right from your home oven while supporting your digestive system and overall wellness.
Extra Tips for Better Taste
To take your artisan baking to the next level, consider implementing these simple, creative kitchen tips:
Use filtered water: Tap water often contains chlorine and heavy chemicals that kill friendly wild yeast cultures. Using pure filtered or spring water protects your starter and ensures a strong natural rise.
Incorporate whole grains: Swap out 50 to 100 grams of white bread flour for stone ground rye, spelt, or whole wheat flour. Whole grains add a richer nutty flavor and provide extra food for wild bacteria.
Add fresh herbs and garlic: During your final stretch and fold step, fold in fresh rosemary, roasted garlic cloves, or sharp cheddar cheese to make a flavorful savory bread.
Control kitchen temperature: Wild yeast loves warmth. If your kitchen feels cold, keep your dough resting inside an turned off oven with the oven light turned on to maintain a cozy fermenting space.
Master the steam effect: Baking in a heavy covered cast iron pot traps natural steam rising from the wet dough, allowing the loaf to expand fully before the crunchy outer crust sets.
Final Thoughts
Baking bread using natural sourdough fermentation is a beautiful journey that combines simple science, patience, and home comfort. While the steps might seem long at first, the active hand time is very minimal, and the delicious reward is worth every minute of waiting. Once you taste a fresh, warm slice of home baked artisan bread with butter, you will never want to go back to processed store bought loaves again. Enjoy the peaceful baking process, share your beautiful golden loaves with friends and family, and have fun mastering this ancient kitchen craft!
Nutrition Details
Here is the nutritional breakdown for the complete recipe loaf as well as estimated values per individual serving slice (assuming the loaf is cut into 10 equal slices):
| Nutrition Facts | Whole Recipe (Full Loaf) | Per Serving (1 Slice) |
| Calories | 1850 kcal | 185 kcal |
| Carbohydrates | 380 grams | 38 grams |
| Dietary Fiber | 20 grams | 2 grams |
| Sugars | 4 grams | 0.4 grams |
| Protein | 55 grams | 5.5 grams |
| Total Fat | 5 grams | 0.5 grams |
| Saturated Fat | 1 gram | 0.1 grams |
| Sodium | 3900 milligrams | 390 milligrams |
| Potassium | 650 milligrams | 65 milligrams |
| Calcium | 120 milligrams | 12 milligrams |
| Iron | 22 milligrams | 2.2 milligrams |
Disclaimer
Please note that everyone’s body is different, and individual digestive responses or nutritional needs may change based on personal health status. While sourdough fermentation reduces gluten levels and breaks down phytic acid, this bread still contains natural wheat gluten and is not suitable for individuals with celiac disease or severe gluten allergies. Always consult with a qualified doctor or nutrition expert for personalized diet advice.