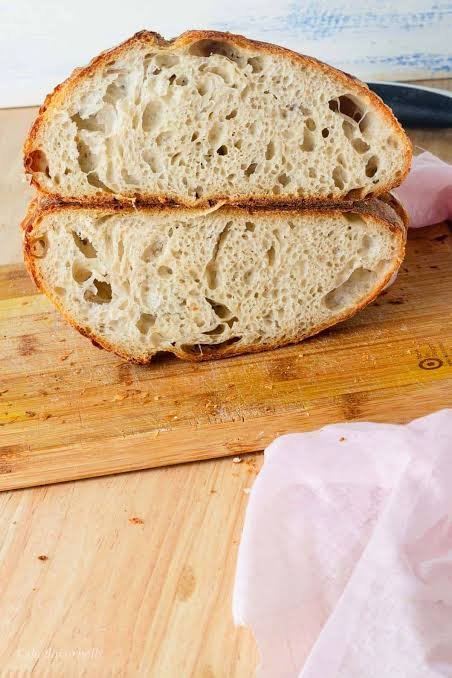
Baking fresh bread at home brings a wonderful feeling of comfort and achievement into your kitchen. This simple recipe focuses on using your leftover starter to make a soft and tasty loaf without wasting any ingredients. Many people feel bad throwing away extra starter during regular feedings, but this method gives that leftover portion a fresh purpose. You will create a rich and tender loaf that works perfectly for morning toast, sandwich slices, or garlic bread. The process keeps everything easy so anyone can jump right into home baking without feeling overwhelmed or confused by technical terms.
Home bakers absolutely love this recipe because it saves both time and money while reducing kitchen waste. Traditional sourdough requires many hours or even days of waiting for natural wild yeast to rise, which can feel tricky for busy schedules. By adding a small amount of commercial yeast alongside your starter discard, you get the amazing tangy flavor of wild fermented flour without the long waiting period. The resulting crust comes out warm and gold while the middle stays soft and airy. You will quickly discover that this reliable recipe turns everyday baking into a satisfying habit that your family will appreciate.
You might want to make this loaf when you desire a warm house filled with the comforting smell of fresh baker goods on a cold weekend. It is also a fantastic choice if you want to eat cleaner foods with fewer store bought additives and preservatives. Eating homemade bread provides a great emotional boost because creating something with your own hands brings genuine happiness and peace. From a health perspective, using fermented flour helps support easier digestion while offering steady energy for your active day. Whether you need a relaxing cooking project or a healthy food option, this loaf fits every occasion.
Getting started does not require any fancy equipment or advanced skill set. You only need a simple mixing bowl, basic measuring tools, a standard loaf pan, and a few everyday kitchen ingredients. The method guides you through gentle mixing and basic kneading techniques that build confidence with every step. You will learn how simple ingredients transform into a soft ball of dough that grows nicely in a warm room. Once you see your first loaf rising golden brown in the oven, you will feel proud of your baking progress and eager to share your creation with friends.
Ingredients You Will Need
To prepare one full loaf of sourdough discard bread, gather the following exact ingredients:
- 350 grams of unbleached all purpose flour
- 200 grams of sourdough discard at room temperature
- 180 milliliters of warm water
- 7 grams of instant dry yeast
- 15 grams of pure honey or white sugar
- 10 grams of fine sea salt
- 30 milliliters of olive oil or melted unsalted butter
Step by Step Method
Step 1: Prepare Your Workspace and Ingredients
Start by cleaning your kitchen counter thoroughly because you will need a clean surface for mixing and shaping your dough. Gather all your measured ingredients so everything stays within easy reach during the process. Make sure your sourdough discard sits out on the counter beforehand so it reaches room temperature. Cold discard direct from the refrigerator can slow down the yeast action and make the dough rise much slower. Measure your warm water carefully using a thermometer or test it on your wrist. The water temperature should feel warm like comfortable bath water, never hot, because hot water can kill your active yeast.
Step 2: Activate the Yeast Mixture
Take a large glass or ceramic bowl and pour in the warm water. Add your honey or sugar into the water and stir gently with a spoon until dissolved. Sprinkle the instant dry yeast evenly across the top of the warm liquid. Let the bowl rest undisturbed for five to eight minutes in a quiet spot. Watch for small bubbles and a soft layer of foam forming on top of the water. This foaming action shows that your yeast is alive, healthy, and ready to make your bread rise high. If the water stays flat and clear without bubbles, throw it out and start again with fresh yeast and cooler water.
Step 3: Combine Discard and Liquid Ingredients
Once your yeast mixture is foamy, pour your room temperature sourdough discard directly into the same bowl. Add your olive oil or melted butter to the liquid mixture. Use a wooden spoon or a spatula to mix everything together until the discard dissolves into the liquid. It is completely normal if small lumps remain floating in the bowl at this stage. The goal is to loosen up the thick discard so it mixes evenly with the dry ingredients later.
Step 4: Add Flour and Salt
Pour half of your measured flour into the bowl along with all the sea salt. Stir the mixture continuously until the flour absorbs the wet ingredients. Gradually add the remaining flour while stirring continuously. As the dough thickens, it will form a shaggy ball and become harder to stir with a spoon. Use your clean hands inside the bowl to press the dough together, picking up all loose bits of flour from the bottom and sides of the bowl.
Step 5: Knead the Dough
Lightly dust your clean table or countertop with a tiny pinch of flour. Turn the dough ball out of the bowl onto your flour covered surface. Begin kneading by pressing the heel of your hand firmly down and forward into the dough. Fold the top edge of the dough back over toward you, then rotate the dough a quarter turn. Repeat this pushing, folding, and turning motion continuously for eight to ten full minutes. As you knead, the surface of the dough will change from rough and sticky to smooth, soft, and stretchy. If the dough sticks heavily to your fingers or counter, sprinkle a tiny bit more flour, but avoid adding too much flour or the finished loaf will turn dry.
Step 6: First Proofing Period
Lightly coat the inside of a clean bowl with a few drops of olive oil. Form your kneaded dough into a smooth, round ball and place it inside the oiled bowl. Roll the dough ball around once so every side gets covered with a thin film of oil, which stops the dough from drying out. Cover the top of the bowl tightly with a clean kitchen towel or plastic wrap. Place the bowl in a warm, draft free spot in your kitchen, such as inside an oven that is turned off with the oven light switched on. Let the dough rest undisturbed for about one hour or until it doubles in size.
Step 7: Shape the Loaf
Lightly oil or line a standard nine inch by five inch loaf pan with parchment paper. Gently press your fist into the center of the risen dough to release excess gas bubbles. Turn the dough onto a clean table surface without adding extra flour this time. Flatten the dough gently into a rectangular shape using your hands. Roll the rectangle tightly from the short top edge down toward the bottom edge, forming a neat log shape. Pinch the bottom seam closed with your fingers so the roll holds its shape tightly. Place the shaped log seam side down into your prepared loaf pan.
Step 8: Second Proofing Period
Cover the loaf pan loosely with a clean towel. Set the pan back in a warm spot to rest for forty five to sixty minutes. During this second rise, the dough will expand upward above the rim of the pan, forming a nice rounded crown. Keep a close eye on the loaf toward the end of this period so it does not over rise and spill over the edges.
Step 9: Bake the Bread
Preheat your oven to 190 degrees Celsius for at least fifteen minutes before baking. Place your loaf pan carefully on the middle rack inside the hot oven. Bake for thirty five to forty minutes without opening the oven door during the first twenty minutes. The top crust should turn a deep golden color, and the loaf will sound hollow when you gently tap the top with your knuckles. If the top brown color becomes too dark early, cover the top loosely with a piece of foil paper for the remaining baking time.
Step 10: Cool Completely
Remove the loaf pan from the oven using thick oven mitts. Let the bread sit inside the pan for five minutes to cool slightly. Run a butter knife gently along the inside edges of the pan to loosen any stuck spots. Carefully lift the bread out of the pan and place it on a wire cooling rack. Allow the loaf to cool completely for at least one full hour before slicing with a sharp serrated bread knife. Slicing warm bread causes steam to escape rapidly, which can make the inside texture gummy or dense.
Why This Recipe Is Special
This sourdough discard bread holds a unique place in home baking because it brings together the best parts of simple baking methods. You do not need to wait endless days for natural levain, yet you still enjoy the pleasant subtle sourness that makes sourdough famous. It solves the everyday waste problem of home sourdough maintenance, converting unused starter into delicious food.
From a digestion perspective, using discard offers notable benefits for everyday health. Even inactive starter contains broken down proteins from the long fermentation process, making the flour easier on your stomach than raw flour goods. People who feel bloated after eating commercial bread often find this style much easier to enjoy.
The texture of this loaf stands out from store bought alternatives. The crust develops a delightful crispness while staying easy to bite through, while the crumb inside offers soft moisture that lasts for days. It stays sturdy enough to hold heavy sandwich fillings without tearing, making it an excellent all around staple for your kitchen routine.
Extra Tips for Better Taste
To lift the flavor profile of your bread, try replacing the warm water with lukewarm whole milk or buttermilk. The milk fat creates an extraordinarily soft texture and adds a mild sweetness that pairs wonderfully with the tangy discard.
You can mix extra ingredients into the dough during step four to create custom flavor varieties. Try folding in half a cup of shredded cheddar cheese along with a tablespoon of dried garlic powder for a savory dinner bread. Alternatively, mix in two tablespoons of mixed seeds like sunflower, flax, and sesame to add extra crunch and dietary fiber.
Brushing the top crust with melted butter immediately after removing the loaf from the oven gives the bread a shiny appearance and keeps the outer layer soft. If you prefer a crispier crust, spray a tiny mist of water into your oven floor right when you put the loaf inside to bake.
Proper storage keeps your homemade bread tasting fresh longer. Keep the cooled loaf inside a paper bag or a wooden bread box at room temperature for up to three days. Avoid storing fresh bread in the refrigerator because cold air dries out the starches faster, causing the crumb to become stale. For long term storage, slice the bread completely and freeze individual slices in a sealed freezer bag. You can place frozen slices straight into your toaster whenever you want hot fresh toast.
Final Thoughts
Baking your own sourdough discard bread brings immense comfort, simplicity, and flavor into your home routine. This user friendly approach takes away all stress from home baking, giving beginners a reliable path to successful loaves every single time. As you practice this recipe, you will get a better feel for your dough and enjoy creating wholesome bread for the people you love. Gather your basic ingredients today, give your discard new life, and enjoy the magical taste of fresh homemade bread straight from your oven.
Nutrition Details
The following table provides detailed estimated nutritional values for one full recipe batch as well as per individual slice, assuming the loaf is cut into ten equal slices.
| Nutritional Component | Value Per Entire Recipe | Value Per Single Slice |
| Total Calories | 1850 kcal | 185 kcal |
| Carbohydrates | 350 grams | 35 grams |
| Dietary Fiber | 12 grams | 1.2 grams |
| Sugars | 16 grams | 1.6 grams |
| Total Protein | 48 grams | 4.8 grams |
| Total Fat | 30 grams | 3.0 grams |
| Saturated Fat | 4.5 grams | 0.45 grams |
| Sodium | 3900 milligrams | 390 milligrams |
| Potassium | 420 milligrams | 42 milligrams |
Disclaimer
This recipe content and nutritional information are provided for basic educational and home cooking purposes only. Individual nutritional needs and dietary responses vary from person to person depending on age, activity levels, and overall health status. The values listed in the nutrition table are estimations based on standard ingredients and may change slightly based on specific brand choices or serving sizes. If you have specific dietary restrictions, allergies, or health conditions, please consult a qualified healthcare professional or certified nutritionist for personalized advice