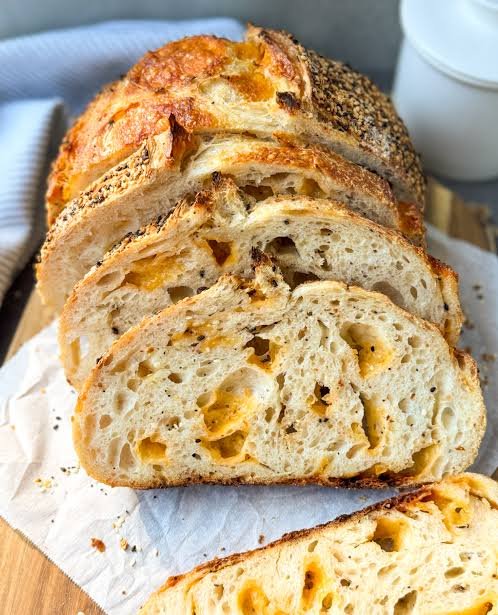
People across the globe fall completely in love with sourdough bread for so many wonderful reasons. The first thing you notice when you slice into a fresh loaf is the contrast between the thick crackly outer crust and the soft, chewy interior filled with gorgeous air pockets. The taste is unlike any store bought sandwich bread you have ever tried, offering a subtle, tangy flavor profile that ranges from mild and buttery to deeply sour depending on how long you let the dough rest. Beyond the incredible flavor, there is a deep, tactile joy in working with your hands to stretch and fold the dough throughout the day. Watching a simple mixture of flour and water rise naturally gives you an amazing sense of accomplishment that commercial breads simply cannot match. It connects us to an older way of living where food was made slowly and thoughtfully, turning a routine daily activity into a peaceful habit that brings immense joy to your morning routine. Share a warm slice with family or friends and you will immediately see why this ancient loaf holds such a beloved place in home kitchens everywhere.
There are countless moments when making a fresh loaf of sourdough makes perfect sense for your life, your emotions, and your health goals. From an emotional perspective, baking sourdough is a fantastic form of mindfulness that forces you to slow down and focus on the present moment as you feel the texture of the dough change under your palms. It is the perfect cozy weekend project when you want your home to fill with the comforting, rich aroma of toasted grain and warm yeast. From a culinary standpoint, nothing elevates a casual weekend breakfast or a cozy bowl of soup like a rustic slice of bread toasted to perfection and spread with real salted butter. From a fitness and wellness perspective, sourdough is exceptionally friendly on the digestive system because the natural fermentation process breaks down gluten and phytic acid long before you take a bite. Many people who feel heavy or bloated after eating standard factory made bread find that wild fermented sourdough digests smoothly, giving sustained energy without causing uncomfortable blood sugar spikes or sluggishness.
Deciding to start your own sourdough journey is a commitment to nourishing your body with simple, clean whole foods free from preservatives, artificial softeners, or hidden sugars. When you read the label on a typical plastic bag of bread at the supermarket, you often see a dozens of chemical ingredients that exist only to extend shelf life or speed up production. Homemade sourdough stands as the exact opposite of that hyper processed food model, relying purely on natural micro organisms to do the heavy lifting over time. As you build confidence with this recipe, baking turns from a novel kitchen experiment into an empowering life skill that allows you to nourish yourself and your loved ones with pure whole grains. The rewarding sound of that crispy crust crackling as it cools on your counter is a sensory reward that never gets old. Whether you want to improve your gut health, cut out unnecessary processed foods, or simply enjoy the ultimate slice of toast every morning, this beginner friendly guide will walk you through every single phase with absolute clarity and ease.
Ingredients You Will Need
To make one large, beautiful round loaf of sourdough bread, gather the following simple ingredients:
-
Active sourdough starter: 100 grams (bubbly, floating in water, and fed about 4 to 8 hours prior)
-
Bread flour or unbleached all purpose flour: 450 grams
-
Whole wheat flour or rye flour: 50 grams (adds depth, moisture, and extra food for the yeast)
-
Warm water: 350 grams (filtered water preferred, warmed to around 80 degrees Fahrenheit)
-
Fine sea salt or kosher salt: 10 grams
-
Extra flour for dusting: 30 to 50 grams (rice flour mixed with white flour works best to prevent sticking)
Step by Step Method
Step 1: Mixing the Dough and Autolyse
In a large glass or ceramic mixing bowl, weigh out your 350 grams of warm water. Add the 100 grams of active, bubbly sourdough starter directly into the water. Stir the liquid gently using a fork or a wooden spoon until the starter dissolves and the liquid looks cloudy and milky.
Next, add the 450 grams of bread flour and 50 grams of whole wheat flour into the bowl. Use a sturdy spatula, a Danish dough whisk, or your clean hands to mix everything together until all the dry flour disappears. The mixture will look quite shaggy, rough, and sticky at this point, which is completely normal. Cover the bowl loosely with a damp kitchen towel or a reusable bowl cover and let it sit undisturbed at room temperature for 30 to 45 minutes. This quiet resting period is called the autolyse phase. During this time, the flour fully absorbs the water, which naturally begins developing the gluten structure without any hard physical kneading required on your part.
Step 2: Adding the Salt
After the resting period ends, sprinkle the 10 grams of fine sea salt evenly over the top of the wet dough. To help the salt dissolve smoothly into the flour mixture, splash a few drops of extra warm water over the top.
Now, reach into the bowl with clean, wet hands. Pinch the dough between your thumb and fingers all across the surface to work the salt deep into the center. Once the salt feels evenly distributed, lift the dough from the edges and fold it over itself several times until it forms a cohesive, semi smooth ball. Cover the bowl once again with your damp towel and let it rest for 30 minutes in a warm spot in your kitchen.
Step 3: Performing the Stretch and Folds
Rather than traditional heavy kneading on a floured counter, sourdough dough relies on gentle folds performed over a couple of hours to build strength and structure. You will complete four separate sets of stretch and folds, spaced 30 minutes apart.
To perform a set, wet your hands with a little cool water so the dough does not stick to your skin. Reach down into one side of the bowl, scoop your fingers under the bottom of the dough, gently pull it upward until you feel resistance, and then fold that stretched portion over the top toward the center. Rotate the bowl a quarter turn and repeat the exact same motion. Do this for all four quadrants of the bowl. That completes one set. Cover the bowl, wait 30 minutes, and repeat the process. With each set, you will notice the dough changing from a rough, sticky mass into a smooth, elastic, and glossy dome that holds its shape nicely.
Step 4: The Bulk Fermentation Rise
Once you finish your fourth and final set of stretch and folds, cover the bowl tightly and leave the dough alone on your counter to complete its main rise, known as bulk fermentation. Depending on the ambient temperature of your kitchen, this process usually takes anywhere from 3 to 6 hours.
If your kitchen is warm, the dough will rise faster, whereas a cooler kitchen will require more time. You are looking for the dough to increase in volume by roughly fifty to seventy percent. It should look aerated, soft, slightly domed on top, and feature visible air bubbles trapped just beneath the smooth surface. If you gently jiggle the bowl, the dough should wobble slightly like gelatin. Avoid letting it double completely in size, as over proofing can cause the dough to lose its structural integrity and flatten out in the oven.
Step 5: Pre Shaping the Loaf
Lightly dust a clean, dry countertop with a tiny sprinkle of flour. Use a flexible dough scraper to gently tip the fermented dough out of the bowl and onto your work surface. Try to let it slide out naturally so you do not pop those precious internal air bubbles.
Using wet or lightly floured hands, gently pull the edges of the dough outward to form a loose flat circle. Fold the top edge down to the center, bring the bottom edge up to meet it, and then fold both the left and right sides over toward the middle, creating a neat little dough parcel. Flip the dough over so the smooth seam side faces down onto the bare counter. Place your hands gently behind the round dough ball and pull it toward your body along the counter surface. The friction against the un-floured tabletop will pull the outer skin of the dough tight. Let this shaped round rest on the counter uncovered for 20 minutes. This rest allows the gluten strands to relax before final shaping.
Step 6: Final Shaping
While the dough is enjoying its bench rest, prepare your proofing basket or a medium sized round mixing bowl. Line the basket or bowl with a clean cotton cloth or flour sack towel, and dust the fabric generously with a mixture of white flour and rice flour. Rice flour is essential here because it lacks gluten, meaning the wet dough will never stick to the towel during the long rest.
Now return to your rested dough ball on the counter. Dust the top lightly with flour, flip it over so the flat bottom faces up again, and gently stretch it into a rectangle. Fold the left side over the center, then fold the right side over that. Roll the dough up firmly from the bottom to the top like a small sleeping bag, creating a tight cylinder. Turn the cylinder sideways and gently tuck the ends under to form a seamless round sphere. Lift the shaped dough carefully using a bench scraper and place it upside down into your lined proofing basket, so the smooth top rests against the bottom of the cloth and the pinched seams face up toward you.
Step 7: Cold Fermentation in the Refrigerator
Slide the entire proofing basket inside a clean plastic bag or wrap it gently with a reusable plastic cover to trap moisture and prevent the exposed bottom of the dough from drying out into a leathery skin. Place the wrapped basket into your refrigerator for a minimum of 12 hours, though anywhere up to 24 hours works fantastically well.
This cold stage slows down the yeast while allowing the beneficial lactic acid bacteria to keep working slowly. This extended cold rest is the secret step that develops that complex sourdough tang, improves the final texture, and firms up the dough so it holds its round shape perfectly when tipped out onto a scorching hot pan.
Step 8: Preheating the Oven and Scoring
About 45 minutes before you plan to bake your bread, place a heavy covered Dutch oven, cast iron combo cooker, or ceramic baking vessel onto the middle rack of your oven. Turn the oven temperature up to 450 degrees Fahrenheit (230 degrees Celsius) and let both the oven and the heavy pot preheat thoroughly until they are piping hot.
Once fully preheated, take your dough basket straight out of the refrigerator. Cut a square piece of parchment paper slightly larger than your loaf. Place the paper over the top of the basket, hold it flat with one hand, and flip the basket upside down onto your counter so the dough lands gently in the middle of the parchment paper. Lift the basket and towel away. Dust off any excess flour on the dough surface. Using a razor blade, a dedicated bread scoring tool, or a very sharp knife, make one smooth, swift slash across the top of the loaf about half an inch deep at a slight angle. Scoring creates a controlled path for steam to escape, allowing the bread to expand upward cleanly rather than bursting open randomly along the sides.
Step 9: Baking the Bread
Carefully remove the blazing hot Dutch oven from your main oven using thick heat resistant oven mitts, and set it on a safe heatproof surface. Lift the heavy lid off. Grab the corners of the parchment paper supporting your scored loaf and lower the paper and cold dough carefully into the center of the pot.
Optional trick: drop two small ice cubes between the parchment paper and the hot pot wall before quickly shutting the lid. The ice melts instantly, filling the sealed vessel with extra steam, which keeps the crust soft long enough for the bread to achieve maximum rise. Place the covered pot back into the 450 degree Fahrenheit oven and bake undisturbed for 20 minutes with the lid firmly on.
After 20 minutes, open the oven door and carefully lift the lid off the pot. You will be greeted by an incredible sight: the loaf will have expanded dramatically, opening wide along your score line. Leave the lid off, drop the oven temperature slightly to 425 degrees Fahrenheit (220 degrees Celsius), and bake uncovered for another 20 to 25 minutes. During this second phase, the pale loaf will transform into a rich mahogany, deep golden brown crust.
Step 10: Cooling the Loaf
When the baking time is complete and the crust looks rich, golden, and crackly, remove the pot from the oven. Carefully lift the hot bread out of the Dutch oven using the parchment paper edges and place the loaf onto a wire cooling rack. Tap the bottom of the bread gently with your knuckles; it should sound completely hollow inside, signaling that the interior structure is fully set and cooked through.
Now comes the hardest step of the entire recipe: you must let the bread cool completely at room temperature for at least two hours before cutting into it. Resist the urge to slice it warm! Slicing hot sourdough traps steam inside, turning the warm interior gummy, dense, and wet. Allowing it to cool fully lets the crumb set into a light, airy, and fluffy texture. Once cool, use a sharp serrated bread knife to slice, serve, and enjoy your fresh homemade loaf!
Why This Recipe Is Special
This sourdough recipe stands out because it brings professional artisan baking techniques into a accessible format designed for everyday home kitchens. Unlike commercial white bread that relies on fast acting manufactured yeast, sugars, and chemical conditioners to force a rapid rise, this sourdough uses only time, natural wild cultures, and simple physical folding. The extended fermentation breaks down complex carbohydrates and proteins that are usually hard for human stomachs to process. Because the lactic acid bacteria consume most of the simple sugars present in the flour during the long cold rest, the resulting bread has a lower glycemic index compared to standard loaves. This means it releases energy into your bloodstream gradually, helping you maintain balanced energy levels without sharp sugar spikes or sudden afternoon crashes.
Another reason this recipe is so remarkable is its exceptional flavor complexity and preservation qualities. The natural acids created during the long bulk fermentation act as a natural preservative, meaning your loaf stays fresh on the counter for days without adding a single artificial preservative. The flavor profile is multi layered, offering subtle notes of warm grain, toasted nuts, and a clean, refreshing tang that enhances both sweet and savory toppings. Whether you top it with mashed avocado, rich soup, aged cheeses, or sweet fruit jams, sourdough complements a massive range of ingredients while providing a satisfying, hearty crunch that makes every single meal feel like a special dining experience.
Extra Tips for Better Taste
To take your homemade sourdough to the next level of flavor and appearance, consider these creative improvement ideas:
-
Enhance the starter feed: Feed your starter with a fifty fifty mix of whole grain rye flour and unbleached bread flour for a much richer, earthier taste profile.
-
Extend the cold proof: Leave the shaped dough ball in the refrigerator for up to 24 to 36 hours. The longer it rests in the cold, the stronger the sour flavor becomes.
-
Add roasted garlic and herbs: During your third set of stretch and folds, gently fold in roasted garlic cloves, chopped fresh rosemary, or cracked black pepper for an aromatic savory twist.
-
Incorporate seeds for texture: Roll the damp shaped dough in toasted sesame seeds, sunflower seeds, or pumpkin seeds just before placing it into the proofing basket.
-
Use high quality sea salt: Switch basic table salt for a mineral rich unrefined sea salt to elevate the subtle savory tones of the baked grain.
-
Control your water quality: Always use un-chlorinated or filtered water, as harsh tap water chemicals can slow down or kill delicate wild yeast organisms.
Final Thoughts
Baking your own sourdough bread is a deeply fulfilling journey that turns basic household ingredients into a wholesome staple you can be truly proud to share. Do not feel discouraged if your first attempt looks a little flat or imperfect; every single loaf you bake teaches you valuable lessons about temperature, timing, and dough texture. Sourdough is a living art form that rewards patience and curiosity above all else. Once you get the hang of this simple routine, pulling a glowing, crispy, aromatic loaf out of your own hot oven will quickly become one of the most satisfying highlights of your weekly cooking routine. Enjoy every step of the process, savor the delicious results, and happy baking!
Nutrition Details
Here is the estimated nutritional breakdown for this homemade sourdough loaf recipe. Values are calculated based on the total recipe weight and broken down into individual average slices.
Recipe Totals and Serving Breakdown
| Nutritional Component | Full Recipe Total | Per Serving (1 Slice / 10 Total) |
| Total Calories | 1850 kcal | 185 kcal |
| Carbohydrates | 380 grams | 38 grams |
| Dietary Fiber | 18 grams | 1.8 grams |
| Sugars | 4 grams | 0.4 grams |
| Protein | 55 grams | 5.5 grams |
| Total Fat | 5 grams | 0.5 grams |
| Saturated Fat | 1 gram | 0.1 grams |
| Sodium | 3900 milligrams | 390 milligrams |
| Potassium | 650 milligrams | 65 milligrams |
Disclaimer
This article is provided strictly for educational and informational purposes. The nutritional figures listed above are general estimations and can vary based on the specific brand of flour, water content, starter activity, and slice sizes you use at home. Everyone’s body is unique, and individual health responses, dietary needs, and digestive experiences with fermented foods or wheat products will naturally vary from person to person. If you have specific medical conditions, celiac disease, or severe wheat allergies, please consult a qualified healthcare professional or registered dietitian before making significant changes to your daily diet.