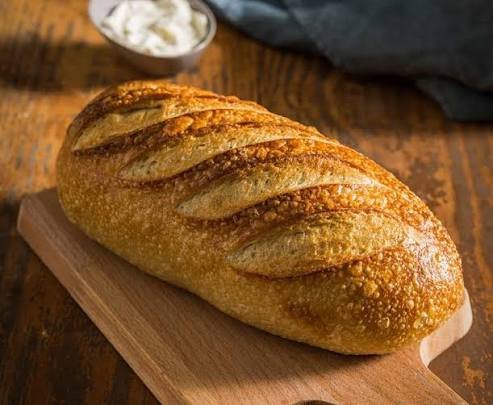
Sourdough bread is one of the most ancient and comforting foods you can make right inside your home kitchen. This detailed guide is completely dedicated to helping you craft a golden, crispy, and delicious loaf of sourdough bread using simple ingredients and gentle steps. Unlike regular commercial bread that relies on fast acting factory yeast, this natural sourdough recipe relies on wild yeast and good bacteria that come directly from flour and natural fermentation. Making sourdough bread at home is a peaceful art that turns basic kitchen staples into a beautiful rustic round loaf with a crackling crust and a soft tender crumb inside. When you slice into a freshly baked homemade loaf, you will hear a wonderful crunch sound followed by a warm cloud of delicious yeasty steam. This simple baking journey will take you from being a total beginner to feeling like a confident artisan baker who can feed family and friends wholesome natural bread every single week.
People all over the world fall deeply in love with sourdough bread for many wonderful reasons that go far beyond basic hunger. The first big reason is the remarkable taste profile which offers a delightful mix of mild tangy flavor and rich deep buttery undertones that store bought loaves can never match. Another major reason people adore sourdough bread is the fantastic texture experience that comes with every single bite you take. The outside of the loaf bakes into a shiny blistering crust that provides a rich crunch, while the inside remains pillowy soft, airy, and gently chewy. People also love the pure simplicity of knowing every single ingredient that enters their bodies, without any hidden artificial chemicals, added preservatives, or unnecessary processing aids. Cooking this bread creates a deep sense of pride because you watch a humble ball of flour and water transform into a towering masterpiece right before your eyes in your oven.
There are so many wonderful moments, emotions, and health reasons to bake this comforting loaf of sourdough bread for yourself and your loved ones. Emotionally, baking sourdough acts as a soothing mindful ritual that helps you slow down from a busy day, giving you time to relax while you knead and fold the gentle dough. Taste wise, it is the ultimate food companion for weekend family breakfasts, hearty dinner soups, rich avocado toasts, or simple midnight snacks slathered in cold unsalted butter. From a fitness and health perspective, natural sourdough fermentation breaks down complex gluten proteins and phytic acid, making it far easier on your stomach and digestive system than fast processed white breads. It also provides steady long lasting energy without causing sudden sharp spikes in your blood sugar levels, making it a smart choice for active balanced lifestyles. Whether you want to nourish your family with clean food or simply enjoy a rewarding kitchen hobby, this sourdough recipe is the absolute perfect place to begin.
Taking the time to master this sourdough bread recipe will open up a whole new world of home cooking joy that brings comfort to your heart and kitchen. As you bake more often, your hands will naturally learn how the dough feels at every stage, turning the entire process into a peaceful weekly routine. Sharing warm slices with friends creates happy kitchen memories, and the delightful aroma that fills your house while it bakes will make your home feel extra cozy and welcoming. Plus, learning this traditional skill gives you complete independence from commercial bakery products that often contain unwanted additive ingredients. Once you taste the amazing difference between a fresh homemade sourdough loaf and factory bread, you will likely never want to go back to buying plain packaged sliced bread ever again.
Ingredients You Will Need
To bake one beautiful round loaf of artisan sourdough bread, gather the following simple ingredients with exact measurements:
100 grams of active bubbly sourdough starter at its peak rise
375 grams of warm filtered water at about 80 degrees Fahrenheit
500 grams of unbleached bread flour with high protein content
10 grams of fine sea salt or kosher salt
25 grams of extra water for mixing salt into the dough later
10 grams of rice flour or all purpose flour for dusting the proofing basket
1 tablespoon of neutral oil or olive oil for lightly greasing your hands and resting bowl
Step by Step Method
Step 1 Preparing Your Sourdough Starter
Before you begin mixing your loaf, make sure your natural sourdough starter is fully active and healthy. Feed your starter equal parts flour and water about four to six hours before you intend to start mixing your dough. Keep the jar in a cozy spot in your kitchen until it doubles or triples in size and becomes full of big bubbly air pockets. You can perform a quick test by dropping a small spoon of starter into a bowl of room temperature water. If the starter floats easily on top of the water, it is ready to bake great bread.
Step 2 Mixing the Main Ingredients
In a large clean glass or ceramic mixing bowl, weigh out 375 grams of warm filtered water. Add 100 grams of your active bubbly sourdough starter directly into the warm water. Use a wooden spoon or your clean fingers to whisk the starter into the water until it dissolves into a milky liquid. Add 500 grams of unbleached high protein bread flour into the bowl. Mix everything together with your hands or a sturdy dough whisk until all the dry white flour disappears and a shaggy sticky dough forms. Cover the bowl with a damp tea towel and let it rest undisturbed for 45 minutes to autolyse.
Step 3 Adding the Salt
After the initial 45 minute rest period, sprinkle 10 grams of fine sea salt evenly over the top of your wet dough. Pour the remaining 25 grams of warm water right over the salt to help the fine grains dissolve easily. Work the salt into the dough by gently dimpling the dough with your fingertips and squeezing it through your hands for about two minutes. The dough will feel a little wet and slippery at first, but it will quickly absorb the extra water as you fold it over itself repeatedly. Cover the bowl again and let it rest for another 30 minutes.
Step 4 Performing Stretch and Folds
To build strong gluten structure without heavy tiring kneading, you will perform four sets of stretch and fold techniques spaced 30 minutes apart over two hours. To do a stretch and fold, wet your clean hands with cold water so the dough does not stick to your fingers. Reach down along the far side of the bowl, grab the edge of the dough, stretch it gently upward without tearing it, and fold it back over the center of the dough. Rotate the bowl a quarter turn and repeat this lifting and folding motion on all four sides. Cover the bowl and repeat this gentle stretching process every 30 minutes for a total of four complete rounds.
Step 5 Bulk Fermentation
After completing your last round of stretch and folds, cover the bowl tightly with plastic wrap or a damp damp cloth. Allow the dough to sit at warm room temperature for bulk fermentation. This crucial resting phase usually takes between four to six hours depending on how warm your kitchen is. Look for clear signs that the dough is ready, such as the volume increasing by about fifty percent, visible air bubbles on top, slightly domed edges, and a light airy bounce when you gently shake the bowl.
Step 6 Pre Shaping the Dough
Lightly dust your clean kitchen counter with a tiny bit of flour. Gently tip the fermented dough out of the bowl onto the work surface, taking care not to pop all the nice air bubbles inside. Take your dough scraper and fold the edges of the dough inward toward the center to form a loose round ball. Flip the ball over so the smooth top surface faces upward. Cup your hands lightly around the dough and gently drag it toward your body across the counter to build light surface tension on the outer skin. Let the ball sit uncovered on your counter for 25 minutes to rest its gluten structure.
Step 7 Final Shaping into a Loaf
Lightly sprinkle flour over the top of your rested dough ball. Flip the dough over so the sticky bottom side faces up again. Pull the bottom edge gently down toward you, then fold it up over the middle of the dough. Stretch the left and right sides outward gently, then fold them inward over the center like a clean envelope letter. Roll the dough up firmly from the top edge down toward you to form a tight smooth cylinder or ball shape. Cup your hands around the shape and gently roll it against the unfloured counter to make a smooth tight outer skin across the entire top surface.
Step 8 Proofing in the Basket
Generously coat the inside of a round banneton proofing basket or a medium bowl lined with a clean cotton tea towel using rice flour. Rice flour is fantastic because it does not contain gluten and will completely prevent your dough from sticking to the basket walls. Carefully lift your shaped dough with a bench scraper and place it upside down into the lined proofing basket so the smooth top skin faces the bottom of the basket and the seam faces up. Cover the basket tightly with a clean plastic bag or shower cap and place it into your refrigerator for a cold slow fermentation lasting 12 to 18 hours.
Step 9 Scoring the Dough
Place a heavy cast iron Dutch oven with its lid on into your home oven. Preheat your oven to 450 degrees Fahrenheit for at least 45 minutes so the Dutch oven becomes extremely hot. Take your chilled dough directly out of the refrigerator. Cut a square piece of parchment paper and place it over the top of the proofing basket, then place a small cutting board over that and carefully flip the basket upside down. Lift the basket away to reveal your cold dough round. Use a super sharp baker razor blade or clean razor knife to slice a confident cut one half inch deep across the top of the dough at a slight angle.
Step 10 Baking the Bread
Carefully remove the blazing hot Dutch oven from your home oven using thick oven mitts and set it on a heat safe pad. Gently lift the parchment paper corners and lower your scored dough directly into the center of the hot pot. Put the lid tightly back on the pot and return it to the hot oven immediately. Bake with the lid on for 20 minutes; the trapped steam inside will help the bread expand fully and create a light thin crust. After 20 minutes, carefully remove the pot lid and reduce the oven temperature to 410 degrees Fahrenheit. Bake uncovered for another 20 to 25 minutes until the outer crust turns a deep rich golden brown color.
Step 11 Cooling the Loaf
Carefully remove the baked sourdough loaf from the hot Dutch oven using tongs or oven mitts and set it onto a wire cooling rack. Resist all temptation to cut into your hot bread immediately. The inside crumb is still completing its delicate cooking process with internal steam, so cutting it open early will make the inside gummy and wet. Allow your fresh sourdough loaf to cool down completely to room temperature for at least two to three hours before taking a bread knife to slice into it.
Why This Recipe Is Special
This homemade sourdough bread recipe is truly special because it returns to the simple roots of ancient traditional baking without any shortcuts or chemical additives. Unlike modern fast bakery breads that use commercial yeast to force dough to rise in under an hour, this recipe honors the slow beauty of natural wild fermentation. The extended fermentation time allows beneficial wild yeast and healthy lactic acid bacteria to slowly transform simple flour into a rich nutritious food that tastes incredible. Every step relies on natural physical movements like folding and resting, which build wonderful dough strength without tiring your arms or needing fancy electric kitchen equipment.
The health benefits of eating traditional long fermented sourdough bread are truly remarkable for everyday wellness. During the long slow fermentation process, natural lactobacilli bacteria convert carbohydrates into beneficial organic acids while breaking down tough gluten structures. This natural process makes sourdough far easier to digest for people who feel bloated after eating standard factory processed white breads. Additionally, the sourdough process neutralizes phytic acid, an antinutrient naturally found in grains that normally blocks your body from absorbing vital minerals like iron, zinc, magnesium, and calcium. By reducing phytic acid, sourdough allows your body to easily absorb all the rich vitamins and natural minerals contained within high quality wheat flour.
Taste and texture are where this sourdough loaf genuinely shines bright above all other breads. The slow fermentation creates complex organic acids that produce a distinctive mild tang that balances perfectly with the natural sweetness of baked grain. The crust becomes delightfully crisp and crackly with beautiful caramelized flavor notes, while the interior crumb stays exceptionally moist, soft, and airy with lovely small and large holes. This ideal balance of crunch and softness makes every single slice a rewarding culinary experience, whether enjoyed fresh, toasted, or made into gourmet sandwiches.
Extra Tips for Better Taste
To take your sourdough bread from good to absolute bakery quality, consider trying a few simple creative baking enhancements. Try swapping 100 grams of your white bread flour with whole wheat flour, dark rye flour, or spelt flour during the mixing step. Adding these alternative whole grains introduces a rich earthy nuttiness and dark golden color to your finished loaf without making the dough overly heavy or dense.
You can also fold delicious tasty extras into your dough during the third set of stretch and folds. Try adding half a cup of shredded sharp cheddar cheese along with fresh chopped jalapeños for a savory spicy twist. Roasted garlic cloves paired with fresh chopped rosemary or thyme create an amazingly aromatic loaf that will fill your entire home with an irresistible smell while baking. For a sweet savory combination, try folding in toasted walnuts, dried cranberries, and a touch of cinnamon.
Paying close attention to steam control during baking is another secret trick for achieving an extra crispy blistered crust. If you want even more blisters on your outer crust, spray two or three light mists of cold water directly onto your dough right before putting the Dutch oven lid on. You can also drop two small ice cubes underneath the parchment paper inside the hot pot just before shutting the lid to generate an extra boost of trapped steam.
Final Thoughts
Baking your own artisan sourdough bread loaf at home is a deeply rewarding adventure that connects you with time honored kitchen traditions and simple wholesome food. While it requires patience and a little practice to learn how dough behaves, the wonderful smell of baking bread and the satisfying sound of a crunchy crust make every single minute worthwhile. Do not be discouraged if your very first loaf is not picture perfect, because even a slightly flat sourdough loaf tastes delightfully delicious when toasted with butter. Enjoy every step of the learning journey, share your fresh warm loaves generously with people you love, and celebrate the simple joy of creating nutritious bread with your own hands.
Nutrition Details
Here is the approximate nutrition breakdown for a complete sourdough loaf and per single slice assuming a typical loaf yields 10 equal slices:
| Nutrient | Total Whole Loaf | Per Serving One Slice |
| Calories | 1850 kcal | 185 kcal |
| Carbohydrates | 380 grams | 38 grams |
| Dietary Fiber | 15 grams | 1.5 grams |
| Sugars | 2 grams | 0.2 grams |
| Protein | 55 grams | 5.5 grams |
| Total Fat | 5 grams | 0.5 grams |
| Saturated Fat | 1 gram | 0.1 grams |
| Sodium | 3900 milligrams | 390 milligrams |
| Potassium | 500 milligrams | 50 milligrams |
| Calcium | 80 milligrams | 8 milligrams |
| Iron | 22 milligrams | 2.2 milligrams |
Disclaimer
This sourdough bread recipe and all nutritional information provided in this guide are intended strictly for general educational and informational purposes. Everyone has a unique body, and individual health conditions or dietary needs vary from person to person. While many people find sourdough bread easier to digest due to natural wild fermentation, this recipe still contains gluten and is not suitable for individuals diagnosed with celiac disease or severe gluten allergies. Actual nutrition numbers may vary based on specific ingredient brands, flour protein percentages, fermentation timing, and slice sizes. Always listen to your own body and consult a qualified healthcare doctor or certified nutritionist for personalized advice regarding your daily dietary choices