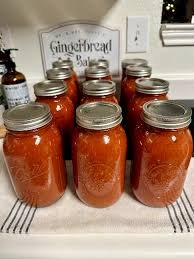
Canning homemade sauces is one of the most rewarding kitchen projects you can ever start because it allows you to capture the fresh flavor of ripe summer vegetables and keep it in your pantry for months. This article focuses on a classic, rich tomato sauce recipe that is specially formulated for safe home canning using a simple water bath method. When you make your own canned sauce at home, you take full control of every single element that goes into your food, from the ripe tomatoes to the herbs and seasonings. You do not have to worry about weird preservatives, chemical thickeners, or hidden sugars that are often packed into store bought jars. Instead, you get a clean, rich, and naturally sweet sauce that brings pure comfort whenever you open a jar. Canning your own sauce is a timeless skill that connects you to simple living, self sufficiency, and wholesome cooking traditions.People absolutely love this canned homemade sauce recipe because the depth of flavor is far superior to anything you can buy at a grocery store. Store bought sauces often taste flat, overly salty, or excessively sweet due to artificial additives, but this homemade version lets the true sweetness of natural tomatoes shine through bright and clear. Home cooks also love the convenience of having a shelf stable sauce ready to go on busy weeknights when cooking from scratch feels like too much work. Imagine coming home tired after a long day and knowing that a delicious, comforting dinner is only a few minutes away because all you need to do is twist open a glass jar. The wonderful smell of simmered tomatoes, garlic, and fresh basil filling your kitchen when you warm up a jar is enough to make anyone fall in love with home canning. It is an easy way to bring warmth, comfort, and restaurant quality flavor to your family table without spending a lot of money.There are so many emotional, health, and practical reasons to make and preserve your own tomato sauce at home throughout the year. Emotionally, standing in your kitchen and filling sparkling clean glass jars with rich red sauce gives you a deep sense of pride, accomplishment, and connection to your food. It feels amazing to look at a pantry full of colorful jars that you made with your own two hands for your loved ones. From a health and fitness standpoint, making your own sauce allows you to customize the recipe to match your personal nutritional goals perfectly. You can easily control the amount of sodium, eliminate refined sugars, and keep the calories low while keeping the vitamins and anti oxidants high. If you grow tomatoes in your backyard garden, canning is also the best way to prevent food waste when your garden produces more tomatoes than you can eat fresh.Whether you want to capture the sweet taste of summer produce at its peak or prepare healthy meals for your family, this recipe is the ultimate guide for beginners. Canning can sometimes feel scary for newcomers who worry about safety, but this step by step process makes everything simple, safe, and stress free. You will learn how to properly acidify your sauce so it stays safe on the shelf, how to process the jars in hot water, and how to store them for long term freshness. Once you master this basic recipe, you will feel confident enough to preserve all kinds of wonderful sauces and food for your household. It is a valuable life skill that saves you money, improves your daily diet, and brings pure joy to your daily cooking routine. Let us get started with everything you need to create your very own kitchen preserved tomato sauce.Ingredients You Will NeedTo make about six pint jars of rich canned tomato sauce, you will need the following simple and fresh ingredients:12 pounds of fresh ripe tomatoes, preferably plum or Roma tomatoes for a thicker consistency0.25 cup of bottled lemon juice, required for safe acidity levels when preserving2 teaspoons of fine sea salt or specialized canning salt1 tablespoon of dried Italian seasoning, including oregano, thyme, and rosemary1 teaspoon of garlic powder, for a subtle background flavor without risking safety1 teaspoon of onion powder, to add natural sweetness and depth0.5 teaspoon of black pepper, finely ground0.25 cup of fresh basil leaves, finely chopped, optional for extra fresh aroma6 tablespoons of high quality olive oil, optional for adding when serving the sauce laterStep by Step MethodStep 1: Preparing Your Equipment and JarsBefore you begin cooking your tomatoes, you must prepare all your canning tools and make sure everything is clean. Wash six pint size glass canning jars, along with their flat metal lids and screw bands, in warm soapy water. Rinse them thoroughly under running water to remove all soap suds. Place a large canning pot fitted with a wire rack on your stove and fill it halfway with clean water. Submerge your clean jars in the water bath and heat the water until it is very hot but not boiling. Keep the jars in the hot water so they stay warm while you prepare the sauce. Warm jars will not crack when you pour hot tomato sauce into them later. Place your flat lids in a small bowl of hot water to soften the rubber seals, which helps create an airtight seal when processing.Step 2: Prepping and Washing the Fresh TomatoesSelect firm, ripe tomatoes that are free from rot, mold, or severe bruises. Wash all twelve pounds of tomatoes thoroughly under cool running water to remove any dirt or debris from the garden. Using a small sharp knife, core out the tough stem area from the top of each tomato. Cut a small shallow cross shape on the bottom of each tomato. This simple trick will make the skin peel off easily after blanching. Sort your tomatoes by size so they cook evenly during the quick scalding process. Keeping your work area clean and organized during this preparation step makes the whole canning experience much smoother and more enjoyable.Step 3: Blanching and Peeling the TomatoesFill a very large pot with water and bring it to a rolling boil over high heat. At the same time, prepare a large bowl filled with cold water and ice cubes next to your stove. Working in small batches, carefully drop several tomatoes into the boiling water and let them cook for about thirty to sixty seconds. You will see the skins start to split open near the cross mark you made earlier. As soon as the skins split, use a slotted spoon to lift the tomatoes out of the boiling water and submerge them immediately into the ice bath. The sudden change in temperature stops the cooking and shrinks the tomato inside the skin. After one minute in the ice bath, remove the tomatoes and slip the skins right off using your fingers.Step 4: Cooking down the Tomato SauceCut the peeled tomatoes into quarters and remove excess seeds if you prefer a smoother texture. Place the cut tomatoes into a large stainless steel or non reactive cooking pot. Use a potato masher to crush the first batch of tomatoes at the bottom of the pot to release their natural juices. Turn the heat to medium high and bring the crushed tomatoes to a gentle boil while stirring constantly. As the mixture heats up, add the rest of the cut tomatoes gradually. The heat will break down the tomatoes and release more liquid. Add the sea salt, dried Italian seasoning, garlic powder, onion powder, and black pepper to the pot. Stir well to distribute the spices evenly throughout the thick mixture.Step 5: Simmering for Texture and ConsistencyOnce the entire pot of tomatoes reaches a boil, lower the heat to medium low so the sauce simmers gently. Allow the tomato sauce to simmer uncovered for about forty five minutes to one hour, stirring occasionally to prevent the bottom from burning. During this time, excess water will evaporate, and your sauce will naturally thicken into a rich, flavorful paste consistency. If you prefer an ultra smooth sauce like commercial brands, you can use an immersion blender to puree the mixture directly in the pot. If you prefer a rustic style sauce, simply leave the soft tomato chunks as they are. Taste the sauce near the end of cooking and adjust the spices if necessary, keeping in mind that flavors will deepen over time.Step 6: Acidifying and Filling the JarsCarefully remove the hot jars from the canning pot using a jar lifter tool and place them on a clean towel spread across your kitchen counter. It is critical for safe canning to add acid to each jar before filling it with tomato sauce. Add two teaspoons of bottled lemon juice into the bottom of each pint jar. Do not use fresh lemon juice because its acidity level can vary, whereas bottled lemon juice has a guaranteed consistent pH level. Ladle the hot cooked tomato sauce into the jars over the lemon juice, using a wide mouth canning funnel to keep the glass rims clean. Leave exactly one half inch of empty space at the top of each jar, which is known as headspace.Step 7: Removing Air Bubbles and Sealing JarsGently slide a clean plastic spatula or bubble remover tool down the inside edges of each filled jar to release any trapped air bubbles. Recheck the headspace and add a little more sauce if needed to maintain the one half inch gap. Wipe the top rim of each glass jar thoroughly with a clean, damp paper towel to remove any sticky sauce residue, which could prevent a proper seal. Place a preheated flat lid on top of each jar, making sure the rubber seal rests flat against the glass rim. Screw the metal band over the lid until it is fingertip tight. Do not overtighten the metal band, as air needs to escape from the jar during the boiling water bath process.Step 8: Processing Jars in the Water BathPlace the sealed jars carefully back into the canning pot using your jar lifter, ensuring they stand upright and do not touch each other directly. Add more hot water to the pot if necessary so that the water level is at least one to two inches above the tops of the jars. Put the lid on the pot and turn the heat to high until the water reaches a full, vigorous boil. Start your timer only when the water comes to a complete boil. Process pint jars for thirty five minutes at a full boil. If you live at a high altitude above one thousand feet, you must add extra processing time according to standard canning guidelines to ensure complete food safety.Step 9: Cooling and Testing the SealsWhen the processing time is complete, turn off the heat and remove the pot lid. Let the jars sit in the hot water for five minutes to stabilize. Use the jar lifter to remove the jars carefully from the pot without tilting them, and place them on a thick towel in a draft free area on your counter. Allow the jars to cool undisturbed at room temperature for twelve to twenty four hours. As the jars cool, you will hear a delightful popping sound, which indicates that the vacuum seal has formed successfully. After twenty four hours, press the center of each metal lid. If the lid stays flat and does not flex up or down, your jar is properly sealed and safe for shelf storage.Why This Recipe Is SpecialThis homemade canning recipe is special because it combines traditional preservation techniques with a clean, natural taste profile that modern families love. Unlike commercial canned sauces that are loaded with corn syrup, artificial colors, and high levels of sodium, this recipe focuses on simple, wholesome ingredients that nourish your body. Tomatoes are naturally packed with lycopene, a powerful anti oxidant that becomes even more accessible to your body when tomatoes are cooked down into a sauce. By controlling the ingredients yourself, you create a nutrient dense food that supports heart health, improves digestion, and provides essential vitamins like vitamin C, vitamin A, and potassium.Another reason this recipe stands out is its incredible versatility in the kitchen. Having a batch of this sauce in your pantry means you have a fast foundation for dozens of delicious meals. You can use it as a classic pasta sauce, a base for homemade pizza, a rich liquid for braising meats, or an ingredient in soups, stews, and casseroles. Because the sauce is seasoned with balanced dried herbs, it adapts easily to any cuisine style you want to build upon when you open the jar. It saves you time during busy weeknights while ensuring that your family eats a meal made from real, unrefined ingredients.Finally, this recipe is tailored specifically for beginners who want to learn home preservation without feeling overwhelmed. It follows strict safety standards by using bottled lemon juice to guarantee proper acidity, making it perfectly safe for simple water bath canning. You do not need expensive pressure canning equipment to make this long lasting sauce. The clear instructions build your confidence step by step, turning what seems like a complex process into a joyful, satisfying kitchen tradition that you will look forward to every harvest season.Extra Tips for Better TasteTo elevate the flavor of your canned tomato sauce to restaurant quality standards, consider these creative tips:Roast the tomatoes in the oven before cooking them down into a sauce. Cut your tomatoes in half, lay them cut side up on baking sheets, and roast at four hundred degrees for thirty minutes. Roasting caramelizes the natural sugars in the tomatoes, giving your sauce a rich, smoky flavor profile.Mix different heirloom tomato varieties together instead of using just one type. Combining sweet yellow tomatoes, meaty Roma tomatoes, and acid rich early girl tomatoes creates a deeply complex flavor balance that single variety sauces cannot match.Sauté fresh onions and garlic in a tiny bit of olive oil and cook them down completely before blending them into the sauce base. While oil must be used very sparingly in canning recipes to ensure safety, a small amount adds a luxurious texture and deep rich taste.Add a tiny pinch of red pepper flakes during the initial simmer if you enjoy a mild, warming background heat in your pasta dishes. The spicy heat will infuse gently into the sauce as it sits in the jars over time.Always add fresh green herbs, such as chopped basil or parsley, right when you reheat the sauce to serve it, rather than during the canning process. Fresh herbs added at serving time bring a bright, vibrant aroma that makes the preserved sauce taste like it was just made from scratch.Final ThoughtsCanning your own homemade sauce is a wonderful journey that brings health, flavor, and tradition back into your home kitchen. Taking the time to select fresh ingredients, cook them down with love, and carefully preserve them in glass jars is an act of care for yourself and your family. Once you taste the rich, clean flavor of this homemade creation, store bought jarred sauces will simply never compare again. Enjoy every step of the process, take pride in your new skill, and savor the warm comfort of homemade goodness all year long.Nutrition DetailsHere is the estimated nutritional breakdown for this homemade canned tomato sauce recipe. The table displays values for the full batch as well as for a single serving size of one half cup.NutrientFull Batch TotalPer Serving (0.5 Cup)Calories480 kcal40 kcalTotal Carbohydrates108 g9 gDietary Fiber24 g2 gSugars72 g6 gProtein24 g2 gTotal Fat3 g0.25 gSaturated Fat0.5 g0 gSodium4800 mg400 mgPotassium5400 mg450 mgVitamin C240 mg20 mgVitamin A12000 IU1000 IUDisclaimerPlease note that dietary needs and health conditions vary from person to person, and individual results from consuming this recipe may change based on your personal metabolism and health background. The nutritional values provided in this article are estimations calculated using standard ingredient databases and may differ depending on the exact variety of tomatoes and seasonings you choose to use. Always follow approved home canning safety guidelines carefully to prevent spoilage or foodborne illness. If you have specific medical conditions, sodium restrictions, or dietary concerns, please consult with a qualified doctor or registered dietitian before making significant changes to your meal plan.