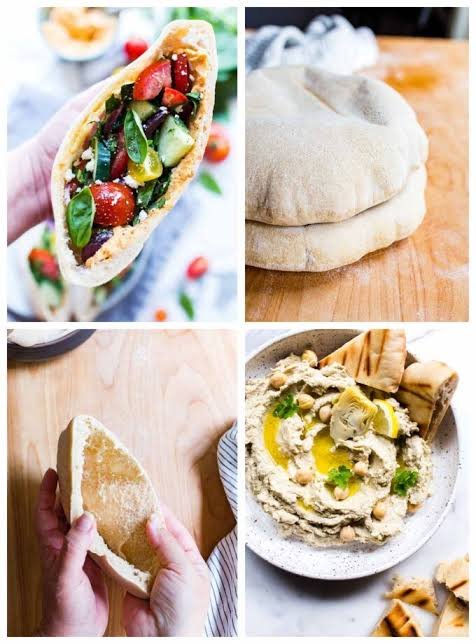
Baking your own bread at home is one of the most rewarding kitchen experiences you can ever have, and making homemade overnight sourdough pita bread takes that joy to a whole new level. This specific recipe focuses on using natural wild yeast from a sourdough starter to create soft, flexible, and perfectly hollow flatbreads that puff up magically in your oven or on a hot skillet. Unlike store bought pita breads that often feel dry, cardboard like, and full of artificial preservatives, this version is amazingly soft, flavorful, and incredibly fresh. The process relies on a long overnight fermentation, which means you mix the dough the day before, let time do all the heavy lifting while you sleep, and wake up to a dough that is rich in flavor and super easy to work with. If you have ever wanted to master flatbreads at home without spending hours stressed out in the kitchen, this simple guide will walk you through every single step with complete confidence.
People all over the world fall in love with this sourdough pita bread recipe because it combines simplicity with outstanding bakery quality results. The long overnight rest allows the natural lactic acid bacteria in the sourdough starter to break down the heavy starches and gluten in the flour, resulting in a deep, slightly tangy taste that commercial yeast simply cannot match. Home bakers also adore the mesmerizing moment when the flat disk of dough hits a burning hot surface and inflates like a pillow, creating a natural pocket inside that is ready to be filled with your favorite ingredients. Furthermore, it uses basic pantry staples that you likely already have on hand, requiring no fancy equipment or complex pastry skills to achieve success. It brings immense satisfaction to both beginners who are just starting their sourdough journey and experienced bakers looking for a reliable, delicious weekday flatbread routine.
There are so many wonderful reasons to make this recipe, whether you are looking for an emotional cooking project, a delicious family meal, or a health conscious addition to your weekly diet. On a quiet weekend afternoon, the simple act of kneading dough by hand can feel wonderfully soothing and grounding, offering a peaceful break from busy screens and daily work stress. From a taste perspective, nothing compares to the warm, comforting aroma of fresh sourdough baking in your home, bringing everyone straight into the kitchen with high anticipation for lunch or dinner. From a fitness and health standpoint, sourdough is far easier on your stomach than conventional breads because the slow fermentation partially pre digests the gluten and phytic acid, making nutrients easier for your body to absorb. Whether you want to host a fun Mediterranean night with friends or pack nutritious lunches for your family, this recipe fits every occasion beautifully.
Making this flatbread at home also gives you complete control over what goes directly into your body and onto your dinner table. Many commercial store breads contain hidden sugars, processed oils, and chemical shelf extenders that can leave you feeling bloated or sluggish after eating. By taking charge of your ingredients, you ensure that every slice is filled with pure flour, water, salt, olive oil, and living sourdough cultures that actively support your overall gut wellness. Additionally, learning to bake sourdough flatbreads builds real confidence in your culinary skills, proving that you do not need expensive store bought items to enjoy luxury quality food every single day. As you get comfortable with the rolling and puffing technique, you will find yourself reaching for this recipe week after week, creating delicious memories alongside healthy, wholesome food for the people you love most.
Ingredients You Will Need
To make eight beautiful sourdough pita breads, gather these clean, simple ingredients:
-
Active sourdough starter (fed and bubbly): 100 grams
-
Unbleached all purpose flour or bread flour: 400 grams
-
Warm water (around 80 degrees Fahrenheit): 230 grams
-
Extra virgin olive oil: 20 grams (about 1.5 tablespoons)
-
Fine sea salt or kosher salt: 8 grams (about 1.5 teaspoons)
-
Honey or maple syrup (optional, for soft texture): 10 grams (about 1 teaspoon)
Step by Step Method
Why This Recipe Is Special
This sourdough pita bread recipe stands out from basic bread recipes for several important reasons that benefit both your taste buds and your physical well-being. First and foremost is the exceptional flavor profile that only slow, natural fermentation can achieve. Unlike fast rising yeast breads that can sometimes taste bland or overly yeasty, sourdough delivers a subtle, pleasing tanginess balanced by the sweet, nutty tones of high quality flour. The texture is equally remarkable, offering a thin, crisp outer crust that gives way to a chewy, cloud like interior that holds fillings without ripping or breaking.
From a health perspective, overnight sourdough fermentation offers significant advantages for your digestive system. The long fermentation process allows micro-organisms to break down complex starches and gluten structures into simpler compounds that your body can digest with ease. Additionally, sourdough fermentation neutralizes phytic acid, an anti-nutrient found naturally in grains that normally blocks your body from absorbing essential minerals like magnesium, iron, and zinc. Consequently, eating sourdough pita bread provides your body with higher nutrient availability without causing the quick blood sugar spikes often linked to refined white bread products.
Another special aspect of this recipe is its ultimate versatility and cost effectiveness in daily meal planning. Making flatbread from scratch costs a fraction of what grocery store brands charge, yet delivers superior quality free from artificial emulsifiers or oil additives. You can use these sturdy yet soft pockets to hold scrambled eggs for breakfast, fresh Mediterranean salads for lunch, or grilled meats and grilled vegetables for family dinners. It empowers you to enjoy fresh, handcrafted artisan bread while keeping your kitchen pantry budget friendly and clean.
Extra Tips for Better Taste
-
Preheat Your Cooking Surface Thoroughly: The secret to getting that perfect hollow pocket inside your pita bread is intense, sudden heat. Whether using an oven or a stovetop cast iron pan, ensure it is screaming hot before placing your dough down, as this creates rapid steam expansion that forces the top and bottom layers apart.
-
Keep Your Starter Strong: Make sure your sourdough starter is fully active, bubbly, and fed within 4 to 8 hours before mixing your dough. A sluggish starter will result in dense flatbreads that struggle to inflate properly during baking.
-
Do Not Over Flour Your Work Surface: While a little flour prevents sticking, adding too much dry flour during rolling can dry out the dough surface, making it stiff and preventing it from trapping internal steam efficiently.
-
Store in a Sealed Fabric Towel Immediately: As soon as a pita finishes baking, wrap it directly inside a clean, dry cotton kitchen towel placed inside a plastic container or basket. The trapped steam inside the towel keeps the crust remarkably soft and pliable instead of hard or brittle.
-
Experiment with Whole Grains: For an earthier taste and extra dietary fiber, substitute up to 20 percent of the white flour with whole wheat or rye flour, adding a couple extra teaspoons of water to maintain proper dough hydration.
-
Add Dried Herbs for Custom Flavor: You can sprinkle dried oregano, garlic powder, or sesame seeds onto the dough during the final rolling step to create custom flavored flatbreads that pair amazingly well with dips like hummus or tzatziki.
Final Thoughts
Making your own overnight sourdough pita bread is a delightful, fulfilling kitchen habit that turns simple ingredients into extraordinary food. Once you experience the magic of watching a thin disc of dough puff up into a warm, hollow flatbread in your own home, you will likely never want to go back to store bought versions again. It allows you to slow down, connect with real culinary traditions, and feed your family healthy, additive free bread made with love and patience. So grab your sourdough starter, warm up your favorite baking pan, and enjoy every single step of this simple, tasty sourdough journey.
Nutrition Details
Here is the approximate nutritional profile for one sourdough pita bread out of an eight piece batch:
| Nutrient Component | Quantity Per Serving |
| Total Calories | 215 kcal |
| Carbohydrates | 41 grams |
| Dietary Fiber | 2 grams |
| Sugars | 1 gram |
| Protein | 6 grams |
| Total Fat | 3.5 grams |
| Saturated Fat | 0.5 grams |
| Sodium | 390 milligrams |
| Potassium | 75 milligrams |
| Calcium | 12 milligrams |
| Iron | 2.2 milligrams |
Disclaimer
This recipe and its nutritional information are provided strictly for educational and informational purposes. Everyone’s body is different, and individual dietary needs, digestive responses, and calorie requirements can change depending on your personal metabolism, health status, and physical activity levels. Nutritional values are estimates based on standard ingredients and may vary depending on the specific brands or measurements you use in your kitchen. If you have severe gluten sensitivities, celiac disease, or specific health conditions, consult with a qualified medical healthcare professional or a registered dietitian before introducing new fermented foods into your routine.