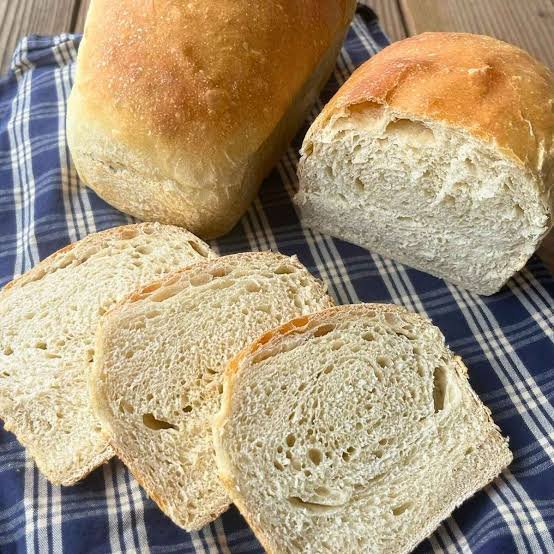
Sourdough sandwich bread is one of the most rewarding baked goods you can make right inside your home kitchen. This recipe is all about creating a soft, tender, and classic loaf of bread that holds up perfectly for everyday meals while giving you that wonderfully gentle tangy sourdough flavor. Unlike traditional hard crust artisan sourdough boules, sandwich sourdough bread is specifically baked to have a light and pillowy texture with a tender crust that is super easy to slice. You do not need any artificial ingredients, commercial yeast packets, or complex equipment to achieve an incredible result. Everything relies on wild yeast and beneficial bacteria that naturally live inside your active sourdough starter. When you learn how to bake your own sourdough sandwich loaf, you take full control of the ingredients going into your body while enjoying the comforting process of traditional bread making.
People all over the world fall deeply in love with sourdough sandwich bread because it combines nostalgic comfort with modern health awareness. Store bought bread often contains preservatives, hidden sugars, softeners, and artificial additives designed to keep slices soft on store shelves for weeks. In contrast, homemade sourdough bread relies on clean and simple pantry staples combined with a long natural fermentation process. This natural process transforms basic flour and water into a deeply flavorful loaf with a rich depth that store bought bread can never match. Families love how easy it is to slice for morning toast, packed school lunches, and grilled cheese sandwiches. The mild natural sour note balances beautifully with sweet spreads like honey or fruit jam, as well as savory fillings like roasted turkey, ripe tomatoes, and cheddar cheese.
Making a fresh loaf of sourdough sandwich bread is a wonderful habit to bring into your life for so many emotional, practical, and health reasons. Emotionally, the act of mixing, kneading, and shaping dough provides a grounding and peaceful escape from a busy lifestyle. Filling your home with the warm and welcoming smell of fresh bread baking in the oven creates pure happiness for anyone walking through your front door. From a health and fitness viewpoint, sourdough is much gentler on your digestive system compared to quick rise breads made with commercial yeast. The natural fermentation process breaks down gluten and phytic acid, making nutrients easier for your body to absorb without causing uncomfortable bloating. Whether you want to feed your family better food, save money, or simply enjoy a relaxing weekend baking project, this recipe fits seamlessly into your routines.
If you are a complete beginner to sourdough baking, you have found the absolute perfect starting point right here. Artisan sourdough round loaves can sometimes feel intimidating because of high water content, special proofing baskets, and super hot Dutch ovens. This sandwich loaf recipe uses a straightforward bread pan which holds the dough in place, guaranteeing a beautiful classic shape every single time. You do not need years of baking experience or complex professional techniques to achieve success. By following the simple step by step steps in this guide, you will gain confidence in handling dough, understanding fermentation times, and baking loaves that look and taste like they came from an expensive bakery shop. Let us dive into everything you need to create your very own fresh loaf today.
Ingredients You Will Need
Here is the exact list of simple ingredients you need to bake one full loaf of soft sourdough sandwich bread. Please use precise kitchen scale measurements in grams for the best results, though basic cup measures are provided for quick reference.
- Active sourdough starter (fed and bubbly): 100 grams or one half cup
- Unbleached bread flour or all purpose flour: 500 grams or four cups
- Lukewarm water (pure filtered water is best): 250 grams or one cup
- Whole milk or milk alternative (slightly warm): 60 grams or one quarter cup
- Unsalted butter (softened at room temperature) or olive oil: 30 grams or two tablespoons
- Honey or maple syrup: 25 grams or one tablespoon
- Fine sea salt or kosher salt: 10 grams or two teaspoons
Step by Step Method
Step 1: Prepare Your Active Starter
Before you begin mixing your dough, you must ensure your sourdough starter is active and ripe. Feed your starter about four to six hours before you plan to start baking. Keep it in a warm location until it doubles in size, shows plenty of bubbles throughout the jar, and smells sweet yet gently sour. You can test its readiness by dropping a small spoonful into a bowl of warm water. If the starter floats to the top, it is completely ready to bake your bread.
Step 2: Combine the Wet Ingredients
In a large mixing bowl, combine the lukewarm water and warm milk. Add your active sourdough starter into the liquid mix. Use a fork or wooden spoon to stir everything together until the starter dissolves into a milky white liquid. Next, add the honey and softened butter into the bowl. Whisk lightly so the ingredients mix evenly.
Step 3: Mix the Flour and Salt
Pour all of the bread flour and fine sea salt directly into the bowl with your liquid mixture. Use a sturdy wooden spoon or a silicone spatula to combine the dry and wet ingredients. Stir continuously until all loose dry flour disappears and a shaggy dough ball forms. If the mixture feels a bit dry, add one extra teaspoon of warm water at a time. Cover the bowl loosely with a clean damp kitchen towel or plastic wrap and let it sit undisturbed for thirty minutes. This quiet resting period is called the autolyse phase, which helps the flour fully absorb moisture and makes the dough much easier to knead later.
Step 4: Knead the Dough
After the thirty minute rest, transfer the dough onto a clean kitchen surface. You do not need to heavily flour your counter unless the dough feels excessively sticky. Knead the dough gently using the palms of your hands. Push the dough forward, fold it back over itself, turn it slightly, and repeat. Continue kneading for about eight to ten minutes. As you work, you will notice the rough shaggy dough transforms into a smooth, elastic, and supple ball. If you have a stand mixer fitted with a dough hook attachment, you can mix on low speed for five to six minutes instead.
Step 5: First Bulk Fermentation
Form your kneaded dough into a neat round ball. Lightly oil your large mixing bowl with a tiny splash of olive oil to prevent sticking. Place the dough ball back into the bowl and turn it over once so the surface gets lightly coated in oil. Cover the bowl tightly with plastic wrap or a bowl cover to trap moisture inside. Allow the dough to sit at room temperature for six to eight hours. During this bulk fermentation period, the wild yeast slowly consumes the sugars in the flour, producing gases that cause the dough to rise. The exact time will depend on your kitchen temperature. Warm rooms make dough rise faster, while cool rooms slow down the process. Look for the dough to increase in size by roughly fifty to seventy five percent and feel airy.
Step 6: Shape the Sandwich Loaf
Lightly grease a standard loaf pan measuring eight and a half inches by four and a half inches with butter or vegetable oil. Gently turn your fermented dough out onto a clean work surface. Gently press down on the dough with your fingertips to flatten it into a thick rectangular shape, releasing large air bubbles in the process. Fold the left side of the rectangle into the center, then fold the right side over it, much like folding an envelope letter. Starting from the top edge furthest from you, roll the dough down tightly into a smooth log. Pinch the bottom seam firmly with your fingers to seal it closed.
Step 7: Final Proofing in the Pan
Carefully lift your shaped dough log and place it seam side down into your greased loaf pan. Cover the loaf pan gently with a light kitchen towel or an upside down plastic container so it does not dry out on top. Let the loaf undergo its final proof at room temperature for two to four hours. During this phase, the dough will expand upward until it rises about one inch above the rim of the pan. It should look puffy and spring back slowly when gently poked with a finger.
Step 8: Bake to Perfection
Preheat your home oven to 375 degrees Fahrenheit or 190 degrees Celsius. Ensure your oven rack is set in the middle position. Once fully preheated, place the loaf pan inside the oven. Bake for thirty five to forty minutes. The top of the bread should turn a deep golden brown color, and the loaf should sound hollow when you tap gently on the top crust. If the top begins to brown too quickly after twenty minutes, loosely lay a piece of aluminum foil over the top to protect it while the inside finishes cooking completely.
Step 9: Cool Completely
Remove the loaf pan safely from the oven using oven mitts. Let the hot bread rest inside the pan for five minutes. Then, gently tip the pan sideways to release the loaf and transfer it onto a wire cooling rack. It is vital to let your sourdough sandwich bread cool down completely to room temperature for at least two hours before slicing into it. Slicing warm bread traps steam, making the interior texture gummy and dense. Patience rewards you with a soft, clean cut slice every single time.
Why This Recipe Is Special
This sourdough sandwich bread recipe stands out because it blends traditional artisan baking with practical daily needs. Most classic sourdough recipes result in dark, thick crusts with large open air holes. While those rustic loaves are wonderful for dipping into olive oil or soups, they are not ideal for daily sandwich making because fillings slip right through the holes. This recipe incorporates soft butter and warm milk into the dough, which enriches the crumb and softens the crust. You get a dense, fine structure that holds sandwich spreads beautifully while maintaining incredible softness for days.
From a nutrition standpoint, sourdough is a true superpower for your daily diet. Traditional long fermentation allows natural lactobacilli bacteria to pre digest the starches in the grain. This lowers the glycemic index of the bread, which helps prevent sharp spikes in your blood sugar levels after eating meals. Furthermore, the natural acids generated during fermentation neutralize phytic acid, an anti nutrient found in grains that normally blocks your body from absorbing important minerals like magnesium, zinc, iron, and calcium. As a result, you digest this bread with ease and absorb far more rich nutrients with every bite.
The flavor profile of this loaf strikes a delicate harmony that appeals to everyone in your home. Some sourdough recipes yield an intensely sour, sharp bite that young kids or sensitive eaters might dislike. By adding a small touch of honey and milk, this loaf achieves a balanced, buttery, and lightly sweet profile with just a subtle hint of background tang. It tastes fresh, wholesome, and truly handmade in every sense of the word.
Extra Tips for Better Taste
To elevate your sourdough sandwich bread to an even higher level, consider trying a few simple creative tips and variations.
First, you can customize the fat source you use in the dough. Swapping unsalted butter for rich avocado oil or extra virgin olive oil gives the loaf a slightly different aroma and a wonderfully moist texture. If you enjoy a touch of subtle nuttiness, replace fifty grams of the white bread flour with whole wheat flour or rye flour. This tiny addition adds extra dietary fiber and deepens the warm golden color of your baked bread without compromising the soft light texture.
Second, consider adding delightful seed toppings to the top of your loaf before baking. Just before putting the pan into the oven, lightly brush the top of the dough with water or milk, then sprinkle sesame seeds, rolled oats, poppy seeds, or sunflower seeds across the top. Press them down very gently so they stick during the baking process. This adds a lovely crunch and extra nutrition to every single slice.
Third, manage your ambient kitchen temperature carefully. Yeast loves warmth, but extreme heat can make your dough sour too quickly before developing proper structure. If your house is chilly, place your dough inside an turned off oven with the interior light turned on to create a warm mini chamber. If your home is very hot, keep an eye on your rising times so your dough does not over proof and collapse.
Finally, proper storage keeps your fresh sourdough soft for maximum enjoyment. Avoid storing homemade bread in the refrigerator because cold temperatures actually cause bread to stale faster. Instead, store your sliced loaf at room temperature inside an airtight plastic bag or a wooden bread box for up to four days. For longer storage, slice the cooled loaf completely, place parchment paper between slices, freeze them in a sealed freezer bag, and pop individual slices straight into your toaster whenever you want hot fresh bread.
Final Thoughts
Baking your own sourdough sandwich bread is a simple, fulfilling, and deeply rewarding journey that brings wholesome food back to your family table. With just flour, water, salt, a bit of milk, butter, and a healthy sourdough starter, you can create a beautiful loaf that surpasses store bought options in both flavor and nutrition. Do not feel discouraged if your very first loaf is not absolute perfection, because bread making is a gentle art that improves with a bit of practice. Enjoy every step of the process, from mixing the wet ingredients to enjoying that very first warm toast slice in the morning. Happy baking to you!
Nutrition Details
Below is an estimated nutrition breakdown for one full loaf of homemade sourdough sandwich bread, along with the estimated nutritional values calculated per individual slice assuming the loaf yields twelve equal slices.
Recipe Nutrition Summary Table
| Category | Entire Loaf Total | Per Serving Slice (1 of 12) |
| Calories | 2180 kcal | 181 kcal |
| Carbohydrates | 410 g | 34.1 g |
| Dietary Fiber | 16 g | 1.3 g |
| Sugars | 22 g | 1.8 g |
| Protein | 56 g | 4.6 g |
| Total Fat | 32 g | 2.6 g |
| Saturated Fat | 17 g | 1.4 g |
| Cholesterol | 70 mg | 5.8 mg |
| Sodium | 3900 mg | 325 mg |
| Potassium | 620 mg | 51.6 mg |
Please note that exact nutritional values will shift slightly depending on the specific brand of flour, milk, butter, and sweetener you select for your baking.
Disclaimer
This article and recipe are created for general educational and informational purposes only. Everyone’s body, digestive system, and nutritional requirements are completely unique, meaning individual health outcomes and experiences with sourdough products may vary. While long natural sourdough fermentation generally reduces gluten content and improves overall digestibility, this recipe is not gluten free and is not suitable for individuals diagnosed with celiac disease or severe wheat allergies. Always listen to your own body and consult with a qualified doctor or certified nutritionist regarding specific dietary needs, allergies, or health conditions.