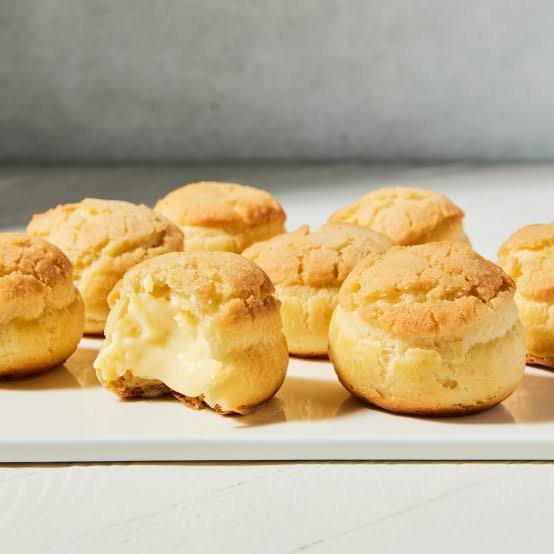
Custard filled cream puffs are one of the most delightful desserts you can ever make in your home kitchen. This classic pastry consists of a light outer shell filled to the brim with rich vanilla custard. The shell is made using choux pastry which bakes into a hollow golden ball that is crunchy on the outside and wonderfully airy on the inside. When you bite into one of these delicious treats, the rich cream bursts out to create a heavenly contrast of textures. Making this recipe at home brings the exact feeling of visiting a high end French bakery without requiring advanced chef skills. Anyone can master this recipe by following basic steps and using simple everyday items from the pantry.
People all around the world love cream puffs because they offer a gentle sweetness that never feels overwhelming. The outer pastry shell is light and buttery while the custard filling inside feels smooth and comforting on your tongue. Children and adults alike adore the fun experience of eating these small round pastries that seem like magic gifts. You can serve them plain or decorate the top with powdered sugar or melted chocolate syrup to make them look extra special. They are also super popular because they look fancy enough for big parties yet taste simple enough for a cozy family Sunday evening. Every bite offers a perfect balance of crispy crust and velvety center that makes you want to reach for another one immediately.
This recipe is ideal to make whenever you want to bring pure joy to your friends and loved ones during special gatherings. Making a fresh batch of cream puffs fills your entire kitchen with the warm inviting scent of butter and vanilla which immediately boosts everyone’s mood. They are wonderful for birthday parties, holiday dinners, baby showers, or romantic dates because they bring an emotional feeling of warm hospitality. Even if you are watching your fitness, you can enjoy these homemade treats because you control every single ingredient that goes into the pot. Compared to store bought desserts that contain hidden preservatives, homemade cream puffs let you use real milk, wholesome eggs, and organic sugar so you can treat yourself while keeping things clean and fresh.
Learning to create this pastry will also boost your kitchen confidence immensely as you watch basic liquids transform into towering puffed pastries. The science behind the rise is fascinating yet very easy to execute once you see how eggs and steam work together in the hot oven. Cooking at home allows you to pause, relax, and turn simple baking into a fun weekend project with your children or partner. Tasting the hot creamy middle paired with the crispy crust gives a sense of accomplishment that store bought sweets can never replace. Once you learn the rhythm of making custard and whipping choux dough, you will want to prepare this magnificent dessert for every family event throughout the year.
Ingredients You Will Need
To make the light choux pastry shells you will need the following fresh items:
- 1 cup of fresh cold water
- 8 tablespoons of unsalted butter cut into small pieces
- 1/2 teaspoon of table salt
- 1 tablespoon of granulated white sugar
- 1 cup of all purpose flour sifted carefully
- 4 large room temperature whole eggs
To make the smooth custard filling you will need these sweet items:
- 2 cups of whole milk for rich texture
- 4 large egg yolks separated from whites
- 1/2 cup of granulated white sugar
- 3 tablespoons of cornstarch for thickening
- 2 tablespoons of unsalted soft butter
- 1 teaspoon of pure vanilla extract
- 1/4 teaspoon of fine salt
To garnish your finished cream puffs before serving you can use:
- 2 tablespoons of powdered sugar for dusting
- 1/4 cup of melted sweet dark chocolate for drizzling
Step by Step Method
Step 1 Prepare the Vanilla Custard
Start by making the custard filling first because it needs plenty of time to chill in the refrigerator before you assemble the pastry. Take a medium heavy saucepan and pour in two cups of whole milk. Set the pan over medium heat and warm the milk until steam starts to rise gently from the top but do not let it boil completely.
While the milk heats up, take a heatproof mixing bowl and combine four egg yolks with one half cup of white sugar. Whisk the eggs and sugar together vigorously for about two minutes until the mixture turns pale yellow and slightly thick. Add three tablespoons of cornstarch and one quarter teaspoon of fine salt to the egg mixture, then whisk again until smooth.
Now slowly pour a small cup of the warm milk into the egg yolk mixture while whisking constantly without stopping. This step tempers the eggs so they become warm without scrambling into solid chunks. Once mixed, pour the warm egg liquid back into the main saucepan with the rest of the heated milk.
Place the saucepan back on the stove over medium low heat. Whisk the mixture continuously for about five to seven minutes. Make sure to scrape the bottom and corners of the pan so nothing burns. As the liquid warms up, it will suddenly thicken into a rich glossy pudding consistency.
Remove the pan from the stove as soon as big bubbles pop at the surface. Stir in two tablespoons of soft butter and one teaspoon of pure vanilla extract until completely melted and incorporated. Pour the hot custard through a fine strainer into a clean glass bowl to remove any potential lumps.
Cover the top of the custard directly with plastic wrap, pressing the plastic against the surface so a thick skin does not form. Place the bowl into your refrigerator for at least two hours until it becomes very cold and set.
Step 2 Make the Choux Pastry Dough
Preheat your kitchen oven to 400 degrees Fahrenheit or 200 degrees Celsius. Line two large baking sheets with parchment paper or silicon baking mats so the pastries will not stick.
Take a deep saucepan and combine one cup of water, eight tablespoons of butter pieces, one tablespoon of sugar, and one half teaspoon of salt. Place the pan over medium high heat and bring the liquid to a rolling boil so the butter melts completely into the water.
As soon as the mixture boils, turn the heat down to low and add one full cup of all purpose flour all at once. Immediately stir the mixture vigorously using a sturdy wooden spoon. Keep stirring for two minutes as the flour absorbs the liquid.
A smooth ball of dough will form and pull away clean from the sides of the pan. You will see a thin white film form on the bottom of the hot pan, which means the excess moisture has successfully evaporated.
Remove the saucepan from the stove and let the hot dough cool down for five minutes until it feels warm rather than burning hot. You can spread the dough slightly around the bowl to speed up the cooling process.
Add the four room temperature eggs one by one into the warm dough. After adding the first egg, beat the mixture strongly with your wooden spoon or an electric hand mixer until the egg is completely absorbed before adding the next one. The dough will look slick and separated at first, but keep mixing and it will come back together into a glossy shiny batter.
The finished choux dough should be thick enough to hold its shape on a spoon, but soft enough to drop slowly when lifted.
Step 3 Pipe and Bake the Pastry Shells
Spoon the glossy choux dough into a piping bag fitted with a large round tip. If you do not have a piping bag, you can simply use a clean plastic freezer bag with one corner cut off, or use two small spoons to scoop the dough.
Pipe round mounds of dough onto your prepared baking sheets, making each mound about two inches wide and one inch high. Leave two inches of space between each mound because they will expand to twice their size during baking.
Wet your fingertip with a little cold water and gently tap down any sharp points on top of the dough mounds. This prevents the top tips from burning in the oven.
Place the baking sheets into the preheated oven and bake at 400 degrees Fahrenheit for twenty minutes without opening the oven door. Opening the door too early introduces cold air which can cause the delicate rising puffs to collapse.
After twenty minutes, reduce the oven temperature to 350 degrees Fahrenheit or 175 degrees Celsius. Continue baking for another fifteen to twenty minutes until the shells are golden brown and sound hollow when tapped on the bottom.
Turn off the oven and prop the oven door open slightly with a wooden spoon. Let the shells sit inside the warm oven for ten minutes so the insides dry out completely. Remove the baking sheets and use a toothpick to poke a tiny hole in the side of each shell to release remaining steam, then cool fully on a wire rack.
Step 4 Fill the Cream Puffs
Once the baked shells are completely cool to the touch and the vanilla custard is thoroughly chilled, you are ready to bring them together.
Scoop the chilled custard into a clean piping bag fitted with a small pointed tip. Alternatively, you can use a serrated knife to gently slice each puff shell in half horizontally.
If using a piping tip, insert the tip gently into the small hole you poked earlier in the side or bottom of the pastry shell. Press the bag steadily to fill the cavity until you feel the shell swell slightly and become heavy.
If you cut the shells in half, simply scoop a generous spoonful of cold custard into the bottom shell half and place the top shell cap back on like a little sandwich.
Arrange all filled cream puffs neatly on a serving platter. Sprinkle two tablespoons of powdered sugar through a small strainer over the tops to give them a snowy romantic look, or drizzle with warm melted chocolate if desired. Serve immediately while fresh.
Why This Recipe Is Special
This home recipe stands out because it brings professional bakery quality directly into your kitchen without requiring complicated ingredients or tools. Most commercial bakery cream puffs use artificial custard mixes and heavy shortening that leave an oily feel in your mouth. By contrast, this recipe relies on real eggs, fresh whole milk, real butter, and pure vanilla extract which yields a clean delicious flavor. The pastry rises using pure natural steam created inside the hot dough rather than chemical baking powder, resulting in an amazingly light crisp texture that melts in your mouth effortlessly.
From a wellness perspective, making your own cream puffs gives you complete command over the quality and quantity of ingredients. You can reduce the sugar content in the custard filling or choose organic dairy products to align with your personal nutrition preferences. Because the pastry shell is mostly air inside, each puff feels light and satisfying without leaving you feeling overly stuffed or heavy. Enjoying a homemade dessert with real ingredients supports a balanced lifestyle where sweet treats are made with love and wholesome nutrition in mind.
The taste profile of this recipe achieves a rare balance between buttery richness and light airy sweetness. The shell brings a subtle salty crunch while the custard offers a smooth creamy sweetness infused with aromatic vanilla notes. It satisfies your sweet cravings completely without feeling cloying or heavy on your stomach. The contrast between the cold filling and the room temperature crisp shell creates a fun sensory experience with every single bite you take.
Extra Tips for Better Taste
To make your cream puffs even more extraordinary, you can experiment with fun flavor twists in the custard filling. Try infusing your warm milk with fresh lemon zest, orange peel, or a cinnamon stick before whisking it with the egg yolks. If you love coffee flavors, dissolve one teaspoon of instant espresso powder into the warm custard for a mocha themed treat.
Another great trick for enhanced taste is to fold a half cup of freshly whipped heavy cream into your chilled custard before filling the pastry. This transforms the standard custard into a diplomat cream, which makes the filling feel even fluffier and lighter on your tongue.
For a unique crunchy texture on top, you can make a quick craquelin topping. Mix equal parts soft butter, brown sugar, and flour into a thin dough, roll it flat, cut tiny circles, and lay one circle on top of each raw dough mound before baking. The topping bakes into a crunchy sweet cookie crust right on top of the cream puff.
Always remember that temperature control is your best friend when baking choux pastry. Make sure your eggs are at full room temperature before adding them to the warm dough so the mixture does not break or separate. If your oven cooks unevenly, rotate your baking sheets halfway through baking, but only after the first twenty minutes have passed to avoid deflating the dough.
Final Thoughts
Baking custard filled cream puffs at home is an immensely satisfying cooking journey that fills your home with warm aromas and brings pure joy to anyone who tastes the final creation. Do not feel intimidated by the fancy French name or the step by step process, because every part of this recipe is simple when taken one step at a time. Once you try your first homemade puff, you will realize how much better and fresher it tastes compared to any shop bought sweet. Gather your basic ingredients, invite a friend or child to help you whisk, and enjoy the magical experience of watching simple dough transform into golden crispy balls of delight.
Nutrition Details
Here is the approximate nutritional information calculated for one single serving of a custard filled cream puff based on a total yield of sixteen medium cream puffs from this recipe.
| Nutrient Item | Quantity Per Serving | Daily Value Percentage |
| Total Calories | 165 kcal | 8 percent |
| Carbohydrates | 16 grams | 6 percent |
| Dietary Fiber | 0.5 grams | 2 percent |
| Total Sugars | 8 grams | 16 percent |
| Total Fat | 9 grams | 12 percent |
| Saturated Fat | 5 grams | 25 percent |
| Cholesterol | 95 milligrams | 32 percent |
| Sodium | 110 milligrams | 5 percent |
| Protein | 4 grams | 8 percent |
| Calcium | 45 milligrams | 4 percent |
| Iron | 0.7 milligrams | 4 percent |
| Potassium | 70 milligrams | 2 percent |
The ingredients in this recipe provide a simple combination of energy giving carbohydrates, proteins from eggs and milk, and healthy fats from butter. The daily percentages are based on a standard two thousand calorie daily diet.
Disclaimer
Please keep in mind that everyone’s body and health needs are unique, so individual nutritional responses may vary based on your specific metabolism, fitness level, and general health status. The nutritional values provided in the table above are approximate estimates calculated using standard ingredient databases and may change depending on the specific brands or substitutions you use in your kitchen. If you have specific dietary restrictions, lactose intolerance, egg allergies, or medical conditions like diabetes, please consult with a qualified doctor or certified nutritionist before adding new treats to your regular meal plan. Enjoy all sweet treats in moderation as part of a well balanced lifestyle