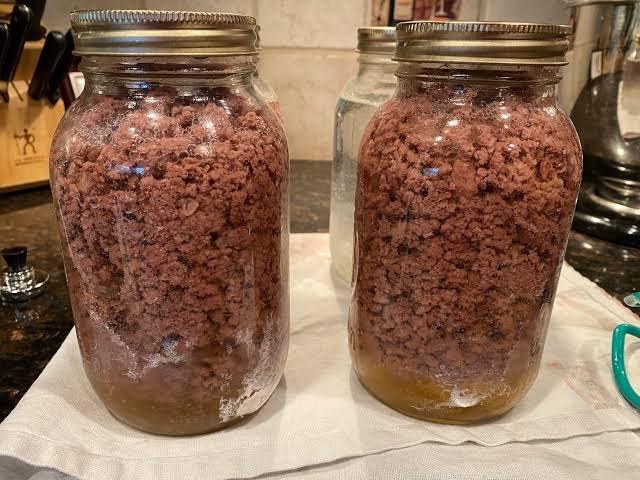
Learning how to preserve meat at home is one of the most rewarding kitchen skills you can ever pick up. This ultimate recipe and guide focuses on canning ground beef using a pressure canner so you can stock your pantry with delicious, shelf stable meat that is ready to eat whenever you need it. Canning meat might sound a little scary if you have never tried it before, but the entire process is actually very straightforward and simple when you follow safe rules. By putting ground beef into glass jars and heat processing it properly, you seal in incredible flavor while keeping the meat safe for long term storage without any refrigeration. Imagine opening your food pantry on a busy evening and finding jars filled with rich, savory ground beef that only needs to be warmed up in a pan for a few quick minutes. This simple method transforms raw meat into a ready made meal base that saves you tons of cooking time during crazy weeknights while helping you control every single ingredient that enters your home kitchen.
People absolutely love canned ground beef because it offers unmatched convenience, incredible versatility, and remarkable flavor that keeps everyone coming back for more. Traditional store bought quick meals often contain strange preservatives, extra artificial chemicals, and high amounts of extra salt that you might want to avoid. When you preserve your own ground beef at home, you get pure meat with natural seasonings cooked right in its own hearty juices. The texture of pressure canned beef becomes surprisingly soft, tender, and melt in your mouth good, which makes it far superior to frozen beef that can sometimes dry out or suffer from harsh freezer burn over time. Home cooks also love the peace of mind that comes with knowing they have a dependable supply of cooked meat sitting on their pantry shelves. Whether you want to quickly whip up a pan of warm tacos, boil a pot of cozy spaghetti sauce, or build a savory casserole, having pre cooked meat ready to pour straight out of a jar makes kitchen prep feel completely effortless and enjoyable.
There are so many wonderful reasons and special moments to make this preserved beef, ranging from emotional comfort to smart everyday meal planning and fitness goals. If you love saving money on grocery bills, buying fresh ground beef in bulk when it goes on sale at your local market is a total game changer for your family budget. Preserving beef at home allows you to take full advantage of meat sales without crowding your home freezer with bulky plastic packages. From a health and fitness standpoint, this canned beef provides a fantastic source of clean protein that supports muscle building and keeps you full throughout long, busy days. Emotionally, stocking your pantry gives you a deeply satisfying feeling of self reliance, security, and warmth, knowing that your family will always have nutritious food available no matter what happens outside. It is also perfect for camping trips, outdoor hiking adventures, emergency preparedness kits, or simply sending your tired self a gift of a quick meal after an exhausting work day.
The deep savory taste and rich aroma of homemade preserved ground beef will instantly elevate your daily cooking routine. When you simmer the beef before canning, you release rich meat juices that concentrate inside the sealed glass jar during the pressure canning process. Every single jar becomes its own small flavor chamber where the beef cooks slowly under pressure, absorbing every drop of delicious moisture and natural meat flavor. Unlike frozen meat that can lose its juicy texture after thawing, canned beef stays super moist and ready to absorb whatever spices, sauces, or herbs you decide to add later. Kids and adults alike enjoy the comforting homemade taste, and even picky eaters love how soft and delicious the meat turns out. Cooking with canned ground beef feels like taking a smart shortcut without ever compromising on quality, freshness, or natural flavor, giving you the best of both world kitchen convenience and heartwarming home cooked goodness.
Ingredients You Will Need
To prepare safe and delicious canned ground beef at home, you only need a few simple ingredients and basic food supplies. Using high quality ingredients ensures the best flavor and safe shelf stability for your jars.
- 10 pounds of lean ground beef, preferably 85 percent to 90 percent lean meat to reduce excess grease in jars
- 2 teaspoons of canning salt or non iodized sea salt per quart jar, adjust to 1 teaspoon if using pint jars
- 4 cups of hot fresh water, vegetable broth, or beef bone broth to fill up space in jars if needed
- 2 tablespoons of healthy cooking oil such as olive oil or avocado oil for initial browning in your pan
- Optional basic seasonings like 1 tablespoon of onion powder, 1 tablespoon of garlic powder, or half a teaspoon of black pepper per jar for extra natural taste
Step by Step Method
Following clean and accurate steps guarantees that your canned ground beef stays safe, flavorful, and perfectly preserved on your food pantry shelves for many months to come.
Preparing Your Kitchen and Tools
Clean your entire workspace thoroughly with hot soapy water. Wash your glass canning jars, clean metal rings, and brand new canning lids in warm soapy water, then rinse them well. Inspect all glass jars carefully for any tiny cracks or chips along the rims, throwing away any damaged jars. Place your clean jars in a large pot of hot water or inside your pressure canner filled with warm water to keep them warm while you cook the beef. Warm jars are super important because putting hot cooked beef into cold glass jars can cause the glass to crack from temperature shock.
Cooking the Ground Beef
Place a large heavy skillet or cooking pot over medium high heat on your stove top. Add a small splash of cooking oil and begin adding your fresh ground beef in manageable batches. Use a wooden spoon or spatula to break the meat into small evenly sized crumbles as it cooks. Cook the ground beef until it turns a light brown color throughout, ensuring no pink meat remains visible. You do not need to crisp or overcook the meat completely, as it will finish cooking thoroughly inside the pressure canner later.
Draining the Excess Fat
Once your ground beef is browned, carefully strain off the warm melted fat and extra grease using a fine mesh strainer or a large colander over a heatproof bowl. Removing excess fat is a critical safety step in meat canning because too much oil can ride up the sides of the jar during processing and prevent the flat metal lids from forming a proper airtight seal. You can also rinse the browned beef very briefly with hot water to remove even more grease if your meat was on the fatty side.
Packing the Warm Jars
Carefully remove your warm glass jars from the hot water bath using a secure jar lifter tool. Place a wide mouth funnel on top of the jar opening to keep the glass rim completely clean. Spoon the hot browned ground beef loosely into each jar using a spoon, filling the jar while leaving exactly 1 inch of empty space at the top, which is called headspace. Do not pack or press the meat down tightly inside the jar, because steam and heat must circulate freely between the meat crumbles to ensure full safety.
Adding Liquids and Salt
Add 1 teaspoon of canning salt to each pint jar, or 2 teaspoons of canning salt to each quart jar. Salt is optional for preservation safety, but it greatly improves the natural flavor of the beef. Next, pour boiling water, hot beef broth, or hot bone broth into each jar over the meat, keeping that important 1 inch of headspace at the top. The hot liquid helps distribute heat evenly through the meat crumbles and keeps your canned beef moist and delicious during long term storage.
Removing Air Bubbles and Cleaning Rims
Gently insert a clean plastic bubble remover tool, thin spatula, or chopstick down along the inside walls of each filled jar. Move the tool up and down to release any trapped air pockets hidden between the meat crumbles. Top up with a little more hot liquid if the level drops below the 1 inch headspace line. Take a clean paper towel dampened with plain white vinegar and carefully wipe the entire top glass rim of every single jar. The vinegar removes any tiny grease spots or meat bits that could prevent the rubber gasket on the lid from sealing tightly.
Adjusting Lids and Rings
Center a fresh, flat metal lid onto the clean rim of each jar. Place a metal screw band ring over the top lid and turn it clockwise with your fingers until it meets light resistance, which is known as finger tip tight. Do not overtighten the metal rings with full hand force, because air bubbles must be able to escape out from under the lid during the heating process.
Processing in the Pressure Canner
Place your pressure canner on your stove and add about 2 to 3 inches of water inside according to the manufacturer instructions for your specific unit. Set the filled jars upright onto the internal rack inside the canner, leaving small spaces between jars so steam circulates freely. Lock the canner lid tightly into place, leaving the vent pipe or petcock open. Turn the heat to high and allow a steady column of steam to vent out of the pipe continuously for a full 10 minutes to purge all trapped air from the vessel.
Timing and Heat Control
After venting steam for 10 minutes, place your weighted gauge or close the petcock to allow pressure to build up inside. Bring the pressure up to 10 pounds of pressure for a weighted gauge canner or 11 pounds of pressure for a dial gauge canner, adjusting for higher altitudes if you live elevated above sea level. Once the proper pressure level is reached, start your timer. Process pint jars for 75 minutes, or process larger quart jars for 90 minutes, maintaining steady heat to keep pressure consistent without dropping below the target level.
Cooling and Storage
When the processing timer finishes, turn off the heat source entirely and let the pressure canner cool down naturally on its own. Never force the canner to cool fast by running cold water over it or pulling off the weight early, as sudden pressure changes can shatter glass jars or force liquid out. Once the pressure gauge reads zero and the safety cover lock drops, carefully remove the lid away from your face. Use a jar lifter to place hot jars onto a clean towel on your counter, leaving spaces between them. Allow jars to cool undisturbed for 12 to 24 hours until you hear satisfying pop sounds indicating successful airtight seals. Remove metal rings, test the center seal of each lid, wipe jars clean, label with the date, and store in a cool dark pantry.
Why This Recipe Is Special
This homemade canned ground beef recipe stands out as a true cornerstone of modern home food preservation because it combines high nutrition, unbeatable practicality, and amazing taste. Unlike commercial canned products that rely heavily on chemical additives, excess sodium, and thick starches, your home canned beef contains only pure meat, natural broth, and a touch of wholesome salt. You retain total control over the quality of beef you purchase, allowing you to choose organic meat, grass fed beef, or lean butcher cuts that fit your household dietary preferences.
From a health point of view, ground beef preserved in glass jars remains a powerhouse of essential vitamins and key daily minerals. It is naturally rich in complete protein, healthy iron, zinc, and crucial B complex vitamins that boost daily energy levels and support robust muscle repair. Because you drain away excess fat before packing the jars, the final product is lean, lighter on digestion, and ideal for healthy lifestyle goals including low carb, keto, or high protein diets.
The taste profile of home canned beef is remarkably rich and comforting. Cooking the meat low and slow inside a sealed pressurized jar breaks down tough fibers, resulting in ultra tender beef crumbles that melt in your mouth. The meat absorbs the ambient liquid, creating a savory broth base right inside the jar that acts as an instant gravy or sauce launcher for meals. Having a cabinet full of these flavorful jars empowers home cooks to build nourishing, restaurant quality dishes in a fraction of the usual cooking time.
Extra Tips for Better Taste
Taking your canned ground beef from simple to extraordinary is easy with a few creative, flavor boosting kitchen techniques. While you must keep ingredient ratios safe, small tweaks before packing or during reheating can make a huge difference in your daily meals.
- Swap plain boiling water for rich homemade beef bone broth or organic vegetable broth to infuse extra savory depth into every crumble of meat.
- Add simple dry herbs like dried oregano, thyme, ground cumin, or mild chili powder into the jars before processing to create pre seasoned taco meat or Italian base mix.
- Sauté minced fresh onions, finely chopped bell peppers, or fresh garlic alongside the beef during the browning stage to create a rich flavor base.
- When reheating a jar for dinner, sear the canned meat in a hot pan with a small pat of butter to crispen up the edges and recreate that freshly cooked texture.
- Save the rich broth from inside the jar to use as a flavorful base for making instant pan gravies, rice dishes, or cozy noodle soups.
- Mix a tablespoon of tomato paste into the warm pan liquid when reheating the meat to instantly build a classic simmered pasta sauce taste.
Final Thoughts
Preserving your own ground beef at home is an incredibly practical, satisfying, and delicious project that transforms the way you manage your kitchen routine. By taking a little time to brown fresh meat and safely process it in a pressure canner, you create an amazing shelf stable protein source ready for quick dinners, busy weekends, or emergency prep. The convenience of opening a warm jar of tender, pre cooked beef and serving a delicious meal within minutes is a true joy for any home cook. Embrace this traditional food preservation skill with confidence, follow safe kitchen procedures, and enjoy the wonderful peace of mind that comes with a well stocked, highly nutritious home pantry.
Nutrition Details
Here is an estimated nutrition breakdown for a standard serving size of homemade canned ground beef. Values can shift slightly based on the initial fat percentage of your chosen ground beef and how thoroughly you drain excess grease.
| Nutritional Component | Amount Per Serving | Percentage Daily Value |
| Serving Size | 4 ounces cooked weight | Not Applicable |
| Total Calories | 210 Calories | Not Applicable |
| Protein | 26 grams | 52 percent |
| Total Fat | 11 grams | 14 percent |
| Saturated Fat | 4.5 grams | 23 percent |
| Trans Fat | 0 grams | Not Applicable |
| Cholesterol | 75 milligrams | 25 percent |
| Sodium | 380 milligrams | 17 percent |
| Total Carbohydrates | 0 grams | 0 percent |
| Dietary Fiber | 0 grams | 0 percent |
| Total Sugars | 0 grams | Not Applicable |
| Iron | 2.5 milligrams | 14 percent |
| Potassium | 340 milligrams | 8 percent |
| Calcium | 18 milligrams | 2 percent |
Disclaimer
This article is provided strictly for educational, informational, and general cooking purposes. Individual dietary needs, metabolic responses, and health conditions vary from person to person, so personal results from consuming this food may change based on your unique body. Always follow tested food preservation guidelines from trusted sources like the National Center for Home Food Preservation to ensure complete canning safety. Consult a qualified medical professional or certified nutritionist if you have specific health concerns, dietary restrictions, or individual questions regarding protein intake and sodium consumption.