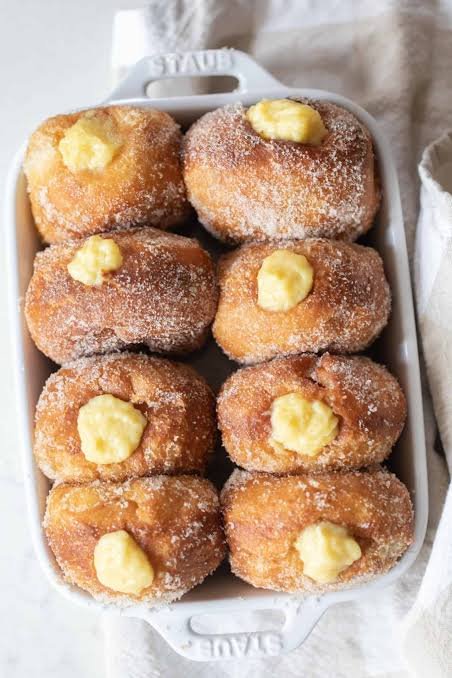
Making homemade bakery quality treats in your own kitchen brings a special kind of comfort and joy that store bought sweets simply cannot match. This recipe for sourdough vanilla custard donuts combines the gentle sour tang of fermented dough with the rich smoothness of classic vanilla pastry cream. You will start with an active sourdough starter that helps the dough rise slowly overnight, building amazing depth of flavor and an amazingly soft interior texture. Once the fluffy dough rounds are fried or baked to golden perfection, they are filled generous amounts of rich homemade vanilla custard. Every single bite delivers a beautiful contrast between the crisp lightly sweet golden crust and the cold velvety custard center. It is a classic pastry recipe made simple enough for home bakers of any skill level to master easily.
People absolute love this particular recipe because it transforms a standard fried treat into something deeply satisfying and much easier on the human digestive system. Standard donuts made with commercial baker yeast can often leave you feeling heavy or bloated after enjoying them. The slow natural fermentation process powered by wild yeast breaks down complex starches and gluten proteins in the flour, making the final donut surprisingly light and much gentler on your stomach. The subtle sour flavor of the sourdough balances the rich sweetness of the vanilla custard filling so perfectly that the donuts never feel overly sugary. When you share these with your family or friends, they will be amazed by the incredible texture and delicate bakery style flavor you created right at home.
There are so many wonderful occasions and emotional reasons to roll up your sleeves and prepare these special sweet treats. Making sourdough requires patience and care, turning a basic baking task into a peaceful weekend kitchen ritual that lets you slow down and enjoy the process. Preparing a fresh batch on a quiet Sunday morning fills your entire home with the warm tempting scent of vanilla and sweet dough. These donuts are ideal for celebrating birthday mornings, family holiday breakfasts, cozy weekend brunches, or simply rewarding yourself after a long busy week. Even if you are mindful of your health and overall fitness, choosing long fermented sourdough treats lets you enjoy a lovely dessert made from real whole ingredients without any artificial chemicals or unwanted preservatives.
Taking the time to bake from scratch also connects you to a timeless tradition of wholesome home cooking that brings people closer together. When you make these vanilla custard filled donuts, you are creating memorable moments that your loved ones will cherish for years to come. Kids love helping to press the cutter into the soft pillowy dough and watching the donuts puff up in the warm pan. Adults appreciate the rich authentic taste that reminds them of traditional European bakeries from long ago. Whether you are baking to comfort a friend, host a lively family gather, or simply satisfy a deep craving for warm sweet pastry, this simple step by step guide will walk you through every stage so you succeed on your very first try.
Ingredients You Will Need
To prepare the sourdough donut dough, you need the following items:
Active sourdough starter that has been fed and is bubbly, 100 grams Unbleached all purpose flour, 400 grams Whole milk warmed to room temperature, 150 milliliters Unsalted butter softened at room temperature, 60 grams Large eggs at room temperature, 2 whole eggs Granulated white sugar, 50 grams Fine sea salt, 6 grams Pure vanilla extract, 5 milliliters
To prepare the fresh vanilla custard filling, you need the following items:
Whole milk, 450 milliliters Large egg yolks, 4 whole yolks Granulated white sugar, 80 grams Cornstarch, 35 grams Unsalted butter, 30 grams Pure vanilla bean paste or high quality vanilla extract, 10 milliliters Pinch of fine sea salt, 1 gram
To cook and finish the donuts, you need the following items:
Neutral vegetable oil or coconut oil for frying, 1 liter Powdered sugar for dusting the finished donuts, 100 grams
Step by Step Method
Phase 1: Preparing the Custard Filling
Step 1: Start by making the rich vanilla custard first so it has plenty of time to cool completely in your refrigerator before you fill the warm donuts. Take a medium saucepan and pour in the whole milk along with your pure vanilla bean paste. Place the saucepan over medium heat and warm it slowly until tiny bubbles start forming around the inside edge of the pan. Do not let the milk come to a full boiling point.
Step 2: While the milk is gently warming, take a heatproof mixing bowl and add the egg yolks along with the granulated white sugar. Whisk these two ingredients together briskly for about two minutes until the mixture turns pale yellow and slightly thick. Add the cornstarch and fine sea salt into the bowl, whisking until you have a completely smooth paste with no dry powdery lumps remaining.
Step 3: Now you will temper the eggs so they do not scramble when heated. Slowly pour about one third of the hot milk into your egg yolk mixture while whisking continuously with your other hand. This gradually raises the temperature of the cold eggs. Once combined, pour the entire tempered egg mixture back into the saucepan with the rest of the warm milk.
Step 4: Place the saucepan back over low to medium heat. Whisk the mixture constantly without stopping, making sure to scrape the bottom and corners of the pan so the cream does not burn. Cook for about three to five minutes until the liquid suddenly thickens into a glossy custard that bubbles gently. Remove the pan from the heat immediately.
Step 5: Stir in the softened unsalted butter until it melts completely into the warm custard, giving it a silky shiny finish. Pour the hot custard through a fine mesh strainer into a clean glass bowl to catch any tiny cooked egg pieces. Cover the surface of the custard directly with plastic wrap so a tough skin does not form on top. Place the bowl into the refrigerator for at least three hours until it becomes cold and firm.
Phase 2: Mixing and Kneading the Sourdough Dough
Step 6: In a large glass or plastic mixing bowl, combine your active bubbly sourdough starter with the room temperature whole milk, granulated white sugar, and whole eggs. Use a whisk or wooden spoon to mix everything together until the liquids are fully blended and smooth.
Step 7: Add the unbleached all purpose flour and fine sea salt into the bowl with the liquid ingredients. Use a sturdy spatula or your hands to mix the ingredients until a shaggy rough dough forms and no dry flour remains at the bottom of the bowl. Cover the bowl with a clean kitchen towel and let it rest undisturbed for thirty minutes. This brief resting period lets the flour fully absorb the liquid.
Step 8: After thirty minutes of resting, add the softened butter into the dough one small piece at a time. Use your hands or a stand mixer fitted with a dough hook attachment to work the butter completely into the dough. Knead the dough vigorously for about eight to ten minutes until it becomes smooth, elastic, and slightly tacky to the touch without sticking heavily to your fingers.
Phase 3: Bulk Fermentation and Shaping
Step 9: Shape the kneaded dough into a neat round ball and place it back inside a lightly oiled bowl. Cover the bowl tightly with plastic wrap or a secure lid. Allow the dough to sit at room temperature for six to eight hours. During this long slow fermentation, the natural wild yeast will cause the dough to expand by about fifty percent in size while building wonderful rich sourdough flavor.
Step 10: After the room temperature rise, place the covered bowl into your refrigerator overnight for about eight to twelve hours. Cold fermentation slows down the rising process, making the dough much firmer and significantly easier to roll out and shape the next morning.
Step 11: The next morning, lightly dust a clean kitchen counter or wooden board with all purpose flour. Turn the cold dough out onto the counter and gently press it down with your hands to release any large air bubbles. Use a rolling pin to flatten the dough until it is evenly about two centimeters thick.
Step 12: Take a round biscuit cutter or round cookie cutter measuring about eight centimeters across. Dip the edges of the cutter in dry flour to prevent sticking, then press it straight down into the rolled dough to cut out neat round shapes. Do not twist the cutter as you press down, because twisting seals the edges and prevents the donuts from rising high. Gather any leftover dough scraps, gently press them back together, let the dough rest ten minutes, then roll and cut remaining circles.
Step 13: Line a large baking sheet with parchment paper and lightly dust it with flour. Place your shaped dough rounds onto the paper, leaving at least three centimeters of space between each round so they have room to swell. Cover the baking sheet loosely with a light kitchen towel and place it in a warm draft free spot to rise for two to three hours until the rounds look puffy and pillowy.
Phase 4: Frying and Assembling the Donuts
Step 14: Pour your neutral cooking oil into a heavy pot or deep skillet until it reaches a depth of at least five centimeters. Heat the oil over medium flame until it reaches a steady temperature of one hundred and seventy five degrees Celsius. Use a deep fry kitchen thermometer to monitor the heat carefully, as oil that is too hot will burn the outside before cooking the inside.
Step 15: Carefully lower two or three puffy dough rounds into the hot oil using a slotted spoon. Do not overcrowd the pot or the oil temperature will drop too low. Fry the donuts for about two to three minutes on the first side until they turn a rich golden brown color.
Step 16: Use tongs or a slotted spoon to flip the donuts over gently. Fry the second side for another two to three minutes until perfectly golden brown all over. You should see a beautiful light stripe around the center ring of each donut where the dough floated high above the hot oil.
Step 17: Lift the cooked donuts out of the oil using your slotted spoon and transfer them to a wire cooling rack lined with paper towels to drain off excess oil. Repeat this cooking process with the remaining dough rounds, keeping a close eye on your oil temperature between batches. Allow the donuts to cool completely to room temperature before filling them.
Step 18: Once the donuts are completely cool, scoop your chilled vanilla custard out of the refrigerator and give it a quick stir to make it soft and creamy again. Transfer the custard into a pastry piping bag fitted with a medium round metal piping tip.
Step 19: Use a small sharp knife or a wooden chopstick to poke a hole into the side of each cool donut. Gently wiggle the knife inside the donut to create a hollow cavity in the center without cutting all the way through the other side.
Step 20: Insert the piping tip deep into the hole on the side of a donut. Squeeze the piping bag gently to fill the inner cavity with cold vanilla custard until you feel the donut expand and become heavy in your hand. Wipe away any tiny bit of extra custard that spills out of the hole.
Step 21: Place your generous amount of powdered sugar into a wide bowl. Roll each filled donut around in the powdered sugar until every side is lightly and evenly coated. Serve your fresh homemade sourdough vanilla custard donuts immediately and enjoy every delightful bite.
Why This Recipe Is Special
This particular pastry creation stands apart from regular bakery desserts in several important ways that benefit both your taste buds and your physical well being. The most significant element that makes this recipe unique is the complete reliance on wild sourdough starter rather than fast acting commercial yeast packets. When dough undergoes a natural fermentation lasting twelve to twenty four hours, complex organic chemical changes take place inside the flour. Wild lactic acid bacteria work alongside natural yeasts to break down phytic acid, an anti nutrient naturally present in grains that often blocks your digestive tract from absorbing essential minerals like zinc, magnesium, and iron.
Because the gluten structure gets softened and partially pre digested by the gentle sourdough culture over time, many people who normally feel bloated or tired after eating traditional wheat foods discover that they can enjoy sourdough treats comfortably. Beyond the digestive benefits, the natural fermentation process gives the dough a subtle complexity that works in harmony with the sweet filling. Instead of tasting one note sweet like standard store bought pastries, these treats offer a rich balance where the light tangy undertone cuts through the heavy creaminess of the vanilla filling.
Additionally, preparing these donuts at home gives you absolute control over every single ingredient entering your kitchen. Commercial factories and large supermarket bakeries regularly add chemical preservatives, artificial flavoring compounds, trans fats, high fructose corn syrup, and synthetic food dyes to extend shelf life and lower manufacturing costs. By making your own custard using simple real ingredients like farm fresh eggs, whole milk, pure butter, and real vanilla, you nourish your body with wholesome food free from unwanted industrial additives. You get to enjoy a genuinely high quality treat that offers pure comfort without compromising on your dedication to eating real home cooked foods.
Extra Tips for Better Taste
To raise your baking results from simple homemade snacks to professional bakery quality masterworks, pay close attention to a few small details during preparation. First, the quality of your vanilla extract or vanilla bean paste makes a huge difference in the final taste of your custard. Try to use real vanilla bean paste containing tiny black seeds instead of cheap synthetic vanilla flavorings. The real paste imparts a fragrant woody sweet floral notes that elevates the whole cream filling to a luxury level.
Another fantastic trick for boosting flavor is to brown your butter slightly before adding it into the sourdough dough or the custard. When you melt butter over low heat until the milk solids turn a light golden color and smell nutty, you introduce a deep caramel like richness to your dough. You can also infuse the whole milk for your custard with extra natural aromatics. While heating the milk on your stove, feel free to drop in a small piece of fresh orange peel, a small cinnamon stick, or a few crushed cardamom pods. Just remember to strain those spices out before mixing the warm milk into your egg yolk paste.
Managing your frying oil temperature accurately is another critical secret to achieving that ideal cloud like donut texture. If your cooking oil drops below one hundred and seventy degrees Celsius, the raw dough will absorb excessive liquid oil like a sponge, leaving your finished donuts feeling greasy and heavy. On the other hand, if your oil rises above one hundred and eighty five degrees Celsius, the exterior crust will brown too fast while the inside dough remains raw and gummy. Using a fast reading digital thermometer keeps your oil perfectly regulated throughout the frying process.
If you prefer a lighter option that uses less cooking oil, you can easily bake these sourdough rounds in your oven instead of frying them. Simply place the shaped dough rounds onto parchment paper and bake them at one hundred and eighty degrees Celsius for twelve to fifteen minutes until light golden brown. Brush the tops of the hot baked donuts with melted butter as soon as they come out of the oven, then roll them in granulated sugar or cinnamon sugar before piping in your cold custard.
Final Thoughts
Baking your own sourdough vanilla custard donuts is a truly rewarding kitchen project that fills your home with comforting aromas and brings pure happiness to anyone lucky enough to try them. While the long fermentation process requires a little planning ahead, the actual hands on effort is very simple and easy for beginners to master. By combining the old world art of sourdough baking with a silky smooth vanilla pastry cream, you create an extraordinary dessert that balances subtle tangy flavor with luxurious sweetness. Roll up your sleeves this weekend, give your sourdough starter a fresh feeding, and enjoy every step of making these delicious bakery style treats right in your own cozy kitchen.
Nutrition Details
Here is an estimated breakdown of the nutritional content for this sourdough recipe. The values listed below are calculated based on whole ingredients used across the entire recipe batch as well as estimated values for one individual filled donut assuming a total yield of twelve equal servings.
Recipe Nutrition Summary Table
| Category / Component | Total Whole Recipe Batch | Amount Per Serving (1 Donut) |
| Calories | 3420 kcal | 285 kcal |
| Total Carbohydrates | 480 grams | 40 grams |
| Dietary Fiber | 12 grams | 1 gram |
| Total Sugars | 216 grams | 18 grams |
| Protein | 72 grams | 6 grams |
| Total Fat | 132 grams | 11 grams |
| Saturated Fat | 60 grams | 5 grams |
| Trans Fat | 0 grams | 0 grams |
| Cholesterol | 780 milligrams | 65 milligrams |
| Sodium | 1560 milligrams | 130 milligrams |
| Potassium | 1080 milligrams | 90 milligrams |
| Calcium | 720 milligrams | 60 milligrams |
| Iron | 18 milligrams | 1.5 milligrams |
Note: The total nutrition estimates listed above include oil absorption calculated at approximately four grams of oil per fried donut, alongside standard whole ingredients including whole milk, eggs, butter, flour, sugar, and cornstarch.
Disclaimer
This recipe and the nutritional information provided in this article are created strictly for educational, informational, and culinary enjoyment purposes. Every human body responds differently to different foods, ingredients, and preparation techniques based on individual metabolism, physical health conditions, underlying food allergies, or specific dietary needs. The nutritional values printed in the table above are general estimates calculated using standard ingredient databases, and actual nutritional counts may vary depending on the specific brands of food you buy, exact frying temperatures, and final serving sizes. If you have severe gluten sensitivities, severe wheat allergies, blood sugar concerns, or specific health conditions requiring medical monitoring, please consult with a qualified professional healthcare provider or registered dietitian before introducing new fermented foods into your routine