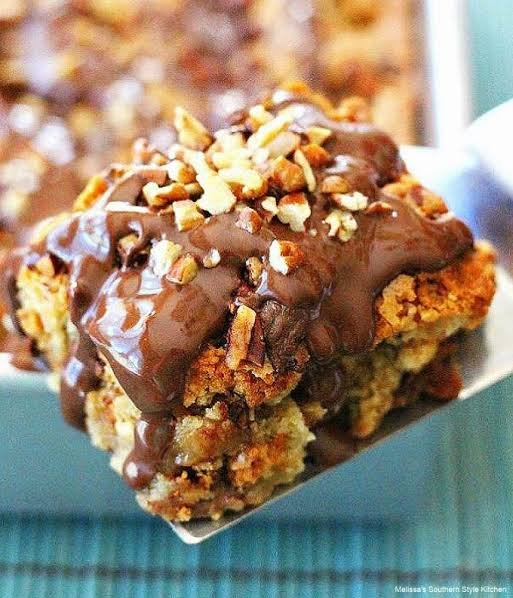
Welcome to the ultimate guide for making delicious and simple dessert treats right in your own home kitchen without any complicated steps or hard to find items. This special recipe is all about creating rich, chocolatey, and nutty squares that deliver immense joy with every single bite. The concept behind this dish is to bring together five incredible components that complement each other perfectly to create a bakery style sweet treat. You will combine a buttery crust, smooth sweet caramel, crunchy pecans, and creamy chocolate chips into one single pan that feeds a crowd. Many people think that making layered dessert squares requires advanced baking skills, expensive equipment, or hours of standing in front of a hot oven, but this easy recipe completely changes that idea forever. Anyone can pick up these basic items at a local grocery store and put together a pan of pure happiness in just a short amount of time. Whether you are brand new to baking or you have been making treats for many years, this straightforward approach will give you reliable and irresistible results every single time.
People absolutely love this particular dessert recipe for so many wonderful reasons, but the main factor is the incredible balance of flavors and contrasting textures in every bite. When you take a bite of these homemade squares, you immediately feel the crunch of toasted pecans mixed with soft, gooey caramel that melts right on your tongue. The chocolate adds a deep, sweet richness while the crust gives a sturdy, buttery base that holds all the fantastic toppings together cleanly. It offers the classic flavor combination of traditional turtle candies in a convenient bar form that is easy to slice, store, and share with family members or friends. Another reason this recipe has become a massive crowd favorite is because it requires minimal preparation effort while yielding a finished product that looks and tastes like it came from a fancy bakery. You do not need to mess with tricky candy thermometers or melt sugar from scratch to get that luxurious caramel texture that everyone craves. Busy parents, students, and home cooks appreciate how fast this sweet dish comes together while still delivering top quality taste.
There are countless special moments, celebrations, and everyday occasions where preparing a fresh batch of these sweet treats makes complete sense. You might want to make them on a quiet weekend afternoon when you desire something warm, sweet, and comforting to enjoy alongside a fresh cup of hot coffee or tea. They are also ideal for holiday gatherings, school bake sales, neighborly gifts, family movie nights, or birthday parties where you need a reliable dessert that pleases guests of all ages. From an emotional perspective, baking these comforting bars fills your whole house with a warm, sugary, nutty aroma that instantly creates a cozy and welcoming atmosphere for everyone inside. Even if you are paying close attention to your daily food choices or working on fitness goals, enjoying a small square of this rich homemade treat can be a wonderful, satisfying way to reward yourself after a long week of hard work. Moderation allows you to savor every rich layer without feeling restricted, making this a happy addition to your balanced lifestyle and kitchen routine.
Learning how to craft these tasty dessert bars is a fantastic confidence booster for beginners who want to build basic baking skills while getting amazing results. Baking can sometimes feel intimidating with precise measurements and complex instructions, but this specific recipe breaks down the whole process into easy, stress free steps that guarantee success. As you assemble the basic layers, you will learn how simple ingredients transform into a cohesive and delightful treat through the power of gentle heat and proper cooling. Sharing food that you created with your own hands brings a unique sense of pride and happiness that store bought packaged snacks simply cannot match. Once you master this core recipe, you will find yourself reaching for it whenever you need a reliable dessert for potlucks or special family dinners. Get ready to embark on a fun baking adventure that will delight your taste buds and impress everyone who gets the chance to sample your delicious homemade creation.
Ingredients You Will Need
- 1 cup all purpose flour
- 0.5 cup unsalted butter, softened to room temperature
- 0.25 cup light brown sugar, packed tightly
- 1 cup whole pecans or chopped pecan halves
- 1 cup milk chocolate chips or semi sweet chocolate chips
- 1 cup thick caramel sauce or melted caramel candies
Step by Step Method
Step 1: Prepare Your Kitchen and Equipment
Before you start mixing any ingredients, you want to get your kitchen space completely ready for baking. Preheat your standard home oven to 350 degrees Fahrenheit so it reaches the proper cooking temperature while you assemble the base. Take an eight inch square baking pan and line the entire inside with parchment paper, leaving a slight overhang on the sides. This simple trick allows you to lift the finished bars right out of the pan later for clean cutting. If you do not have parchment paper, you can thoroughly grease the pan with a little bit of butter or non stick cooking spray.
Step 2: Make the Buttery Crust Base
In a medium mixing bowl, add the softened unsalted butter, the packed light brown sugar, and the all purpose flour. Use a simple hand mixer, a pastry cutter, or even a clean pair of hands to combine these three base items together. Mix gently until the mixture turns into soft, fine crumbles that hold together when you press them between your fingers. Do not worry if it looks a bit crumbly at first, because pressing it into the pan will form a solid, uniform crust.
Step 3: Press and Bake the Bottom Layer
Transfer the crumbly flour and butter mixture directly into the bottom of your prepared baking pan. Use the flat bottom of a measuring cup or your fingers to press the dough down firmly and evenly across the entire surface. Make sure the crust is level so that every finished bar has an equal amount of base. Place the pan into your preheated oven and bake for about ten to twelve minutes, or until the edges turn a soft light golden brown color. Remove the pan safely using oven mitts and set it on a wire cooling rack.
Step 4: Add the Nutty Pecan Layer
While the baked crust is still warm from the oven, take your pecans and scatter them evenly across the top. You can use whole pecan halves for a beautiful look or coarsely chopped pecans for easier slicing later on. Gently press the pecans down into the warm base so they stay firmly in place when the caramel is added. The heat from the freshly baked crust will help lightly toast the bottom of the nuts, releasing their delightful natural oils and aroma.
Step 5: Pour the Rich Caramel Layer
Slowly pour your thick caramel sauce over the layer of scattered pecans, making sure to distribute it as evenly as possible. If your caramel sauce is very thick or cold, warm it in the microwave for fifteen seconds so it flows smoothly across the pan. Use a spatula or the back of a spoon to guide the caramel into every corner, covering all of the pecans completely. This sweet, gooey layer acts as the delicious glue that holds the entire bar together.
Step 6: Top with Creamy Chocolate
Immediately sprinkle the chocolate chips evenly over the hot caramel layer. You can use classic milk chocolate chips for maximum sweetness, semi sweet chocolate chips for a balanced flavor, or dark chocolate chips if you prefer a deeper cocoa taste. The natural heat from the freshly baked base and caramel will slowly soften the chocolate chips, making them shiny and slightly melted while still keeping their beautiful shape.
Step 7: Final Bake and Complete Cooling
Return the entire pan back to the warm oven for about three to five minutes just to allow all the top layers to set and melt together seamlessly. Remove the pan carefully from the oven and set it on a flat surface to cool completely at room temperature. Once the pan is no longer warm to the touch, place it inside the refrigerator for at least one hour so the caramel and chocolate can firm up properly.
Step 8: Slice into Perfect Squares
Once the dessert has chilled completely, use the parchment paper handles to gently lift the whole slab out of the pan and onto a clean cutting board. Take a large sharp chef knife and slice the slab into sixteen equal square bars. To get super clean slices, wipe your knife blade with a warm wet paper towel between every single cut. Serve these fabulous treats immediately or store them for later enjoyment.
Why This Recipe Is Special
This particular dessert recipe stands out as truly special because it delivers maximum flavor with minimal time and effort in the kitchen. By using only five simple ingredients, you eliminate the stress of complex baking techniques while still producing a sweet treat that rivals high end bakery items. The combination of textures is exceptional, featuring a crisp buttery crust, a soft chewing center of caramel, crunchy toasted pecans, and smooth chocolate. Every single layer plays a specific role in creating a balanced taste experience that is neither overly dry nor excessively sticky.
From a practical and health conscious perspective, making your own treats at home allows you to control the quality of the ingredients you put into your body. Store bought packaged snacks often contain artificial preservatives, hydrogenated oils, and unnecessary chemical additives that you do not need. When you make these bars yourself, you use simple pantry staples like real butter, natural nuts, and wholesome flour. Pecans offer healthy plant fats, antioxidants, and essential minerals that nourish your body when enjoyed as part of a balanced diet.
Furthermore, this recipe is incredibly forgiving for beginner cooks who are just starting their baking journey. You do not need expensive kitchen machinery, specialized molds, or expert culinary knowledge to make a beautiful batch of these bars on your very first try. The steps are intuitive, easy to follow, and offer quick satisfaction, which helps build true confidence in the kitchen. It is a reliable recipe that you can pull out whenever you need a fast, impressive dessert for unexpected guests or special events.
Extra Tips for Better Taste
- Toast your pecans in a dry skillet over medium heat for three minutes before adding them to enhance their natural nutty flavor.
- Sprinkle a small pinch of coarse sea salt over the top chocolate layer right after it comes out of the oven for a gourmet salted caramel flavor.
- Swap traditional pecans for walnuts or sliced almonds if you prefer a different kind of crunch in your dessert bars.
- Use a mixture of white chocolate chips and dark chocolate chips on top to create a striking visual contrast and a multi dimensional taste.
- Keep your cut bars stored inside an airtight container in the refrigerator to maintain their firm shape and wonderful chewy texture.
- Warm a sliced bar in the microwave for five seconds before serving if you like a soft, extra gooey caramel experience.
Final Thoughts
Making delicious homemade treats should always be a joyful, easy, and satisfying experience for anyone who loves good food. These easy 5 Ingredient Turtle Bars prove that you do not need complicated instructions or dozens of items to create a sensational dessert that brings smiles to everyone around your table. From the buttery base to the crunchy nuts and sweet melting chocolate, every bite offers pure satisfaction. Give this simple recipe a try today, share a batch with the people you care about most, and enjoy the delicious rewards of simple home baking.
Nutrition Details
| Item Description | Amount Per Serving |
| Total Servings | 16 individual bars |
| Serving Size | 1 bar |
| Calories | 220 calories |
| Total Fat | 13 grams |
| Saturated Fat | 6 grams |
| Trans Fat | 0 grams |
| Cholesterol | 15 milligrams |
| Sodium | 85 milligrams |
| Total Carbohydrates | 24 grams |
| Dietary Fiber | 1 gram |
| Sugars | 16 grams |
| Protein | 2 grams |
Disclaimer
Everyone’s body is unique and individual nutritional requirements or health responses may vary based on personal factors. The nutritional figures provided in this guide are estimates calculated for general informational purposes only and may change depending on the specific brands or products you choose to use in your kitchen. If you have specific dietary restrictions, food allergies, or health conditions, please consult with a qualified medical professional or certified nutritionist before making changes to your regular meal plan.