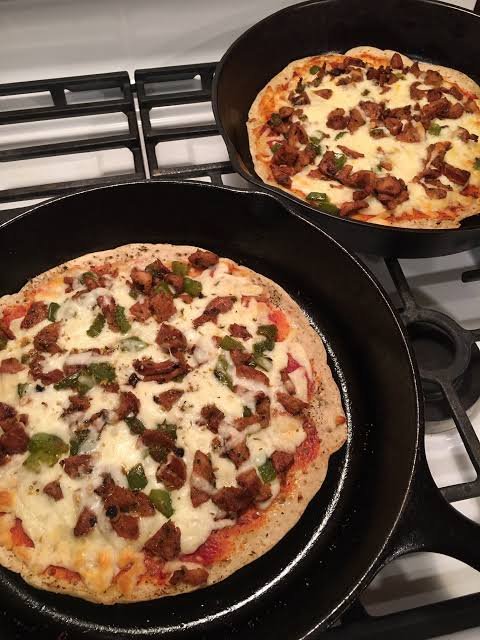
Welcome to the ultimate guide for making the most amazing pizza you will ever taste in your own kitchen. This sourdough skillet pizza recipe is a simple and delicious way to bring restaurant quality food into your home without needing a fancy wood fire oven or special baking tools. At its core, this dish brings together the natural tang of fermented dough with the intense heat distribution of a heavy cast iron pan to create a crust that is crispy on the bottom and chewy on the inside. You do not need to be a professional chef to make this work because the cast iron skillet does most of the hard labor for you. By combining basic pantry staples like flour, water, salt, and your active wild yeast starter, you can transform simple elements into an extraordinary meal that far beats any frozen or delivery option available in your town.
People absolutely adore this meal because it offers a texture and flavor profile that regular yeast pizzas simply cannot match. The magic happens during the slow fermentation process of the sourdough starter, which breaks down complex starches and creates rich deeper flavors that delight your taste buds. When this flavorful dough hits a red hot cast iron skillet, the bottom gets deeply golden and crunchy while the inside stays fluffy, light, and airy. Additionally, topping it with freshly grated mozzarella, rich tomato sauce, and savory herbs creates a perfect balance of rich, salty, tangy, and sweet notes in every single bite. Family members and dinner guests always fall in love with the comforting crunch and rich aroma that fills the entire house while this dinner bakes in the oven.
There are so many wonderful occasions and emotional reasons to pull out your cast iron pan and whip up this meal. Making pizza from scratch is a deeply therapeutic activity that helps you slow down after a stressful week and reconnect with the joy of simple home cooking. It is perfect for casual weekend movie nights with family, romantic dinner dates at home, or fun cooking parties where everyone gets to add their favorite toppings. From a wellness perspective, sourdough is far easier on your stomach than standard fast acting yeast doughs because the beneficial bacteria help break down gluten proteins prior to baking. This means you can enjoy a comforting slice of hot cheesy bread without feeling bloated or sluggish afterward, making it a wonderful choice for people who want to eat wholesome homemade food that satisfies deep cravings.
Taking control of your ingredients allows you to enjoy top tier comfort food while knowing exactly what goes into your body every day. When you make food from scratch, you completely avoid artificial preservatives, hidden sugars, and low quality oils commonly found in commercial takeaway boxes. Instead, you get pure nourishment from unbleached organic flour, fresh tomatoes, cold pressed olive oil, and real milk cheese. Whether you are looking to impress your friends at your next gathering, teach your children how real food is made, or simply treat yourself to a delicious warm meal on a chilly evening, learning this skillet technique will completely change how you view homemade dinner forever.
Ingredients You Will Need
To make the sourdough pizza dough from scratch:
- Active sourdough starter that is bubbly and fully fed: 150 grams
- All purpose flour or bread flour: 300 grams
- Warm filtered water: 200 grams
- Fine sea salt or kosher salt: 7 grams
- Extra virgin olive oil: 15 grams
To assemble and top the skillet pizza:
- Extra virgin olive oil for coating the skillet: 2 tablespoons
- Tomato sauce or passata: 120 grams
- Dried oregano or Italian seasoning mix: 1 teaspoon
- Garlic powder: half a teaspoon
- Freshly grated low moisture mozzarella cheese: 150 grams
- Freshly grated parmesan cheese: 30 grams
- Fresh basil leaves: 6 whole leaves
- Pinch of red pepper flakes for optional heat: half a teaspoon
Step by Step Method
Phase 1: Mixing and Fermenting the Dough
- Start by taking a large glass or ceramic mixing bowl and pouring in your warm filtered water along with your active bubbly sourdough starter. Use a fork or a wooden spoon to whisk the mixture gently until the starter is completely dissolved and the liquid looks milky white.
- Add the flour and fine sea salt into the bowl with your wet starter mixture. Mix everything together with your hands or a sturdy spatula until a shaggy dough forms and no dry pockets of flour remain at the bottom of the bowl. Cover the bowl loosely with a clean kitchen towel and let it rest for thirty minutes to allow the flour to absorb the liquid properly.
- After the short rest period, pour the small amount of olive oil over the dough ball. Perform a series of gentle stretches and folds by reaching under one side of the dough, pulling it upward gently without tearing it, and folding it back over its center. Rotate the bowl a quarter turn and repeat this lifting and folding process four times until you complete a full circle around the dough.
- Cover the bowl tightly with plastic wrap or a secure silicone lid to prevent the surface from drying out. Place the bowl in a warm place in your kitchen and let the dough rise until it increases in size by roughly fifty percent and shows visible air bubbles beneath the surface. Depending on the ambient temperature in your kitchen, this bulk fermentation stage usually takes anywhere from four hours to six hours.
- If you want even more deep flavor and an easier dough to handle, transfer the covered bowl into your refrigerator for twelve to twenty four hours after the room temperature rise. This cold fermentation period develops that signature tangy flavor and relaxes the dough structure so it stretches smoothly inside your baking skillet.
Phase 2: Preparing the Cast Iron Skillet
- Take a standard ten inch or twelve inch heavy cast iron skillet and place it on your kitchen counter. Pour two tablespoons of good quality extra virgin olive oil directly into the middle of the pan. Use your fingers or a silicone pastry brush to spread the oil all over the bottom surface and all the way up the inner sides of the skillet.
- Carefully transfer your fermented sourdough ball from the mixing bowl straight into the center of your oiled cast iron skillet. Turn the dough over once so that both sides get lightly coated in the olive oil, which prevents sticking and helps create a very crispy bottom layer.
- Gently press the dough outward toward the edges of the skillet using the flat pads of your fingers. If the dough snaps back or feels too tight to stretch fully, do not force it or tear the structure. Simply cover the skillet with a towel and let the dough rest for fifteen to twenty minutes so the gluten relaxes, then try dimpling and pushing it out to the edges again until it fills the whole base evenly.
Phase 3: Topping and Cooking the Pizza
- Once your dough is stretched across the bottom of your skillet, cover it again and let it puff up at room temperature for about one hour until it looks soft, pillowy, and full of tiny air pockets.
- Preheat your kitchen oven to its highest possible temperature setting, which is usually around 250 degrees Celsius or 500 degrees Fahrenheit. If your oven has a top broiler function, make sure it is working properly because you will use it near the very end of the cooking process.
- Place your loaded cast iron skillet onto your stovetop burner over medium heat for roughly three to five minutes before adding toppings. This crucial step preheats the metal pan and starts sizzling the bottom crust directly on the stove so that the center cooks evenly without becoming soggy. You can gently lift an edge with a spatula to check if tiny bubbles are forming underneath the dough.
- Turn off the stovetop burner. Spoon your tomato sauce into the middle of the dough and spread it outward in smooth circular movements using the back of a large spoon, leaving a small border around the outer edge for the crust to rise into a thick golden ring.
- Sprinkle the garlic powder and dried oregano evenly over the tomato sauce layer. Next, scatter the freshly grated low moisture mozzarella cheese and grated parmesan cheese across the entire top surface, making sure to push some cheese right to the outer edges where the dough meets the hot cast iron walls for extra crispy brown cheese bites.
- Transfer the hot skillet very carefully into your preheated oven on the middle or upper oven rack using thick heat resistant oven mitts. Bake the pizza for roughly ten to twelve minutes until the cheese is completely melted, bubbling violently, and showing dark golden brown spots.
- If the top cheese needs a little bit more golden brown color, switch your oven to the top broiler setting for the final sixty seconds of baking. Watch the skillet constantly during this step because the intense direct heat can burn the toppings very quickly if left unattended.
- Carefully remove the heavy skillet from the oven and set it on a heatproof surface or wooden board. Immediately drop your fresh basil leaves over the bubbly melted cheese so the residual heat releases their aromatic herbal essential oils. Let the pizza rest in the skillet for five full minutes so the melted cheese sets slightly and the crust finishes crisping.
- Slide a flexible metal spatula underneath the bottom of the crust to transfer the pizza onto a large wooden cutting board. Slice the pizza into eight equal triangular slices using a sharp pizza wheel, serve immediately while warm, and enjoy your delightful homemade creation.
Why This Recipe Is Special
This sourdough skillet pizza is truly special because it combines traditional artisan bread making methods with accessible household kitchen tools. The extended natural fermentation process used in sourdough baking breaks down complex carbohydrates and phytic acid found in raw wheat grains. As a result, your body absorbs the minerals like iron, zinc, and magnesium far more efficiently while digesting the bread much more smoothly than standard commercial bakery doughs made with high speed chemical additives.
The taste experience of this dish is completely unmatched compared to standard baking tray pizzas. Cooking in cast iron retains high thermal energy, creating an intense blast of direct heat that causes the dough to puff up rapidly while crisping the bottom to perfection. You get a delightful crunch on your very first bite, followed by a soft, chewy, and airy interior structure filled with large open air pockets. The natural sour undertones of the crust blend beautifully with sweet tomato sauce and rich creamy cheese, giving you a full spectrum of delicious gourmet flavors right in your home.
Additionally, this method is exceptionally versatile and forgiving for beginners who do not own an expensive stone slab or special high temperature pizza oven. The heavy walls of the skillet hold steady warmth, protecting your pizza from cold spots and guaranteeing a reliable rise every single time you make it. You can easily modify the ingredients to suit various dietary needs, vegetable choices, or personal preferences, making it a reliable staple recipe you will return to week after week.
Extra Tips for Better Taste
To take your skillet pizza from good to truly incredible, always buy high quality whole block mozzarella cheese and grate it yourself at home using a hand box grater. Pre shredded cheeses in bags are coated with anti caking starches and cellulose powders that prevent the cheese from melting into a smooth, gooey, luxurious layer. Grating your own fresh cheese ensures maximum meltability and superior creamy texture across the entire surface of your hot crust.
Another secret trick for ultimate flavor is to dust the bottom of your oiled skillet with a tiny sprinkle of coarse cornmeal or semolina flour right before placing your dough inside. These tiny grains create a elevated physical barrier between the hot metal surface and the dough, adding a fantastic rustic crunch and a lovely nutty flavor to the bottom of every slice.
If you enjoy sweet and spicy flavor combinations, try drizzling a generous tablespoon of warm hot honey over the melted cheese and crispy crust right after pulling the pizza out of the oven. The sweet nectar cuts through the rich salty cheese and spicy tomato sauce, instantly elevating the entire dish into a trendy restaurant quality masterpiece that will wow your friends and family.
Finally, do not throw away your leftover sourdough discard when you clean your kitchen jars. You can easily use unfed cold sourdough starter discard directly in this skillet method by adding a small pinch of baking soda to help it puff up in the hot pan. This quick shortcut saves precious time while still giving you that wonderful signature sour taste without waiting hours for a fresh bulk fermentation cycle.
Final Thoughts
Making sourdough skillet pizza at home is one of the most rewarding culinary skills you can learn in your personal kitchen journey. It transforms basic affordable ingredients into an extraordinary comfort food experience that brings people together around the dinner table. Do not worry if your very first attempt is not perfectly round or if your dough feels a bit tricky to stretch at first. Cooking is a wonderful practice of patience and learning, and every single pie you bake will taste better than the last as you gain confidence with your skillet. Gather your ingredients, feed your wild starter, heat up your cast iron pan, and enjoy the wonderful journey of crafting crispy homemade slices from scratch.
Nutrition Details
Below is the approximate nutritional breakdown for the full sourdough skillet pizza recipe as well as the average nutritional content per individual slice when divided into eight equal portions.
Full Recipe Nutrition Table
| Nutritional Component | Amount Per Full Recipe |
| Total Calories | 2150 kcal |
| Carbohydrates | 275 grams |
| Dietary Fiber | 12 grams |
| Sugars | 10 grams |
| Protein | 80 grams |
| Total Fat | 82 grams |
| Saturated Fat | 32 grams |
| Trans Fat | 0 grams |
| Cholesterol | 160 milligrams |
| Sodium | 2900 milligrams |
| Potassium | 750 milligrams |
Per Serving Nutrition Table (1 Slice out of 8)
| Nutritional Component | Amount Per Serving |
| Total Calories | 268 kcal |
| Carbohydrates | 34.3 grams |
| Dietary Fiber | 1.5 grams |
| Sugars | 1.2 grams |
| Protein | 10 grams |
| Total Fat | 10.2 grams |
| Saturated Fat | 4 grams |
| Trans Fat | 0 grams |
| Cholesterol | 20 milligrams |
| Sodium | 362 milligrams |
| Potassium | 93 milligrams |
Disclaimer
This recipe and the accompanying nutritional calculations are provided for general educational and informational purposes only. Everyone has a unique body with distinct health needs, metabolic rates, dietary requirements, and food sensitivities. Actual nutritional values may vary depending on the specific product brands you select, exact measuring techniques, and modification of topping amounts. If you have specific medical conditions, severe digestive issues, or special dietary concerns regarding gluten or dairy products, please consult with a qualified healthcare professional or certified registered dietitian before making significant changes to your daily eating habits.